This article shows how to read analog inputs with the ESP32 using Arduino IDE. Analog reading is useful to read values from variable resistors like potentiometers, or analog sensors.

Reading analog inputs with the ESP32 is as easy as using the analogRead(GPIO) function, that accepts as argument, the GPIO you want to read.
We also have other tutorials on how to use analog pins with ESP board:
- ESP8266 ADC – Read Analog Values with Arduino IDE, MicroPython and Lua
- ESP32 Analog Readings with MicroPython
Analog Inputs (ADC)
Reading an analog value with the ESP32 means you can measure varying voltage levels between 0 V and 3.3 V.
The voltage measured is then assigned to a value between 0 and 4095, in which 0 V corresponds to 0, and 3.3 V corresponds to 4095. Any voltage between 0 V and 3.3 V will be given the corresponding value in between.

ADC is Non-linear
Ideally, you would expect a linear behavior when using the ESP32 ADC pins. However, that doesn’t happen. What you’ll get is a behavior as shown in the following chart:

This behavior means that your ESP32 is not able to distinguish 3.3 V from 3.2 V. You’ll get the same value for both voltages: 4095.
The same happens for very low voltage values: for 0 V and 0.1 V you’ll get the same value: 0. You need to keep this in mind when using the ESP32 ADC pins.
There’s a discussion on GitHub about this subject.
analogRead() Function
Reading an analog input with the ESP32 using the Arduino IDE is as simple as using the analogRead() function. It accepts as argument, the GPIO you want to read:
analogRead(GPIO);The ESP32 supports measurements in 18 different channels. Only 15 are available in the DEVKIT V1 DOIT board (version with 30 GPIOs).
Grab your ESP32 board pinout and locate the ADC pins. These are highlighted with a red border in the figure below.

Learn more about the ESP32 GPIOs: ESP32 Pinout Reference.
These analog input pins have 12-bit resolution. This means that when you read an analog input, its range may vary from 0 to 4095.
Note: ADC2 pins cannot be used when Wi-Fi is used. So, if you’re using Wi-Fi and you’re having trouble getting the value from an ADC2 GPIO, you may consider using an ADC1 GPIO instead, that should solve your problem.
Other Useful Functions
There are other more advanced functions to use with the ADC pins that can be useful in other projects.
- analogReadResolution(resolution): set the sample bits and resolution. It can be a value between 9 (0 – 511) and 12 bits (0 – 4095). Default is 12-bit resolution.
- analogSetWidth(width): set the sample bits and resolution. It can be a value between 9 (0 – 511) and 12 bits (0 – 4095). Default is 12-bit resolution.
- analogSetCycles(cycles): set the number of cycles per sample. Default is 8. Range: 1 to 255.
- analogSetSamples(samples): set the number of samples in the range. Default is 1 sample. It has an effect of increasing sensitivity.
- analogSetClockDiv(attenuation): set the divider for the ADC clock. Default is 1. Range: 1 to 255.
- analogSetAttenuation(attenuation): sets the input attenuation for all ADC pins. Default is ADC_11db. Accepted values:
- ADC_0db: sets no attenuation. ADC can measure up to approximately 800 mV (1V input = ADC reading of 1088).
- ADC_2_5db: The input voltage of ADC will be attenuated, extending the range of measurement to up to approx. 1100 mV. (1V input = ADC reading of 3722).
- ADC_6db: The input voltage of ADC will be attenuated, extending the range of measurement to up to approx. 1350 mV. (1V input = ADC reading of 3033).
- ADC_11db: The input voltage of ADC will be attenuated, extending the range of measurement to up to approx. 2600 mV. (1V input = ADC reading of 1575).
- analogSetPinAttenuation(pin, attenuation): sets the input attenuation for the specified pin. The default is ADC_11db. Attenuation values are the same from previous function.
- adcAttachPin(pin): Attach a pin to ADC (also clears any other analog mode that could be on). Returns TRUE or FALSE result.
- adcStart(pin), adcBusy(pin) and resultadcEnd(pin): starts an ADC convertion on attached pin’s bus. Check if conversion on the pin’s ADC bus is currently running (returns TRUE or FALSE). Get the result of the conversion: returns 16-bit integer.
There is a very good video explaining these functions that you can watch here.
Read Analog Values from a Potentiometer with ESP32
To see how everything ties together, we’ll make a simple example to read an analog value from a potentiometer.
For this example, you need the following parts:
- ESP32 DOIT DEVKIT V1 Board (read Best ESP32 development boards)
- Potentiometer
- Breadboard
- Jumper wires
Schematic
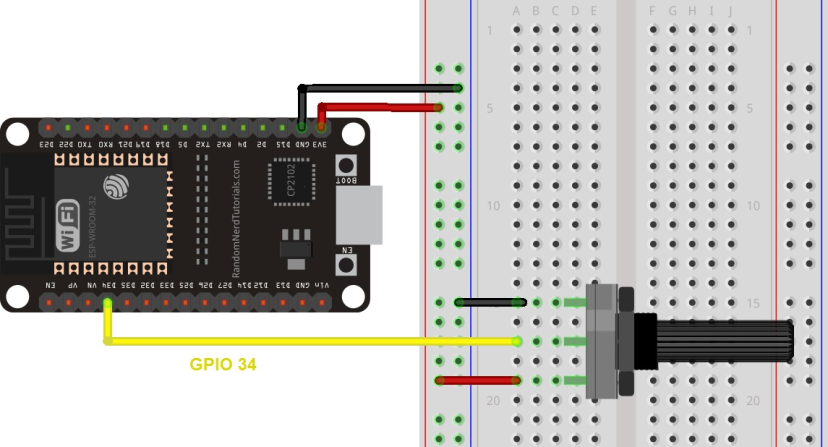
Wire a potentiometer to your ESP32. The potentiometer middle pin should be connected to GPIO 34. You can use the following schematic diagram as a reference.

Code
We’ll program the ESP32 using Arduino IDE, so make sure you have the ESP32 add-on installed before proceeding:
- Windows instructions – ESP32 Board in Arduino IDE
- Mac and Linux instructions – ESP32 Board in Arduino IDE
Open your Arduino IDE and copy the following code.
// Potentiometer is connected to GPIO 34 (Analog ADC1_CH6)
const int potPin = 34;

// variable for storing the potentiometer value
int potValue = 0;

void setup() {
  Serial.begin(115200);
  delay(1000);
}

void loop() {
  // Reading potentiometer value
  potValue = analogRead(potPin);
  Serial.println(potValue);
  delay(500);
}
This code simply reads the values from the potentiometer and prints those values in the Serial Monitor.
In the code, you start by defining the GPIO the potentiometer is connected to. In this example, GPIO 34.
const int potPin = 34;In the setup(), initialize a serial communication at a baud rate of 115200.
Serial.begin(115200);In the loop(), use the analogRead()function to read the analog input from the potPin.
potValue = analogRead(potPin);Finally, print the values read from the potentiometer in the serial monitor.
Serial.println(potValue);Upload the code provided to your ESP32. Make sure you have the right board and COM port selected in the Tools menu.
Testing the Example
After uploading the code and pressing the ESP32 reset button, open the Serial Monitor at a baud rate of 115200. Rotate the potentiometer and see the values changing.

The maximum value you’ll get is 4095 and the minimum value is 0.

Wrapping Up
In this article you’ve learned how to read analog inputs using the ESP32 with the Arduino IDE. In summary:
- The ESP32 DEVKIT V1 DOIT board (version with 30 pins) has 15 ADC pins you can use to read analog inputs.
- These pins have a resolution of 12 bits, which means you can get values from 0 to 4095.
- To read a value in the Arduino IDE, you simply use the analogRead() function.
- The ESP32 ADC pins don’t have a linear behavior. You’ll probably won’t be able to distinguish between 0 and 0.1V, or between 3.2 and 3.3V. You need to keep that in mind when using the ADC pins.
https://randomnerdtutorials.com/esp32-adc-analog-read-arduino-ide/
const int potPin = 2;

// variable for storing the potentiometer value
int potValue = 0;

void setup() {
  analogReadResolution(8);
  Serial.begin(115200);
  delay(1000);
}

void loop() {
  // Reading potentiometer value
  potValue = analogRead(potPin);
  Serial.println(potValue);
  delay(500);
}