The if() statement is the most basic of all programming control structures. It allows you to make something happen or not, depending on whether a given condition is true or not. It looks like this:
if (someCondition) {
// do stuff if the condition is true
}
There is a common variation called if-else that looks like this:
if (someCondition) {
// do stuff if the condition is true
} else {
// do stuff if the condition is false
}
There’s also the else-if, where you can check a second condition if the first is false:
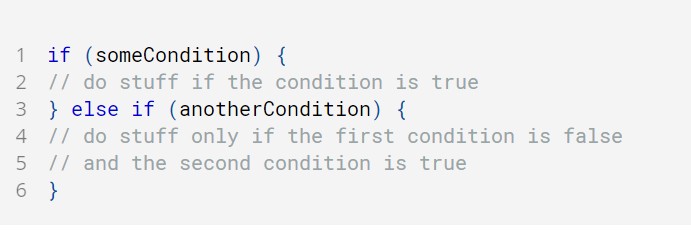
if (someCondition) {
// do stuff if the condition is true
} else if (anotherCondition) {
// do stuff only if the first condition is false
// and the second condition is true
}
You’ll use if statements all the time. The example below turns on an LED on pin 13 (the built-in LED on many Arduino boards) if the value read on an analog input goes above a certain threshold.
Hardware Required
- Arduino Board
- Potentiometer or variable resistor
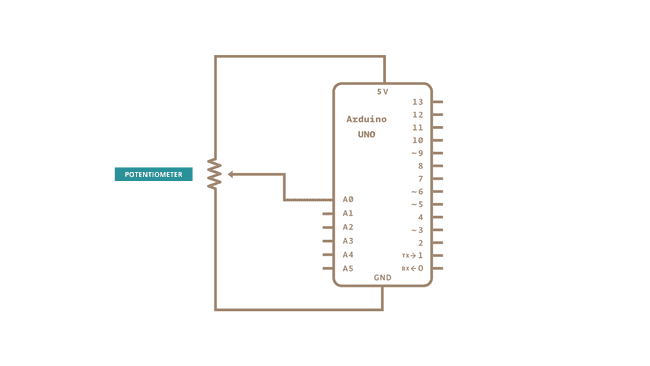
Circuit
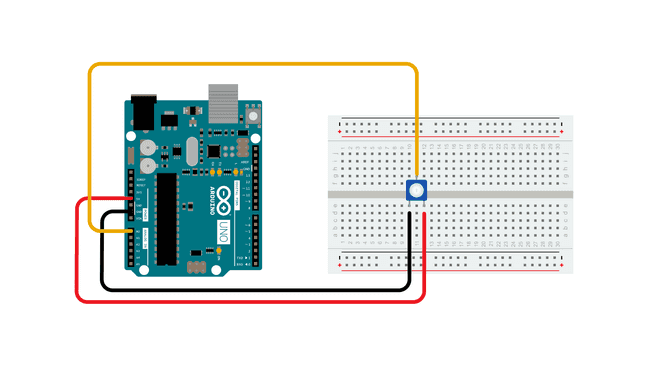
Schematic
Code
In the code below, a variable called
analogValueis used to store the data collected from a potentiometer connected to the board on analogPin 0. This data is then compared to a threshold value. If the analog value is found to be above the set threshold the built-in LED connected to digital pin 13 is turned on. If analogValue is found to be
<(less than) threshold, the LED remains off.
/*
  Conditionals - If statement

  This example demonstrates the use of if() statements.
  It reads the state of a potentiometer (an analog input) and turns on an LED
  only if the potentiometer goes above a certain threshold level. It prints the
  analog value regardless of the level.

  The circuit:
  - potentiometer
    Center pin of the potentiometer goes to analog pin 0.
    Side pins of the potentiometer go to +5V and ground.
  - LED connected from digital pin 13 to ground through 220 ohm resistor

  - Note: On most Arduino boards, there is already an LED on the board connected
    to pin 13, so you don't need any extra components for this example.

  created 17 Jan 2009
  modified 9 Apr 2012
  by Tom Igoe

  This example code is in the public domain.

  https://www.arduino.cc/en/Tutorial/BuiltInExamples/ifStatementConditional
*/

// These constants won't change:
const int analogPin = A0;   // pin that the sensor is attached to
const int ledPin = 13;      // pin that the LED is attached to
const int threshold = 400;  // an arbitrary threshold level that's in the range of the analog input

void setup() {
  // initialize the LED pin as an output:
  pinMode(ledPin, OUTPUT);
  // initialize serial communications:
  Serial.begin(9600);
}

void loop() {
  // read the value of the potentiometer:
  int analogValue = analogRead(analogPin);

  // if the analog value is high enough, turn on the LED:
  if (analogValue > threshold) {
    digitalWrite(ledPin, HIGH);
  } else {
    digitalWrite(ledPin, LOW);
  }

  // print the analog value:
  Serial.println(analogValue);
  delay(1);  // delay in between reads for stability
}
Link:https://docs.arduino.cc/built-in-examples/control-structures/ifStatementConditional/