The bootloader is a small piece of software that allows uploading of sketches onto the Arduino board. It comes preprogrammed on the microcontrollers on Arduino boards. Whether the bootloader has been corrupted or intentionally has been removed, it can be restored by burning (also called, flashing or programming) a new bootloader to the board.
The easiest way to burn the bootloader to classic AVR boards (UNO, Mega, Nano, etc.) is using a second Arduino AVR board as a programmer, which is the method that will be covered below.
Step 1: Connect the boards
AVR boards are programmed with the SPI interface (COPI, CIPO and SCK signals). On many boards (including UNO, Mega, and Nano), these are available in two locations:
- The digital and power pins. These are the most commonly used pins on Arduino, and you’ll only need six standard male-to-male jumper wires.
- The ICSP header. CIPO, COPI, and SCK are available in a consistent physical location on the ICSP header. You’ll need female-to-female jumper cables for these pins.
Note
It’s recommended to use a board of the AVR architecture as the programmer. Although the ArduinoISP programmer sketch will compile for many boards, you may experience issues running it on non-AVR boards.
These are examples of Arduino AVR boards that you can use as “Arduino as ISP” programmers:
- Arduino UNO (R3 and earlier, not R4)
- Arduino Mega boards
- Arduino Nano
Note
To use an Arduino AVR board that’s not included in the table below, check the pinout diagrams in Arduino Docs to find which pins to use for CIPO, COPI, and SCK. On some boards PIN 10 may not be available. In this case, change the line #define RESET 10 to use a different pin.
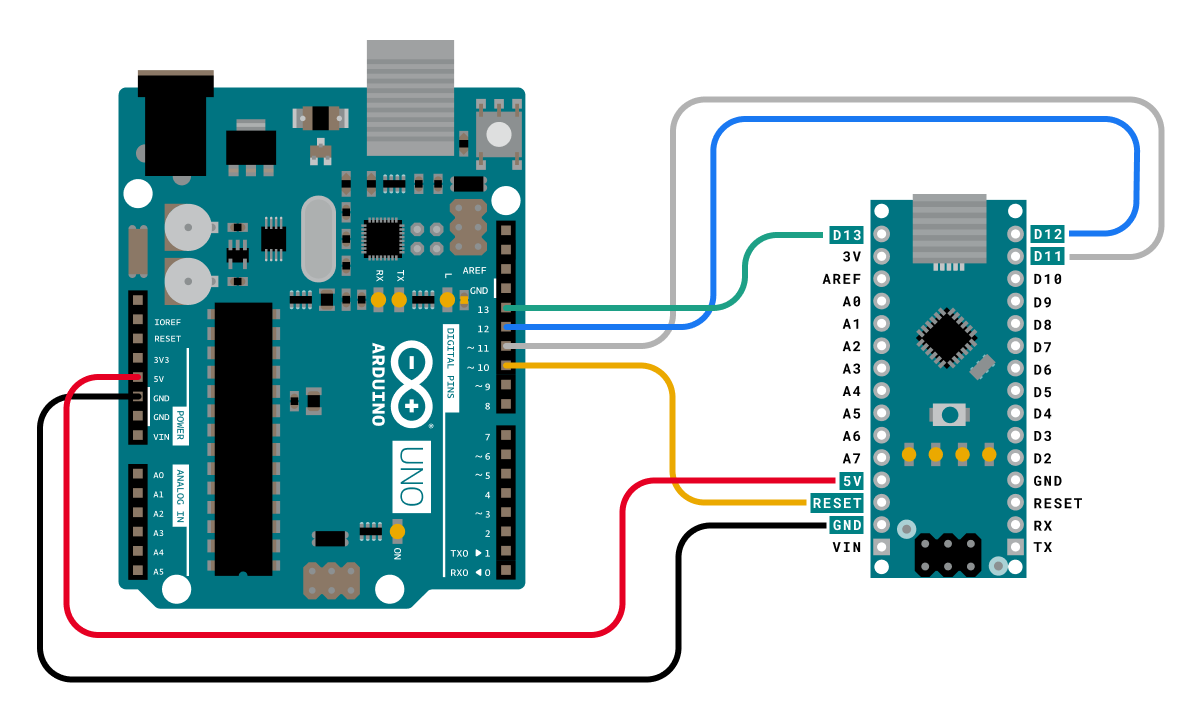
Option A: Using the digital and power pins
For each row in the table below, connect the programmer pin to the corresponding target pin.
| PROGRAMMER BOARD | TARGET BOARD |
|---|---|
| PIN 10 | RESET |
| COPI UNO: PIN 11 Nano: PIN 11 Mega: PIN 51 | COPI UNO: PIN 11 Nano: PIN 11 Mega: PIN 51 |
| CIPO UNO: PIN 12 Nano: PIN 12 Mega: PIN 50 | CIPO UNO: PIN 12 Nano: PIN 12 Mega: PIN 50 |
| SCK UNO: PIN 13 Nano: PIN 13 Mega: PIN 52 | SCK UNO: PIN 13 Nano: PIN 13 Mega: PIN 52 |
| 5V | 5V |
| GND | GND |
When the boards are connected, you can proceed with burning the bootloader in Arduino IDE.
Option B: Using the ICSP header pins
Note that the orientation of the header relative to the USB port is different on the Nano.
- Connect every programmer ICSP pin except RESET to the equivalent ICSP pin on the target.
- Connect PIN 10 on the programmer board to any RESET pin on the target.
Step 2: Burn the bootloader in Arduino IDE
Now that the board connections are set up, we can use Arduino IDE to burn the bootloader.
- Open Arduino IDE.
- Connect the programmer board to the computer.
- Select your programmer board in Tools > Board, for example Tools > Board > Arduino AVR Boards > Arduino Uno.
- Select the port the board is connecting to in Tools > Port.
- Open File > Examples > 11.ArduinoISP > ArduinoISP.
- Click
Upload to upload the sketch to the board.
- Select the target board in Tools > Board.
- Select Tools > Programmer > Arduino as ISP.
- We can now start the burning process. It’s a good idea to enable verbose upload output in preferences since there will be no console output during the process otherwise. To start the process, select Tools > Burn Bootloader.
- Wait for the process to complete, which may take up to a minute. When it’s finished, the message “Done burning bootloader” will appear on top of the console, or in a bottom-right notification pop-up, depending on your IDE version.
Troubleshooting
Error: Missing programmer
avrdude: Yikes!  Invalid device signature.
         Double check connections and try again, or use -F to override
         this check.

Error while burning the bootloader: Failed chip erase: uploading error: exit    status 1
Check your selection in Tools > Programmer.
Error: Failed chip erase: uploading error: exit status 1
Error while burning the bootloader: Failed chip erase: uploading error: exit status 1
- Make sure you’ve selected the target board in Tools > Board.
- Make sure you’ve connected the RESET pin correctly.
avrdude: Error: Could not find USBtiny device
Error while burning bootloader.
avrdude: Error: Could not find USBtiny device (0x2341/0x49)
Make sure you’ve selected Arduino as ISP in Tools > Programmer, and not ArduinoISP or other similar options.
Further reading
- Bootloader (Arduino Docs)
- Arduino as ISP and Arduino Bootloaders. Some information is not up to date (no capacitor is needed for the Mega 2560 Rev3).
Link:https://support.arduino.cc/hc/en-us/articles/4841602539164-Burn-the-bootloader-on-UNO-Mega-and-classic-Nano-using-another-Arduino