This guide shows how to use the HC-SR04 Ultrasonic Sensor with the ESP8266 NodeMCU board using the Arduino core. The ultrasonic sensor uses sonar to determine the distance to an object. We’ll show you how to wire the sensor to the ESP8266 and provide several example sketches to determine the distance to an object using the HC-SR04.
This tutorial covers the following topics:
- Ultrasonic Sensor HC-SR04 Pinout
- Wiring the Ultrasonic Sensor HC-SR04 to the ESP8266
- Getting Distance to an Object Using the Ultrasonic Sensor HC-SR04 with the ESP8266
- Displaying the Distance to an Object on a Display Using the ESP8266 and HC-SR04
Introducing the HC-SR04 Ultrasonic Sensor
The HC-SR04 ultrasonic sensor uses sonar to determine the distance to an object. This sensor reads from 2cm to 400cm (0.8inch to 157inch) with an accuracy of 0.3cm (0.1inches), which is good for most hobbyist projects. In addition, this particular module comes with ultrasonic transmitter and receiver modules.
The following picture shows the HC-SR04 ultrasonic sensor.

The next picture shows the other side of the sensor.

Where to buy HC-SR04 Ultrasonic Sensor?
You can check the Ultrasonic Sensor HC-SR04 sensor on Maker Advisor to find the best price:
HC-SR04 Ultrasonic Sensor Technical Data
The following table shows the key features and specs of the HC-SR04 ultrasonic sensor. For more information, you should consult the sensor’s datasheet.
| Power Supply | 5V DC |
| Working Current | 15 mA |
| Working Frequency | 40 kHz |
| Maximum Range | 4 meters |
| Minimum Range | 2 cm |
| Measuring Angle | 15º |
| Resolution | 0.3 cm |
| Trigger Input Signal | 10uS TTL pulse |
| Echo Output Signal | TTL pulse proportional to the distance range |
| Dimensions | 45mm x 20mm x 15mm |
HC-SR04 Ultrasonic Sensor Pinout
Here’s the pinout of the HC-SR04 Ultrasonic Sensor.

How Does the HC-SR04 Ultrasonic Sensor Work?
The ultrasonic sensor uses sonar to determine the distance to an object. Here’s how it works:
- The ultrasound transmitter (trig pin) emits a high-frequency sound (40 kHz).
- The sound travels through the air. If it finds an object, it bounces back to the module.
- The ultrasound receiver (echo pin) receives the reflected sound (echo).

Taking into account the sound’s velocity in the air and the travel time (time passed since the transmission and reception of the signal) we can calculate the distance to an object. Here’s the formula:
distance to an object = ((speed of sound in the air)*time)/2- speed of sound in the air at 20ºC (68ºF) = 343m/s
Parts Required

To complete this tutorial you need the following parts:
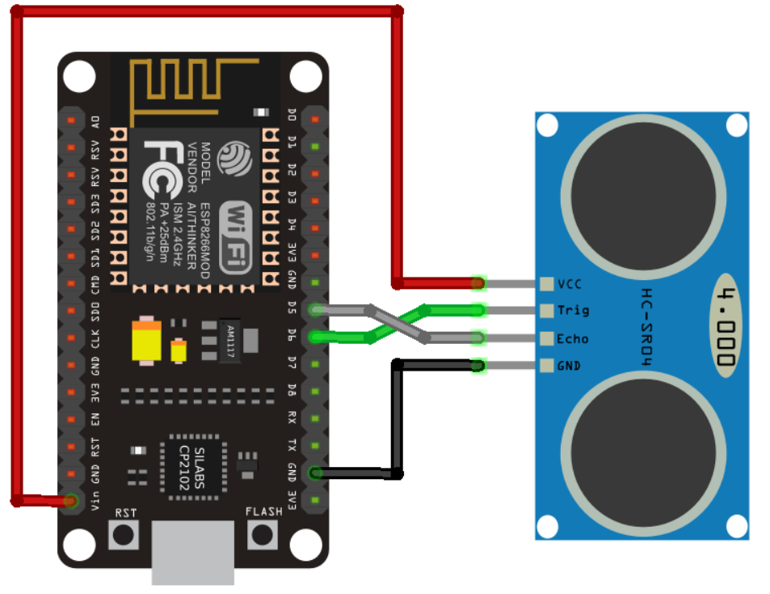
Wire the HC-SR04 ultrasonic sensor to the ESP8266 as shown in the following schematic diagram. We’re connecting the Trig pin to GPIO 5 and the Echo pin to GPIO 18, but you can use any other suitable pins.

| Ultrasonic Sensor | ESP8266 |
| VCC | VIN |
| Trig | GPIO 12 (D6) |
| Echo | GPIO 14 (D5) |
| GND | GND |
Preparing Arduino IDE
We’ll program the ESP8266 board using Arduino IDE. So, make sure you have the ESP8266 add-on installed. Follow the next tutorial:
Install the ESP8266 Board in Arduino IDE
If you want to use VS Code with the PlatformIO extension, follow the next tutorial instead to learn how to program the ESP8266:
Getting Started with VS Code and PlatformIO IDE for ESP32 and ESP8266 (Windows, Mac OS X, Linux Ubuntu)
Code – Getting Distance to an Object using the HC-SR04 Ultrasonic Sensor and ESP8266
The following sketch is a simple example of how you can get the distance between the sensor and an object using the ESP8266 board with the Arduino core.
/*********
Rui Santos
Complete project details at https://RandomNerdTutorials.com/esp8266-nodemcu-hc-sr04-ultrasonic-arduino/
Permission is hereby granted, free of charge, to any person obtaining a copy
of this software and associated documentation files.
The above copyright notice and this permission notice shall be included in all
copies or substantial portions of the Software.
*********/
const int trigPin = 12;
const int echoPin = 14;
//define sound velocity in cm/uS
#define SOUND_VELOCITY 0.034
#define CM_TO_INCH 0.393701
long duration;
float distanceCm;
float distanceInch;
void setup() {
Serial.begin(115200); // Starts the serial communication
pinMode(trigPin, OUTPUT); // Sets the trigPin as an Output
pinMode(echoPin, INPUT); // Sets the echoPin as an Input
}
void loop() {
// Clears the trigPin
digitalWrite(trigPin, LOW);
delayMicroseconds(2);
// Sets the trigPin on HIGH state for 10 micro seconds
digitalWrite(trigPin, HIGH);
delayMicroseconds(10);
digitalWrite(trigPin, LOW);
// Reads the echoPin, returns the sound wave travel time in microseconds
duration = pulseIn(echoPin, HIGH);
// Calculate the distance
distanceCm = duration * SOUND_VELOCITY/2;
// Convert to inches
distanceInch = distanceCm * CM_TO_INCH;
// Prints the distance on the Serial Monitor
Serial.print("Distance (cm): ");
Serial.println(distanceCm);
Serial.print("Distance (inch): ");
Serial.println(distanceInch);
delay(1000);
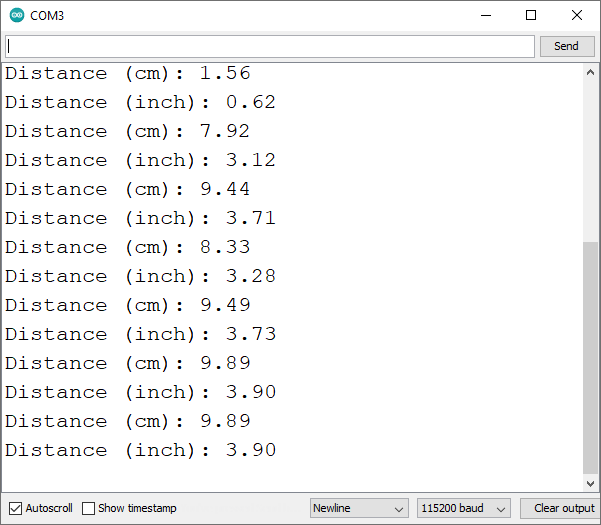
}Upload the code to your board and it will work straight away. Continue reading if you want to learn how the code works or skip to the demonstration section.
How the Code Works
First, define the trigger and the echo pins.
const int trigPin = 12;
const int echoPin = 14;
In this example, we’re using GPIO 12 and GPIO 14. But you can use any other suitable GPIOs—read ESP8266 Pinout Reference: Which GPIO pins should you use?
The SOUND_SPEED variable saves the velocity of sound in the air at 20ºC. We’re using the value in cm/uS.
#define SOUND_SPEED 0.034The CM_TO_INCH variable allows us to convert distance in centimeters to inches.
#define CM_TO_INCH 0.393701Then, initialize the following variables.
long duration;
float distanceCm;
float distanceInch;
The duration variable saves the travel time of the ultrasonic waves (time elapsed since transmission and reception of the pulse wave). The distanceCm and distanceInch, as the names suggest, save the distance to an object in centimeters and inches.
setup()
In the setup(), initialize a serial communication at a baud rate of 115200 so that we can print the measurements on the Serial Monitor.
Serial.begin(115200); // Starts the serial communicationDefine the trigger pin as an OUTPUT—the trigger pin emits the ultrasound. And define the echo pin as an INPUT—the echo pin receives the reflected wave and sends a signal to the ESP8266 that is proportional to the travel time.
pinMode(trigPin, OUTPUT); // Sets the trigPin as an Output
pinMode(echoPin, INPUT); // Sets the echoPin as an Input
loop()
In the loop(), the following lines produce a 10uS HIGH pulse on the trigger pin—this means the pin will emit an ultrasound. Note that before sending the pulse, we give a short LOW pulse to ensure you’ll get a clean HIGH pulse.
// Clears the trigPin
digitalWrite(trigPin, LOW);
delayMicroseconds(2);
// Sets the trigPin on HIGH state for 10 micro seconds
digitalWrite(trigPin, HIGH);
delayMicroseconds(10);
digitalWrite(trigPin, LOW);
We use the pulseIn() function to get the sound wave travel time:
duration = pulseIn(echoPin, HIGH);
The pulseIn() function reads a HIGH or a LOW pulse on a pin. It accepts as arguments the pin and the state of the pulse (either HIGH or LOW). It returns the length of the pulse in microseconds. The pulse length corresponds to the time it took to travel to the object plus the time traveled on the way back.

Then, we simply calculate the distance to an object taking into account the sound speed.

distanceCm = duration * SOUND_SPEED/2;
Convert the distance to inches:
#define trigPin 13
#define echoPin 12
#define led 11

void setup()
{ Serial.begin (9600);
pinMode(trigPin, OUTPUT);
pinMode(echoPin, INPUT);
pinMode(led, OUTPUT);
}

void loop()
{
long duration, distance;
digitalWrite(trigPin, LOW);
delayMicroseconds(2);
digitalWrite(trigPin, HIGH);
delayMicroseconds(10);
digitalWrite(trigPin, LOW);
duration = pulseIn(echoPin, HIGH);
distance = (duration/2) / 29.1;
if (distance < 10)
{
digitalWrite(led,HIGH);
}
else {
digitalWrite(led,LOW);
}
Serial.print(distance);
Serial.println(" cm");
delay(500);
}
Link:https://www.instructables.com/Simple-Project-With-the-Ultrasonic-Sensor-HC-SR04-/