If you’re looking to create a budget website on an easy-to-use platform, Google Sites may be the perfect fit. While setting up a Google site is relatively straightforward, that doesn’t mean a Google Sites tutorial wouldn’t be helpful.

Build your website with HubSpot’s Free CMS Software
I’ve built plenty of Google Sites for a variety of purposes over the years, so I know what you need to make a compelling website on the platform. I’ll walk you through the ultimate Google Sites tutorial that will answer any questions you have about using the tool to create your website.
- What is Google Sites
- Is Google Sites Free?
- How to Use Google Sites
- How to Make a Website for Free on Google
- Best Google Sites Templates and Themes
- Google Sites Examples
- Google Sites Tips
- Google Sites FAQs
What is Google Sites?
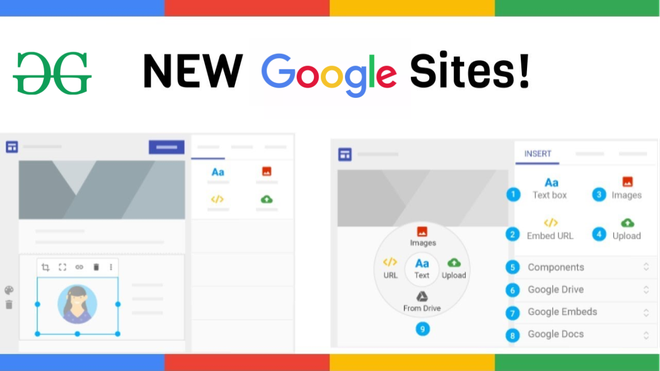
Google Sites is Google’s content management system (CMS) where you can create a website for free. You can use your own domain and customize your template with copy, images, fonts, headers, footers, and menus. If you’re an experienced website builder or consider yourself tech-savvy, Google’s framework provides plenty of web development and deployment options to leverage, too.
I’ve witnessed Google Sites undergo plenty of changes since it debuted. Originally, it looked similar to how Google Docs does now. Since then, Google has added functionality and new features, making it a viable contender for business owners and creators looking for an easy-to-use CMS.
If you’ve got the classic version of Google Sites already up and running, I suggest you make the switch to the new interface. The updated design framework is much easier to use, thanks to drag-and-drop design elements and the ability to quickly insert text, images, and videos.
If you don’t make the switch, you aren’t using Google Sites to its full potential. I suggest you use the new Google Sites because it boasts plenty of features the older version doesn’t. I love that the new Google Sites was created specifically for users who don’t have experience with code. You’re also able to see drafts of your website, preview changes before publication, adjust your site for mobile compatibility, and add a Cloud search box to your website. All of these features were previously impossible.
Pro Tip: If you are unsure where to begin with creating your website, Google Sites provides some templates you can peruse and use. However, I recommend you customize whichever you choose, as it will otherwise be a cookie-cutter site your visitors can find elsewhere on the web.
Is Google Sites free?
Google Sites is completely free with any standard Google account. The number of sites you can make is only limited to the 15 GB of storage that comes with your account, but you can purchase more at any time. Remember that this storage maximum is shared with all your other Google apps.
Because of its nonexistent price tag, Google Sites is a good place to start for those who want to create a quick website. For instance, I used the Google Sites CMS to build websites for courses I took in college, as the websites were free to create and offered a sense of professionalism.
Now that you’re aware of how much Google Sites costs to use, I’ll walk you through what you’re really here for: A step-by-step Google Sites tutorial.
How to Use Google Sites
- Step 1: Open Google Sites.
- Step 2: Open the Google Sites Support Page.
- Step 3: Add layouts, text, and images.
- Step 4: Use free or paid templates to help your site stand out.
- Step 5: Click “Publish” when you’re done.
- Step 6: Let others view or edit your website.
Let’s look at each of these steps in more detail. Since you’ll probably have some questions during the process, it’s worth opening the Google Sites Support Page for a list of some of the most common Google Sites functions. I recommend you bookmark this page so you can easily access it while creating your site.
What would a Google Sites tutorial be without a step-by-step walkthrough? I went through the steps detailed below to create a website. Check out the final result before we begin so you can see what your site will look like when it’s done.
Step 1: Open Google Sites.
Head to Google Sites to start creating your new website. If this is your first time building a website, but you’re a seasoned Google user, you’ll find that the layout of this page is similar to all other Google products, such as Google Docs and Google Slides. As far as I’m concerned, this is a huge plus because there’s not a significant learning curve.
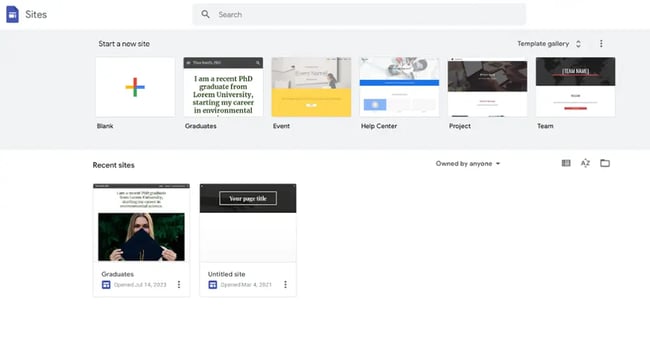
To begin creating your website, you can either use Google’s templates or start a site from scratch. Even if you aren’t going to use a template, I suggest you give them a quick look to get an idea of what the template websites include.
Free templates are available directly from Google, allowing you to quickly change things like fonts, color schemes, or layouts. You can also purchase and install new themes and templates. I’ve included a handful of top templates and themes later down below.
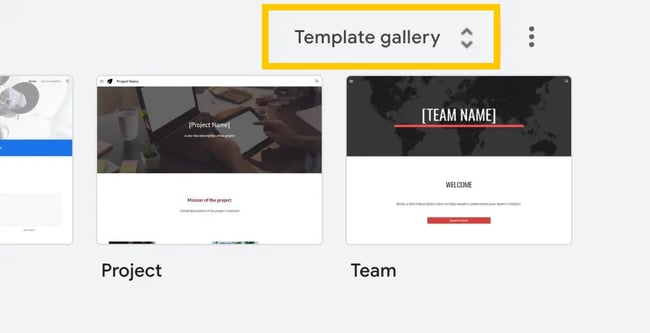
I recommend taking a look at the templates first to see if any strike your fancy. To access them, simply click “Template gallery” in the upper right-hand corner of the header. Click the arrows to expand this box so you can check out all the offerings and don’t miss out on any of the templates you may want to consider.
Google has done a fantastic job including templates for most personal and professional use cases. That said, because of its limited functionality, I wouldn’t really recommend this tool for business users. Overall, Google Sites is better suited for personal or educational use.
If you are attempting to create a business site, I would recommend you consider a more robust option such as Content Hub, which offers business tools in addition to a website builder. (You can also get started with Content Hub for free, which makes it a compelling option, too.)
For other users, Google Sites offers templates aplenty. Here’s a quick overview of how you can use the Google Sites templates:
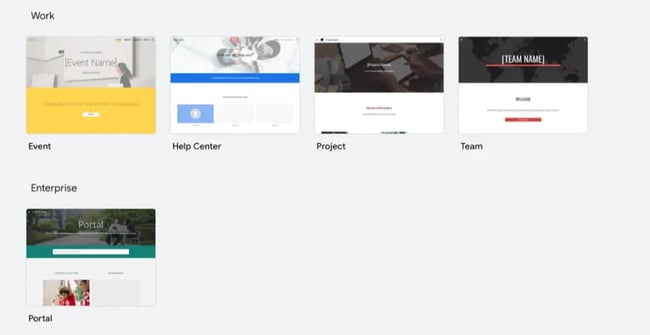
- For work: You can create an event homepage, help center, project website, or team website.
- For small businesses: You can create a dog walker site, holiday party home page, portfolio website, restaurant website, or salon website.
- For personal use: You can create a family update site, digital portfolio, or wedding website.
- For educational uses: You can create a website for graduates, professors, classes, clubs, or students.
As you can see, there are a variety of ways you can use Google Sites. However, you’re better off not building anything too complex. For more robust websites, you’d be better off opting for a more comprehensive CMS. No shade to Google Sites — it’s great for what it offers. However, its functionality is limited when compared to website builders like WordPress.
I’m going to create a website for a coffee shop review site from scratch, even though I know nothing about coffee (proud whatever-is-available drinker). I will always go for a local roast, though. Just don’t ask me to remember its name.

HubSpot’s Free Website Builder
Create and customize your own business website with an easy drag-and-drop website builder.
- Build a website without any coding skills.
- Pre-built themes and templates.
- Built-in marketing tools and features.
- And more!
Step 2: Build your site header.
Even if you start a site from scratch, Google Sites will include a header for you to edit right away and hit the ground running. This is awesome — it makes starting a site much less intimidating, as you don’t have to figure out where to add the header.
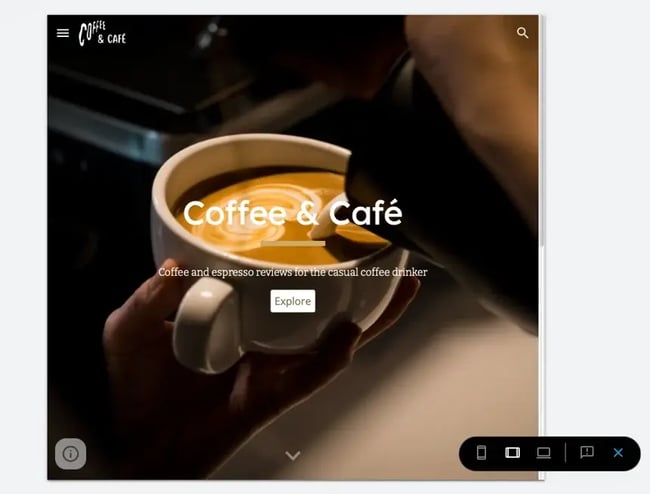
The process is intuitive. Simply click on the header text and start editing. Your standard text options will come up: Text style, font, text size, and formatting. Click around and get acquainted with your options. I named my site “Coffee & Café,” as you can see below. (Creative, I know.)

Add Your Logo
Next, I updated the logo. In the upper right-left corner, hover over your site name, and click “Add logo.”
This will open your site settings, where you can both upload a logo and a favicon. The favicon is the small symbol that appears next to your website name on a browser tab. This icon also appears in users’ favorites if they happen to favorite or bookmark your site. I recommend you don’t skip this step — it can make a significant difference in making your website feel more polished and professional.
One thing I noticed when uploading a logo is that it’s very, very small unless you’re careful. For my Google Sites logo, I used the dimensions 1000 pixels wide by 500 pixels tall, and that worked out pretty well. Remember to add alt text, too, for website accessibility purposes. (If you want to learn more about website accessibility, which I recommend you do, check out this helpful web accessibility checklist.)
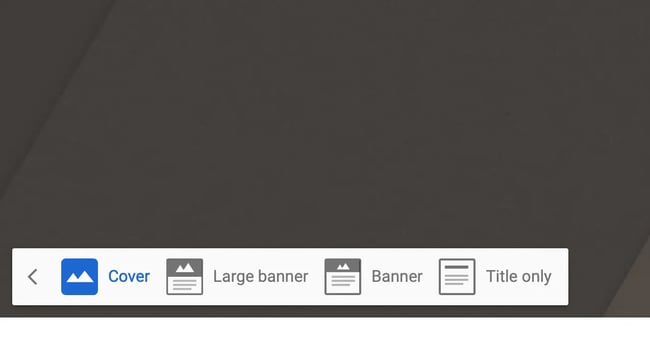
Change Your Header Type
Google Sites gives you the option of changing your header type to a full-height cover image, to a narrow banner, or to your title only. To access these options, hover at the bottom of your header and click “Header Type.”
There, you’ll see your options. I chose “Cover” so that my header took up the entirety of the page. I encourage you to try out the different options to determine which suits your branding the best.
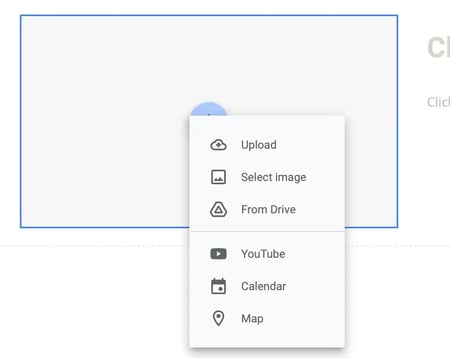
Add a Background Image
Next, you’ll want to choose a background image unless you’re using a title-only header. At the bottom menu of the header, click “Image.”
You can upload an image from your computer, or you can browse Google’s options, your internal library, and Google itself. You can also insert an image via a URL. Remember to choose an image you have the rights to use, or select a free stock photo website. If you don’t, you risk copyright infringement, which is a major no-no.
I chose to look for an image from a free stock photo website called Unsplash. Here’s how my header turned out. Pretty spiffy, if you ask me.

My site is looking good so far, if I do say so myself. You can use pretty much any dimensions for your Google Sites header’s background, so long as the dimensions are above 1200 pixels wide. This allows your picture to look high-quality while having a lower image file size.
At the bottom of the right-hand corner, you can change the anchoring for the image. You can also toggle the background image’s “readability,” which makes your image lighter or darker so that your text is clear and provides better accessibility.
Add Subheadings and Buttons
We’re not finished yet. Google Sites allows you to add additional elements to your header so that you can pull viewers in. To do so, you can double-click anywhere on the cover, and a menu will pop up:
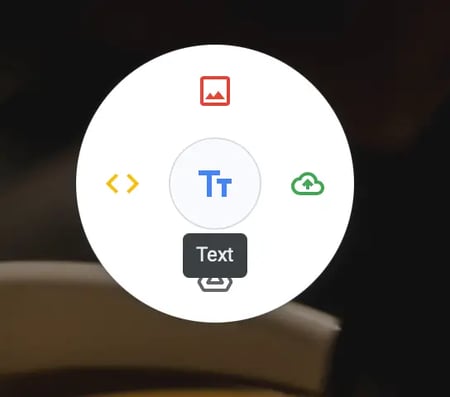
From this menu, you can add text, images, uploads (from either your local drive or your Google Drive), and embeds. This last one is neat because if you’re building a landing page, you could embed a website form you create on a form builder tool, directly into your header. If you’re launching a newsletter and want to offer visitors the opportunity to get it sent to their inboxes, this would be a great option.
Alternatively, you can simply go to the “Insert” tab on the sidebar, and then choose your element from there. When I used this method, the new element inserted itself into the body of the page, but all I had to do was drag it over to the header, and it snapped to the grid.
I decided to add a subtitle and button to add some personality to my site.

Explore Themes
Before we move on from the header, I wanted to draw your attention to Google Sites’ themes on the right-hand side, located under the “Themes” tab. These are different from templates. The themes allow you to choose a general aesthetic for your website, whereas the templates offer a pre-arranged format.
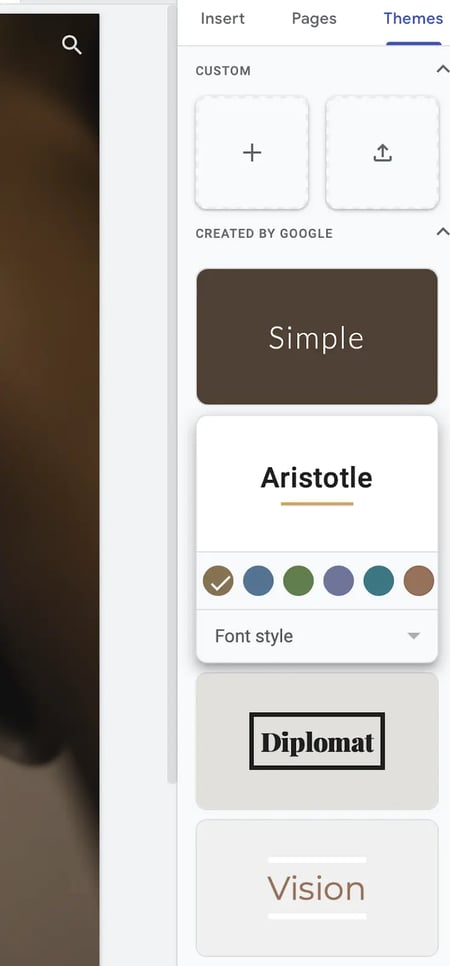
You can also create a theme with custom colors and fonts or upload one from your local drive. The opportunities for customization aren’t endless, but they are suitable for our needs.
I chose the “Aristotle” theme. One cool note here is that Google Sites will automatically sense your brand colors and change its themes’ colors to match, which saved me time.
Step 3: Add layouts, text, and images to your home page.
It’s time to start building my home page. Using the “Insert” tab in the right-hand sidebar, you can add layouts, text, images, and videos. Let’s go over our options for page building and customization.
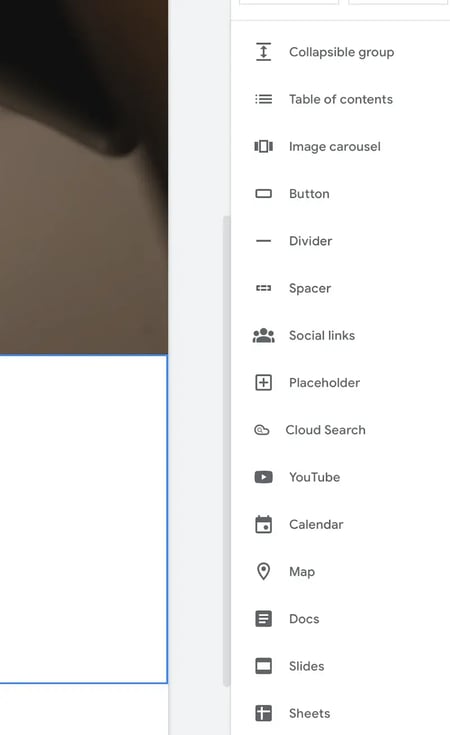
- Content Blocks: These are premade layouts that you can insert into your page. They come with placeholders for images, headers, and text.
- Collapsible Group: Create a section with sections that can expand or retract.
- Table of Contents: Insert a table of contents that automatically populates based on your page’s headings.
- Image Carousel: Insert a carousel of pictures. This is an awesome way to add visual interest to your website, as well as make it look more polished.
- Button: Add a button with a link. When I used this feature, I was unable to adjust the spacing around the text; you can only change the alignment of the button.
- Divider: Add a line that runs across your page to split different sections.
- Spacer: Insert an area of white space, which you can resize by dragging.
- Social Links: Create links to your social media profiles. You can upload custom icons, but Google Sites will automatically generate icons for the most common social sites. You should definitely do this if you are building a small business page or portfolio.
- Placeholder: Add an “empty” block to insert an image, video, or map later. Helpful for creating a layout without yet adding content.
- Cloud Search: Insert a search function to your page. I generally don’t recommend this unless you deactivate the search icon at the top of your website header.
- YouTube: Add a YouTube video from the entire YouTube library, or upload a video.
- Calendar: Insert a widget from your Google Calendar. This only shows your agenda; it wouldn’t replace a meeting scheduler embed widget.
- Map: Add an embed from Google Maps. This is great for companies with brick-and-mortar locations that want to share the information in an easy-to-read manner.
- Docs, Slides, and Sheets: Insert an embed from any document in your Google Drive; users can scroll through the entire file, which can be exceedingly useful for internal team websites.
- Forms: Insert a Google Form, but you’ll need to create it ahead of time; there’s no option to create it straight from Google Sites.
- Charts: Insert a chart taken from a Google Sheets file; you’ll also need to create the file ahead of time. Google Sites won’t import the entire spreadsheet but only the charts found inside.
I recommend starting with content blocks so you don’t have to build layouts from scratch. Not only will this make your layouts look more professional, it will save you a lot of frustration.
.webp?width=450&height=507&name=how-to-use-google-sites-content-blocks%20(1).webp)
We have several options here, all of which include different setups for your images and content. For instance, one of the content blocks includes two columns with an image placeholder on each.
The image placeholders can also be used to insert videos, calendars, and even maps. I love how many different options there are for content blocks, so you can bring your site to life however you feel fit.
One thing I noticed was that if you add the wrong video from YouTube, there’s no way to replace it; you can only delete the element. Thankfully, all you have to do is re-insert a video element into the page.
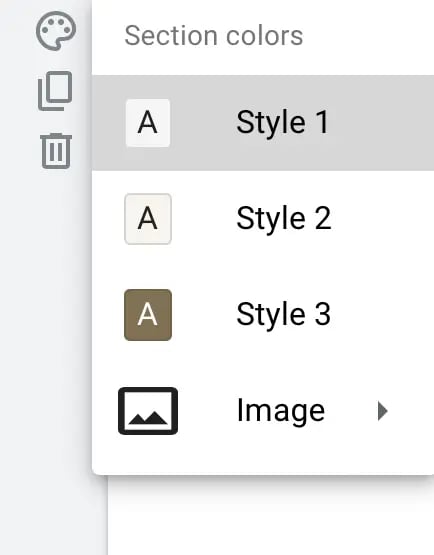
You can adjust every section’s background color. Google Sites pre-picks colors that align with your color palette. This can be a little limiting, but it’s also useful if you’re short on time. (And yet another reason why this tool is great for students or young professionals — it’s polished without taking up too much time.)
I also observed that there’s no option to adjust the margin or padding on each section. You can, however, re-order the layouts and add spacers to create more white areas.
Remember to preview your page in different device sizes as you add new elements. At the top, click on the “Devices” symbol.
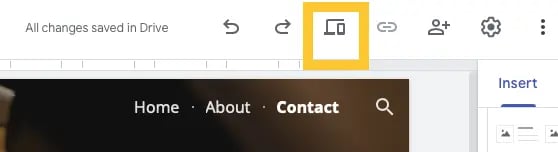
This will allow you to preview your content on mobile phones, tablets, and desktop windows.
Step 4: Add a footer.
Your website footer is a helpful section at the bottom of the page where you can add social links and copyright information. Some site owners also opt to add contact information or details about their location or hours of operation. To add one, simply hover at the bottom line, and the option will come up.

When you create a footer on Google Sites, it will automatically come with a text module you can edit. You can also add images, maps, and calendar widgets, but I kept it simple — I simply added the logo and social links.
You have the option of creating different columns. To do so, drag the content onto the footer and drop it where you’d like. Google Sites will automatically snap your content to the closest grid.
I suggest you check out other websites you love to get a feel for what their site designers added to the footer. This can provide you with some inspiration as you navigate what to add to yours.

Step 5: Add Pages
Google Sites allows you to create new pages under the “Pages” tab in its sidebar. Click the plus sign at the bottom.
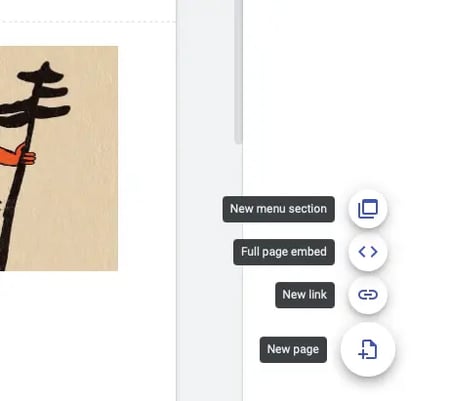
You can add a new menu section, which is not a page but rather a heading that users can hover over to access subpages. You can also import an entire webpage from another site or point to an external link. To me, this is a major perk of using Google Sites.
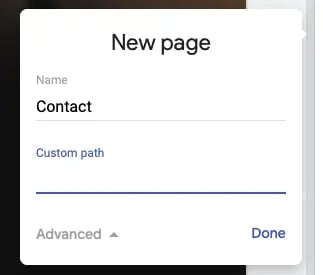
I chose to create a plain new page and gave it a name. You could potentially customize the URL’s path (the words that appear after the / symbol in the domain), but I only recommend doing this if your page’s name is long or if you’re targeting a certain keyword with the URL.
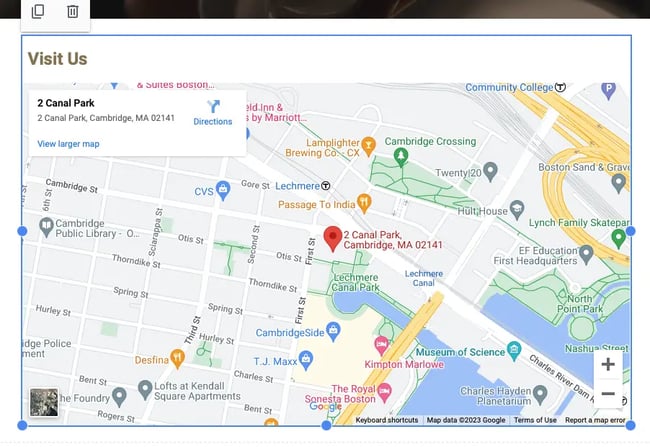
Now, let’s add a map and a contact form to this page. You probably know the drill by now: Go to “Insert” on the right-hand side, then click “Map.”
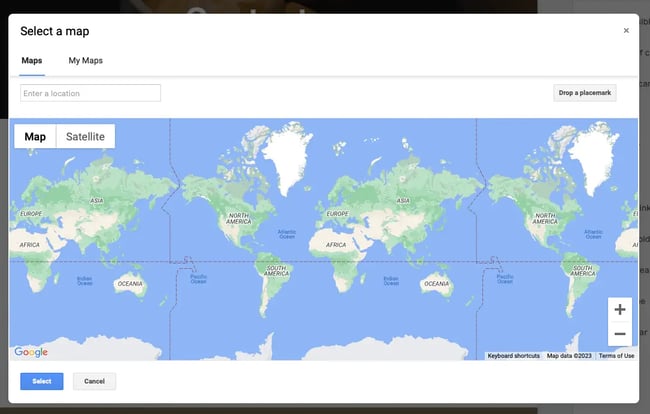
I inserted HubSpot’s corporate address. You can resize the map by dragging the dots in the corner.
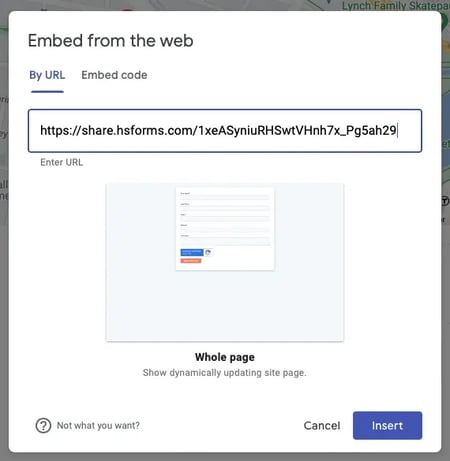
Next, let’s add a Google Form, but remember that you must have created it beforehand before inserting it. Go to “Insert,” then click “Form.”
I found it easy to locate the exact form I was looking for, but it was difficult to make it look like it belonged on the page, so I recommend using a form builder instead (such as HubSpot’s free form tool) and embedding it into your page.
To embed, simply go to “Insert” and then “Embed.” I used the URL of my form, and it rendered beautifully. That’s what I call a success.
Step 5: Click “Publish” when you’re done.
If everything looks good, we’re ready to publish. I recommend reviewing your site settings to ensure everything looks in order. Then, click the “Publish” button in the upper right-hand corner.
Choose a new URL address for your site. Unfortunately, it will be located at a subdomain of a subdomain, like this one:
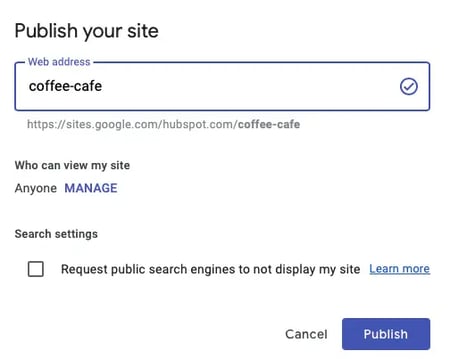
No, it doesn’t look as professional as a custom domain. Luckily, there’s a way to work around it: You can attach a custom domain to your website. Domains vary in pricing, but if you are using Google Sites to build a website for your business, I think it’s worth the money. Here are instructions to connect a custom domain to your Google Site.
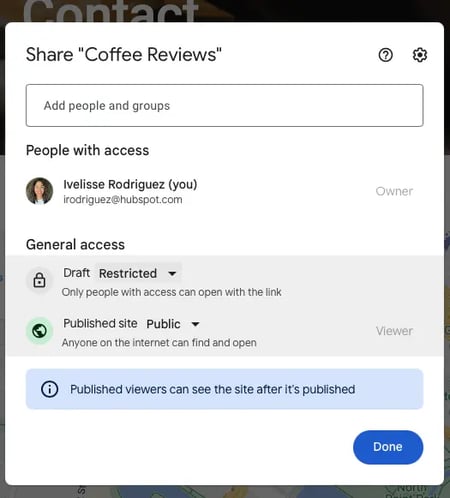
Don’t forget to make your site public. Click the MANAGE text below your web address, and there, you can set site permissions. Don’t toggle the box that says “Request public search engines to not display my site” unless you don’t want to appear in Google search results. This may be a good option if you’re creating a private family or company site.
Just like Google Docs, you can even get a shareable link to allow others to edit your website. This is great for students working on a group project. However, once you’re done working with your peers, just remember to update the permissions so random visitors on the internet can’t edit your site and undo your hard work.
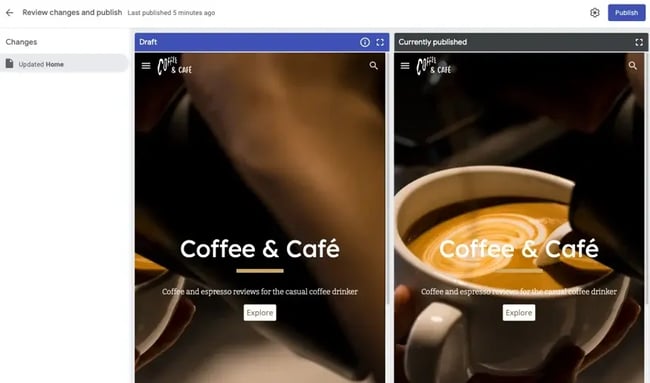
If you ever make changes and hit “Publish” again, Google Sites will give you a chance to compare the changes side-by-side. I think that’s a pretty neat feature that allows you to publish with confidence.
Curious to see the final result? Here it is.
Seems easy, right? It is — for the most part — thanks to Google’s efforts in streamlining the creation and publishing process. But if you feel overwhelmed, here’s a more beginner-friendly tutorial on how to make a website for free on Google.
link:https://blog.hubspot.com/website/google-sites-tutorial ,https://www.geeksforgeeks.org/introduction-to-google-sites/