
ภาพรวมระบบ Smart Farm V1.65
Smart Farm V1.65 แบ่งออกเป็น 2 ส่วนหลัก:
- Node Sensor (ESP32 38‑pin)
- ESP32 DEVKIT V1 (38 pin)
- Relay 2‑CH module (5V, transistor/optocoupler ในตัว)
- NeoPixel Matrix 8×8 (WS2812B, 64 RGB LED)
- MQ‑135 (อากาศ/ก๊าซทั่วไป เช่น NH₃, Alcohol, Benzene)
- MQ‑2 (Smoke/LP/Propane ฯลฯ)
- Potentiometer 10kΩ (ปรับความสว่าง NeoPixel)
- แหล่งจ่าย 5V แยก สำหรับ NeoPixel และ Relay (แนะนำ 5V/2A ขึ้นไป)
- Dashboard ฝั่ง WebServer (ฝังอยู่ใน ESP32)
- HTML + CSS + JavaScript (Responsive)
- แสดงค่าเซนเซอร์ MQ‑135, MQ‑2 แบบ near‑realtime (polling ทุก 0.5 วินาที)
- ปุ่ม Toggle ควบคุม NeoPixel (สีเขียว) และ Relay #1/#2
หมายเหตุความปลอดภัยไฟฟ้า: LED Matrix 64 ดวงกินกระแสได้สูง (โดยเฉพาะเมื่อเปิดสว่างเต็มที่) ควรใช้ ภาคจ่ายไฟ 5V แยก พร้อมใส่ C 1000 µF/6.3V คร่อม +5V/GND ใกล้แผง LED และ R series 330Ω ที่สาย DATA เพื่อความเสถียร; GND ต้องร่วมกัน ระหว่าง ESP32, Relay, NeoPixel และโมดูลเซนเซอร์
ผังระบบและการต่อวงจร (พร้อมตาราง Pin Mapping)
เลือกขาให้ปลอดภัยบน ESP32 (38‑pin DevKit V1)
- ขา ADC1 เท่านั้นเมื่อใช้ Wi‑Fi: GPIO 32,33,34,35,36,39 (34/35/36/39 เป็น input‑only)
- หลีกเลี่ยงขาบูต/พิเศษ (เช่น GPIO0, GPIO2, GPIO15, GPIO12) หากไม่จำเป็น
ตารางการต่อ (แนะนำค่าเริ่มต้น)
| อุปกรณ์ | สัญญาณ | ESP32 Pin | หมายเหตุ |
|---|---|---|---|
| MQ‑135 | AOUT (ผ่านแบ่งแรงดัน*) | GPIO34 | ADC1, input‑only |
| MQ‑2 | AOUT (ผ่านแบ่งแรงดัน*) | GPIO35 | ADC1, input‑only |
| Potentiometer 10kΩ | ตัวกลาง (wiper) | GPIO33 | ADC1; ปลายสองขาไป 3.3V/GND |
| Relay #1 | IN1 | GPIO26 | กำหนด active‑LOW/active‑HIGH ตามโมดูล |
| Relay #2 | IN2 | GPIO27 | เช่นเดียวกับด้านบน |
| NeoPixel Matrix | DIN | GPIO14 | ใส่ R 330Ω ต่ออนุกรมที่สาย DATA |
| NeoPixel Matrix | +5V/GND | — | ใช้ 5V ภายนอก + C 1000 µF ใกล้บอร์ด LED |
* การแบ่งแรงดันสำหรับ AOUT ของ MQ‑135/MQ‑2: โมดูล MQ ส่วนใหญ่ให้สัญญาณอนาล็อกช่วง 0–5V ซึ่ง สูงเกิน 3.3V ที่ ADC ของ ESP32 รับได้ ให้ต่อ R แบ่งแรงดัน ตัวอย่างเช่น Rtop=10kΩ (ต่อจาก AOUT เซนเซอร์ไปจุดวัด) และ Rbottom=20kΩ (จากจุดวัดลง GND) จะได้สัดส่วน ~0.66×Vin (5V → ~3.3V) ปลอดภัยต่อ ESP32
หากใช้โมดูล MQ รุ่นที่ AOUT ถูกจำกัดไว้ ~3.3V อยู่แล้ว ให้ยืนยันด้วยมัลติมิเตอร์ก่อน หากไม่แน่ใจให้ใช้วงจรแบ่งแรงดันตามคำแนะนำ
เดินสาย NeoPixel
- +5V จากแหล่งจ่าย 5V ภายนอก → +5V ของแผง LED
- GND แหล่งจ่าย → GND ของแผง LED และ ร่วมกับ GND ของ ESP32
- DATA จาก ESP32 GPIO14 → R 330Ω → DIN แผง LED (สายสั้นที่สุด)
- ใส่ C 1000 µF ระหว่าง +5V/GND ใกล้แผง LED เพื่อลดสัญญาณกระชาก
เดินสาย Relay 2‑CH
- จ่ายไฟให้โมดูล Relay ด้วย 5V (แยกจาก 3.3V ของ ESP32)
- สาย IN1 ← GPIO26, IN2 ← GPIO27 (ตรวจ Active‑LOW/High ของโมดูล)
- ขั้วคอนแทค COM/NO/NC ต่อโหลดภายนอกตามต้องการ (เช่น ปั๊มน้ำ/พัดลม 220VAC ผ่านอุปกรณ์ป้องกันที่เหมาะสมและช่างไฟฟ้าผู้ชำนาญ)
/*
  Rui Santos & Sara Santos - Random Nerd Tutorials
  https://RandomNerdTutorials.com/esp32-web-server-beginners-guide/
  Permission is hereby granted, free of charge, to any person obtaining a copy of this software and associated documentation files.
  The above copyright notice and this permission notice shall be included in all copies or substantial portions of the Software.
*/

#include <WiFi.h>
#include <WebServer.h>

// Replace with your network credentials
const char* ssid = "REPLACE_WITH_YOUR_SSID";
const char* password = "REPLACE_WITH_YOUR_PASSWORD";

// Assign output variables to GPIO pins
const int output26 = 26;
const int output27 = 27;
String output26State = "off";
String output27State = "off";

// Create a web server object
WebServer server(80);

// Function to handle turning GPIO 26 on
void handleGPIO26On() {
  output26State = "on";
  digitalWrite(output26, HIGH);
  handleRoot();
}

// Function to handle turning GPIO 26 off
void handleGPIO26Off() {
  output26State = "off";
  digitalWrite(output26, LOW);
  handleRoot();
}

// Function to handle turning GPIO 27 on
void handleGPIO27On() {
  output27State = "on";
  digitalWrite(output27, HIGH);
  handleRoot();
}

// Function to handle turning GPIO 27 off
void handleGPIO27Off() {
  output27State = "off";
  digitalWrite(output27, LOW);
  handleRoot();
}

// Function to handle the root URL and show the current states
void handleRoot() {
  String html = "<!DOCTYPE html><html><head><meta name=\"viewport\" content=\"width=device-width, initial-scale=1\">";
  html += "<link rel=\"icon\" href=\"data:,\">";
  html += "<style>html { font-family: Helvetica; display: inline-block; margin: 0px auto; text-align: center;}";
  html += ".button { background-color: #4CAF50; border: none; color: white; padding: 16px 40px; text-decoration: none; font-size: 30px; margin: 2px; cursor: pointer;}";
  html += ".button2 { background-color: #555555; }</style></head>";
  html += "<body><h1>ESP32 Web Server</h1>";

  // Display GPIO 26 controls
  html += "<p>GPIO 26 - State " + output26State + "</p>";
  if (output26State == "off") {
    html += "<p><a href=\"/26/on\"><button class=\"button\">ON</button></a></p>";
  } else {
    html += "<p><a href=\"/26/off\"><button class=\"button button2\">OFF</button></a></p>";
  }

  // Display GPIO 27 controls
  html += "<p>GPIO 27 - State " + output27State + "</p>";
  if (output27State == "off") {
    html += "<p><a href=\"/27/on\"><button class=\"button\">ON</button></a></p>";
  } else {
    html += "<p><a href=\"/27/off\"><button class=\"button button2\">OFF</button></a></p>";
  }

  html += "</body></html>";
  server.send(200, "text/html", html);
}

void setup() {
  Serial.begin(115200);

  // Initialize the output variables as outputs
  pinMode(output26, OUTPUT);
  pinMode(output27, OUTPUT);
  // Set outputs to LOW
  digitalWrite(output26, LOW);
  digitalWrite(output27, LOW);

  // Connect to Wi-Fi network
  Serial.print("Connecting to ");
  Serial.println(ssid);
  WiFi.begin(ssid, password);
  while (WiFi.status() != WL_CONNECTED) {
    delay(500);
    Serial.print(".");
  }
  Serial.println("");
  Serial.println("WiFi connected.");
  Serial.println("IP address: ");
  Serial.println(WiFi.localIP());

  // Set up the web server to handle different routes
  server.on("/", handleRoot);
  server.on("/26/on", handleGPIO26On);
  server.on("/26/off", handleGPIO26Off);
  server.on("/27/on", handleGPIO27On);
  server.on("/27/off", handleGPIO27Off);

  // Start the web server
  server.begin();
  Serial.println("HTTP server started");
}

void loop() {
  // Handle incoming client requests
  server.handleClient();
}
responsive design
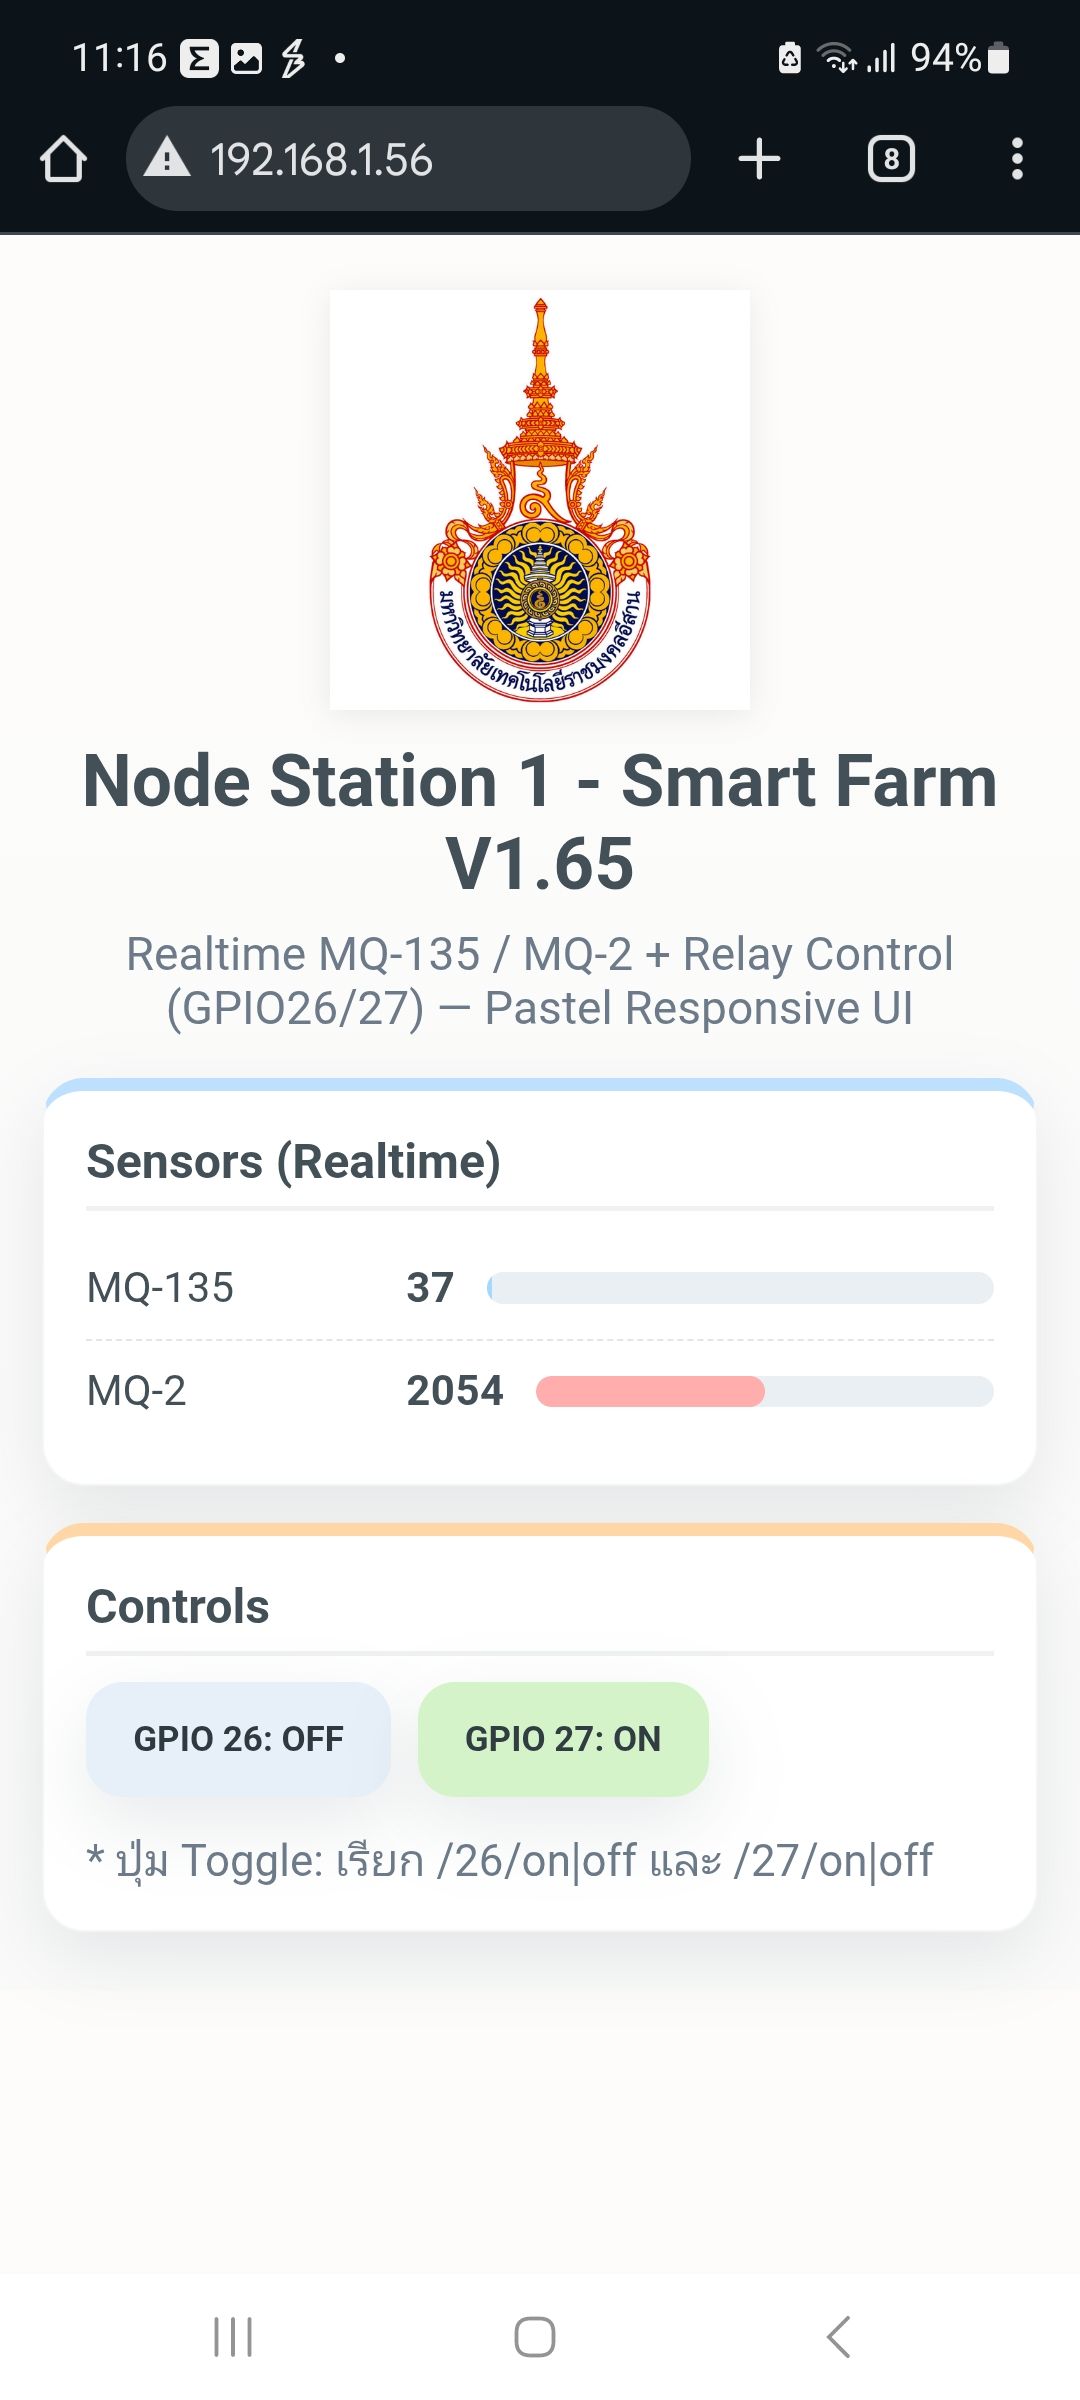
// ======================= Smart Farm V1.65 (ESP32 WebServer)
// =======================Asst. Prof. Dr.Chaloemchai Lowongtrakool
// Feature : responsive + Realtime MQ-135/MQ-2 + Relay control (GPIO26/27)
// Notes : ใช้ ADC1 (GPIO34/35) สำหรับอ่านค่า MQ-* และควรแบ่งแรงดันให้ไม่เกิน 3.3V ที่ ADC
// Update : ใช้ delimiter แบบเฉพาะ และแทน em-dash ด้วย — เพื่อกัน parse error
// ================================================================================
#include <WiFi.h>
#include <WebServer.h>
// --------- WiFi Credentials ---------
const char* ssid = "aaa";
const char* password = "bbb";
// --------- Relay Pins ---------
const int output26 = 26;
const int output27 = 27;
String output26State = "off";
String output27State = "off";
// --------- MQ Sensor Pins (ADC1) ---------
const int PIN_MQ135 = 34; // ADC1, input-only
const int PIN_MQ2 = 35; // ADC1, input-only
// --------- Web Server ---------
WebServer server(80);
// --------- Helpers: อ่าน ADC แบบเฉลี่ยเพื่อลด noise ---------
static uint16_t readADCavg(int pin, int N = 8) {
uint32_t acc = 0;
for (int i=0;i<N;++i) acc += analogRead(pin);
return (uint16_t)(acc / N); // 0..4095 (12-bit)
}
// ===================== HTTP HANDLERS =====================
// หน้าเว็บหลัก
extern const char index_html[] PROGMEM;
void handleRoot() {
server.send_P(200, "text/html", index_html);
}
// API รีลไทม์: CSV => "mq135,mq2"
void handleSensors() {
uint16_t v135 = readADCavg(PIN_MQ135);
uint16_t v2 = readADCavg(PIN_MQ2);
String csv = String(v135) + "," + String(v2);
server.send(200, "text/plain", csv);
}
// GPIO26 ON/OFF
void handleGPIO26On() { output26State = "on"; digitalWrite(output26, HIGH); server.send(200,"text/plain","OK"); }
void handleGPIO26Off() { output26State = "off"; digitalWrite(output26, LOW); server.send(200,"text/plain","OK"); }
// GPIO27 ON/OFF
void handleGPIO27On() { output27State = "on"; digitalWrite(output27, HIGH); server.send(200,"text/plain","OK"); }
void handleGPIO27Off() { output27State = "off"; digitalWrite(output27, LOW); server.send(200,"text/plain","OK"); }
// ===================== SETUP / LOOP ======================
void setup() {
Serial.begin(115200);
// Relay outputs
pinMode(output26, OUTPUT);
pinMode(output27, OUTPUT);
digitalWrite(output26, LOW);
digitalWrite(output27, LOW);
// WiFi connect
Serial.print("Connecting to "); Serial.println(ssid);
WiFi.mode(WIFI_STA);
WiFi.begin(ssid, password);
while (WiFi.status() != WL_CONNECTED) { delay(500); Serial.print("."); }
Serial.println(); Serial.println("WiFi connected.");
Serial.print("IP address: "); Serial.println(WiFi.localIP());
// Routes
server.on("/", HTTP_GET, handleRoot);
server.on("/api/sensors", HTTP_GET, handleSensors);
server.on("/26/on", HTTP_GET, handleGPIO26On);
server.on("/26/off", HTTP_GET, handleGPIO26Off);
server.on("/27/on", HTTP_GET, handleGPIO27On);
server.on("/27/off", HTTP_GET, handleGPIO27Off);
server.begin();
Serial.println("HTTP server started");
}
void loop() {
server.handleClient();
}
// ===================== HTML (Pastel + Responsive) =====================
const char index_html[] PROGMEM = R"==RMUTI_HTML==(
<!doctype html>
<html lang="th">
<head>
<meta charset="utf-8">
<meta name="viewport" content="width=device-width,initial-scale=1">
<title>Node Station 1 - Smart Farm V1.65</title>
<style>
:root{
--bg:#FAFAFA; --ink:#435058; --muted:#6C7A89; --card:#FFFFFF;
--accent:#A5D8FF; --accent-2:#FFD6A5; --accent-3:#BDE0FE; --accent-4:#CDEAC0; --accent-5:#FFADAD;
--shadow:0 10px 28px rgba(67,80,88,.12); --rad:16px; --gap:14px;
--btn-on:#CDEAC0; --btn-off:#E7F0F9; --btn-text:#2F3A40;
--bar:#EAEFF4; --bar-fill1:#A5D8FF; --bar-fill2:#FFADAD;
--logo-w:160px;
}
*{box-sizing:border-box}
html,body{margin:0;padding:0;font-family:ui-sans-serif,system-ui,-apple-system,Segoe UI,Roboto,Arial,"Noto Sans Thai","Noto Sans",sans-serif;background:linear-gradient(180deg,#FDFCFB 0%,var(--bg) 100%);color:var(--ink)}
.wrap{max-width:1040px;margin:22px auto;padding:0 16px;text-align:left}
.brand{display:flex;justify-content:center;align-items:center;margin:8px 0 12px}
.brand img{width:var(--logo-w);max-width:40vw;height:auto;display:block;filter:drop-shadow(0 2px 6px rgba(0,0,0,.08))}
h1{font-size:1.7rem;margin:8px 0 8px;text-align:center}
p.desc{margin:0 0 16px;color:var(--muted);text-align:center}
.grid{display:grid;grid-template-columns:repeat(12,1fr);gap:var(--gap)}
.card{grid-column:span 12;background:var(--card);border-radius:var(--rad);box-shadow:var(--shadow);padding:16px;border:1px solid rgba(67,80,88,.06)}
@media(min-width:720px){.half{grid-column:span 6}}
.sensor{display:flex;align-items:center;gap:12px;padding:10px 0;border-bottom:1px dashed rgba(67,80,88,.15)}
.sensor:last-child{border-bottom:0}
.sensor .name{min-width:110px}
.value{font-weight:700;letter-spacing:.2px}
.bar{height:12px;background:var(--bar);border-radius:999px;overflow:hidden;flex:1;position:relative}
.bar>i{display:block;height:100%;width:0%;transition:width .25s ease;border-radius:999px}
.row{display:flex;flex-wrap:wrap;gap:10px}
.btn{cursor:pointer;appearance:none;border:0;border-radius:14px;padding:14px 18px;font-weight:700;color:var(--btn-text);background:var(--btn-off);box-shadow:var(--shadow);transition:transform .05s ease,filter .15s ease}
.btn:hover{filter:brightness(1.04)}
.btn:active{transform:translateY(1px)}
.btn.active{background:var(--btn-on)}
h2{font-size:1.1rem;margin:0 0 10px;padding-bottom:6px;border-bottom:2px solid rgba(67,80,88,.08)}
.sensors{border-top:5px solid var(--accent-3)}
.controls{border-top:5px solid var(--accent-2)}
.label{color:var(--muted);font-size:.95rem;margin-top:10px}
</style>
</head>
<body>
<div class="wrap">
<!-- โลโก้ RMUTI บรรทัดบนสุด กึ่งกลางหน้า -->
<div class="brand">
<img src="https://upload.wikimedia.org/wikipedia/commons/thumb/c/c6/Logo_rmuti.png/600px-Logo_rmuti.png"
alt="RMUTI Logo" loading="lazy">
</div>
<h1>Node Station 1 - Smart Farm V1.65</h1>
<p class="desc">Realtime MQ-135 / MQ-2 + Relay Control (GPIO26/27) — Responsive Desing UI</p>
<section class="grid">
<div class="card sensors half">
<h2>Sensors (Realtime)</h2>
<div class="sensor">
<span class="name">MQ-135</span>
<span class="value" id="v135">—</span>
<div class="bar"><i id="b135" style="background:var(--bar-fill1)"></i></div>
</div>
<div class="sensor">
<span class="name">MQ-2</span>
<span class="value" id="v2">—</span>
<div class="bar"><i id="b2" style="background:var(--bar-fill2)"></i></div>
</div>
</div>
<div class="card controls half">
<h2>Controls</h2>
<div class="row" style="margin-bottom:12px;">
<button id="btn-26" class="btn">GPIO 26: OFF</button>
<button id="btn-27" class="btn">GPIO 27: OFF</button>
</div>
<div class="label">* ปุ่ม Toggle: เรียก /26/on|off และ /27/on|off</div>
</div>
</section>
</div>
<script>
let st26 = false, st27 = false;
const $ = (id)=>document.getElementById(id);
const pct = (x)=>Math.max(0, Math.min(100, Math.round((x/4095)*100)));
const setBtn = (el, on, label)=>{ el.classList.toggle('active', on); el.textContent = label + (on? 'ON':'OFF'); };
const pullSensors = async ()=>{
try{
const r = await fetch('/api/sensors');
const txt = (await r.text()).trim(); // "v135,v2"
const a = txt.split(',');
if (a.length < 2) return;
const v135 = parseInt(a[0],10);
const v2 = parseInt(a[1],10);
$('v135').textContent = isNaN(v135)? '\u2014' : v135; // — fallback
$('v2').textContent = isNaN(v2)? '\u2014' : v2;
if(!isNaN(v135)) $('b135').style.width = pct(v135)+'%';
if(!isNaN(v2)) $('b2').style.width = pct(v2)+'%';
}catch(e){ console.error(e); }
};
setInterval(pullSensors, 500);
pullSensors();
document.getElementById('btn-26').addEventListener('click', async ()=>{
const target = st26 ? 'off' : 'on';
await fetch('/26/'+target);
st26 = !st26; setBtn(document.getElementById('btn-26'), st26, 'GPIO 26: ');
});
document.getElementById('btn-27').addEventListener('click', async ()=>{
const target = st27 ? 'off' : 'on';
await fetch('/27/'+target);
st27 = !st27; setBtn(document.getElementById('btn-27'), st27, 'GPIO 27: ');
});
</script>
</body>
</html>
)==RMUTI_HTML==";