
1. ชื่อโครงงาน
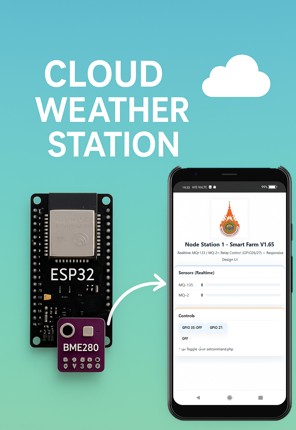
ชื่อโครงงาน: Smart Farm V2.14 – ระบบตรวจสอบและควบคุมฟาร์มอัจฉริยะด้วย ESP32 และเว็บเซิร์ฟเวอร์จริง
2. วัตถุประสงค์
วัตถุประสงค์หลักของโครงงานนี้คือ:
- เพื่อพัฒนาระบบตรวจสอบ (monitoring) ค่าเซ็นเซอร์แบบเรียลไทม์ เช่น MQ-135 (สำหรับตรวจจับก๊าซ เช่น CO2, NH3) และ MQ-2 (สำหรับตรวจจับก๊าซไวไฟ เช่น LPG, Methane) ซึ่งเหมาะสำหรับการตรวจสอบสภาพอากาศในฟาร์ม
- เพื่อควบคุมอุปกรณ์ไฟฟ้า (เช่น ปั๊มน้ำหรือพัดลม) ผ่านรีเลย์ (relay) GPIO26 และ GPIO27 แบบเรียลไทม์จากระยะไกลผ่านอินเทอร์เน็ต
- เพื่อแสดงผลข้อมูลและควบคุมผ่านเว็บอินเตอร์เฟซ (dashboard) ที่ responsive บน thailink.net โดยไม่ต้องใช้ WiFi LAN เดียวกัน แต่ใช้เซิร์ฟเวอร์กลางแทน
- เพื่อศึกษาการสื่อสารข้อมูลผ่าน HTTP/HTTPS โดยใช้ ESP32 เป็น client และ PHP เป็น backend โดยไม่ใช้ฐานข้อมูล (ใช้ JSON file แทน)
โครงงานนี้เหมาะสำหรับการเรียนรู้ IoT (Internet of Things) ในบริบท Smart Farm โดยเน้นความเรียบง่ายและต้นทุนต่ำ
3. อุปกรณ์และสิ่งที่ต้องเตรียมต่างๆ
อุปกรณ์หลักที่ต้องเตรียมสำหรับโครงงานนี้มีดังนี้:
- ฮาร์ดแวร์:
- ESP32 DevKit (เช่น NodeMCU ESP32) – สำหรับประมวลผลหลัก
- เซ็นเซอร์ MQ-135 (สำหรับตรวจจับก๊าซคุณภาพอากาศ) และ MQ-2 (สำหรับตรวจจับก๊าซไวไฟ) – เชื่อมต่อกับ ADC pins (GPIO34, GPIO35)
- โมดูลรีเลย์ 2 ช่อง (Relay Module) – เชื่อมต่อกับ GPIO26 และ GPIO27 สำหรับควบคุมอุปกรณ์ไฟฟ้า (เช่น ปั๊มน้ำ 220V)
- Power Supply ที่เสถียร (5V USB หรือแบตเตอรี่) – เพื่อป้องกันไฟตกในฟาร์ม
- สาย jumper, breadboard สำหรับต่อวงจรทดสอบ
- ซอฟต์แวร์และบริการ:
- Arduino IDE (เวอร์ชันล่าสุด) – สำหรับเขียนและอัพโหลดโค้ดไป ESP32
- ไลบรารี Arduino: WiFi.h, HTTPClient.h, WiFiClientSecure.h (ติดตั้งผ่าน Library Manager)
- Hosting บน thailink.net (รองรับ PHP) – สำหรับอัพโหลดไฟล์ PHP, HTML, JSON ใน path /smartapprmuti/
- เครื่องมือทดสอบ: Serial Monitor ใน Arduino IDE, curl/Postman สำหรับทดสอบ API, FTP client (เช่น FileZilla) สำหรับอัพโหลดไฟล์
- สิ่งอื่นๆ ที่ต้องเตรียม:
- บัญชี hosting บน thailink.net (ตรวจสอบว่าเปิดใช้งาน PHP แล้ว)
- SIM card หรือ WiFi router ที่มีอินเทอร์เน็ตเสถียร
- ความรู้พื้นฐาน: การต่อวงจร ESP32, การเขียน C++ ใน Arduino
4. อธิบายโครงสร้าง ความสัมพันธ์ และการทำงานของไฟล์แต่ละตัว
โครงสร้างระบบแบ่งเป็น 2 ส่วนหลัก: ESP32 (client) และ thailink.net (server ใน path /smartapprmuti/)
- ไฟล์บน ESP32 (SmartFarmClient.ino):
- นี่คือโค้ดหลักที่รันบน ESP32 ทำหน้าที่เป็น client ส่งข้อมูลเซ็นเซอร์ไป server และ poll คำสั่ง relay
- ความสัมพันธ์: เชื่อมต่อ WiFi, อ่านเซ็นเซอร์จาก ADC pins, ส่ง POST ไป update.php, GET จาก command.php
- การทำงาน: Loop ทุก 1 วินาทีเพื่ออัพเดทข้อมูลและรับคำสั่ง
- ไฟล์บน thailink.net/smartapprmuti/ (Server Side):
- index.html: หน้าเว็บ frontend (HTML/CSS/JS) สำหรับแสดง dashboard responsive แสดงค่าเซ็นเซอร์ (pull จาก getdata.php ทุก 500ms) และปุ่มควบคุม relay (ส่ง GET ไป setcommand.php)
- ความสัมพันธ์: ใช้ JS fetch เพื่อสื่อสารกับ PHP
- การทำงาน: แสดง UI และจัดการ event กดปุ่ม
- update.php: รับ POST จาก ESP32 เพื่ออัพเดท data.json ด้วยค่าเซ็นเซอร์
- ความสัมพันธ์: เขียนข้อมูลลง JSON จาก POST data
- การทำงาน: รับ mq135/mq2 แล้วบันทึก JSON
- command.php: ส่ง GET response ให้ ESP32 (อ่านจาก commands.json)
- ความสัมพันธ์: อ่าน JSON แล้วส่ง string เช่น “relay26=on&relay27=off”
- การทำงาน: ส่งสถานะ relay กลับไป
- getdata.php: ส่ง JSON response ให้ frontend (อ่านจาก data.json)
- ความสัมพันธ์: อ่าน JSON แล้วส่งให้ JS ใน index.html
- การทำงาน: ส่งค่าเซ็นเซอร์ให้ UI
- setcommand.php: รับ GET จาก frontend เพื่ออัพเดท commands.json
- ความสัมพันธ์: อัพเดท JSON จาก GET params (relay26/relay27)
- การทำงาน: บันทึกสถานะ relay เมื่อกดปุ่ม
- data.json: เก็บค่าเซ็นเซอร์ล่าสุด (เช่น {“mq135″:1234,”mq2”:5678})
- ความสัมพันธ์: เขียนโดย update.php, อ่านโดย getdata.php
- commands.json: เก็บสถานะ relay (เช่น {“relay26″:”on”,”relay27″:”off”})
- ความสัมพันธ์: เขียนโดย setcommand.php, อ่านโดย command.php
- index.html: หน้าเว็บ frontend (HTML/CSS/JS) สำหรับแสดง dashboard responsive แสดงค่าเซ็นเซอร์ (pull จาก getdata.php ทุก 500ms) และปุ่มควบคุม relay (ส่ง GET ไป setcommand.php)
ความสัมพันธ์โดยรวม: ESP32 (client) <-> PHP (backend) <-> JSON (storage) <-> HTML/JS (frontend) การทำงานเป็นแบบ polling: ESP32 ส่ง/รับข้อมูลทุก 1 วินาที, UI อัพเดททุก 500ms
โค้ด ESP32 (Client) – อัพเดทใหม่ (ปรับ path เป็น /smartapprmuti/)
ใช้ HTTPClient และ WiFiClientSecure สำหรับ HTTPS (ลอง HTTPS ก่อน ถ้า error แล้วค่อย HTTP) พร้อม handle redirect ถ้ามี
smartfarmclient.ino
// ======================= Smart Farm V2.14 (ESP32 Application)
// =======================Asst. Prof. Dr.Chaloemchai Lowongtrakool
// Feature : responsive + Realtime MQ-135/MQ-2 + Relay control (GPIO26/27)
// Notes : application to control and monitor smartfarm
// Update : cloud server application
// ================================================================================
#include <WiFi.h>
#include <HTTPClient.h>
#include <WiFiClientSecure.h> // สำหรับ HTTPS
// WiFi Credentials
const char* ssid = "aaa";
const char* password = "bbb";
// Server URL (ใช้ HTTPS กับ subdirectory)
const char* serverUrl = "https://thailink.net/smartapprmuti"; // ถ้า HTTPS error เปลี่ยนเป็น "http://thailink.net/smartapprmuti"
// Relay Pins
const int output26 = 26;
const int output27 = 27;
String output26State = "off";
String output27State = "off";
// MQ Sensor Pins (ADC1)
const int PIN_MQ135 = 34; // ADC1, input-only
const int PIN_MQ2 = 35; // ADC1, input-only
// WiFiClientSecure สำหรับ HTTPS
WiFiClientSecure clientSecure;
// Helpers: อ่าน ADC แบบเฉลี่ยเพื่อลด noise
static uint16_t readADCavg(int pin, int N = 8) {
uint32_t acc = 0;
for (int i = 0; i < N; ++i) acc += analogRead(pin);
return (uint16_t)(acc / N); // 0..4095 (12-bit)
}
void setup() {
Serial.begin(115200);
// Relay outputs
pinMode(output26, OUTPUT);
pinMode(output27, OUTPUT);
digitalWrite(output26, LOW);
digitalWrite(output27, LOW);
// WiFi connect
Serial.print("Connecting to "); Serial.println(ssid);
WiFi.mode(WIFI_STA);
WiFi.begin(ssid, password);
while (WiFi.status() != WL_CONNECTED) {
delay(500);
Serial.print(".");
}
Serial.println(); Serial.println("WiFi connected.");
Serial.print("IP address: "); Serial.println(WiFi.localIP());
// ตั้งค่า HTTPS (ข้าม certificate check ชั่วคราวสำหรับ test)
clientSecure.setInsecure();
}
void loop() {
if (WiFi.status() == WL_CONNECTED) {
HTTPClient http;
// อ่านค่าเซ็นเซอร์
uint16_t v135 = readADCavg(PIN_MQ135);
uint16_t v2 = readADCavg(PIN_MQ2);
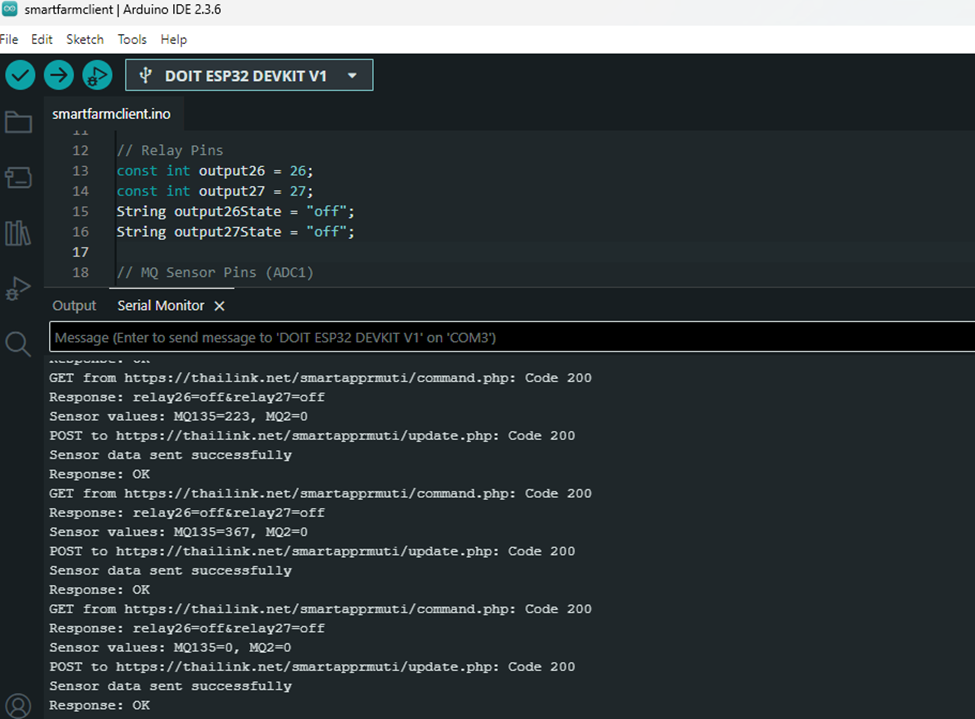
Serial.printf("Sensor values: MQ135=%d, MQ2=%d\n", v135, v2);
// ส่งข้อมูลเซ็นเซอร์ไป update.php
String postUrl = String(serverUrl) + "/update.php";
http.begin(clientSecure, postUrl);
http.addHeader("Content-Type", "application/x-www-form-urlencoded");
String postData = "mq135=" + String(v135) + "&mq2=" + String(v2);
int httpCode = http.POST(postData);
Serial.printf("POST to %s: Code %d\n", postUrl.c_str(), httpCode);
if (httpCode == HTTP_CODE_OK) {
Serial.println("Sensor data sent successfully");
Serial.println("Response: " + http.getString());
} else {
Serial.printf("POST failed: %d\n", httpCode);
}
http.end();
// Poll คำสั่ง relay จาก command.php
String getUrl = String(serverUrl) + "/command.php";
http.begin(clientSecure, getUrl);
httpCode = http.GET();
Serial.printf("GET from %s: Code %d\n", getUrl.c_str(), httpCode);
if (httpCode == HTTP_CODE_OK) {
String response = http.getString();
Serial.printf("Response: %s\n", response.c_str());
if (response.indexOf("relay26=on") > -1 && output26State != "on") {
digitalWrite(output26, HIGH);
output26State = "on";
Serial.println("Relay 26 ON");
} else if (response.indexOf("relay26=off") > -1 && output26State != "off") {
digitalWrite(output26, LOW);
output26State = "off";
Serial.println("Relay 26 OFF");
}
if (response.indexOf("relay27=on") > -1 && output27State != "on") {
digitalWrite(output27, HIGH);
output27State = "on";
Serial.println("Relay 27 ON");
} else if (response.indexOf("relay27=off") > -1 && output27State != "off") {
digitalWrite(output27, LOW);
output27State = "off";
Serial.println("Relay 27 OFF");
}
} else {
Serial.printf("GET failed: %d\n", httpCode);
}
http.end();
}
delay(1000); // Poll ทุก 1 วินาที
}ไฟล์ PHP สำหรับ thailink.net/smartapprmuti/ – อัพเดทใหม่
อัพโหลดไฟล์เหล่านี้ไปยัง /smartapprmuti/ (ผ่าน FTP/control panel) ถ้า JSON files ยังไม่มี ให้สร้างเริ่มต้น
update.php (รับข้อมูลเซ็นเซอร์จาก ESP32 และอัพเดท data.json)
<?php
header('Content-Type: text/plain');

// รับข้อมูลจาก POST
$mq135 = isset($_POST['mq135']) ? (int)$_POST['mq135'] : 0;
$mq2 = isset($_POST['mq2']) ? (int)$_POST['mq2'] : 0;

// สร้าง/อัพเดท data.json (ใน subdirectory เดียวกัน)
$data = array('mq135' => $mq135, 'mq2' => $mq2);
file_put_contents('data.json', json_encode($data));

echo "OK";
?>
command.php (ส่งคำสั่ง relay ไป ESP32)
<?php
header('Content-Type: text/plain');

// อ่าน commands.json (ใน subdirectory เดียวกัน)
if (file_exists('commands.json')) {
    $commands = json_decode(file_get_contents('commands.json'), true);
    echo "relay26=" . ($commands['relay26'] ?? 'off') . "&relay27=" . ($commands['relay27'] ?? 'off');
} else {
    echo "relay26=off&relay27=off";
}
?>
getdata.php (ส่งข้อมูลเซ็นเซอร์ไป UI)
header('Content-Type: application/json');

// อ่าน data.json (ใน subdirectory เดียวกัน)
if (file_exists('data.json')) {
    echo file_get_contents('data.json');
} else {
    echo json_encode(array('mq135' => 0, 'mq2' => 0));
}
setcommand.php (รับคำสั่งจาก UI และอัพเดท commands.json)
header('Content-Type: text/plain');

// รับคำสั่งจาก GET (รองรับ relay26 หรือ relay27 แยก)
$relay26 = isset($_GET['relay26']) ? $_GET['relay26'] : (isset($_GET['relay27']) ? 'off' : 'off');  // Default off ถ้าไม่มี
$relay27 = isset($_GET['relay27']) ? $_GET['relay27'] : 'off';

// อ่าน commands.json ปัจจุบัน (ถ้ามี) เพื่ออัพเดทเฉพาะ field ที่เปลี่ยน
$commands = array('relay26' => $relay26, 'relay27' => $relay27);
if (file_exists('commands.json')) {
    $oldCommands = json_decode(file_get_contents('commands.json'), true);
    $commands['relay26'] = $oldCommands['relay26'] ?? $relay26;
    $commands['relay27'] = $oldCommands['relay27'] ?? $relay27;
    if (isset($_GET['relay26'])) $commands['relay26'] = $relay26;
    if (isset($_GET['relay27'])) $commands['relay27'] = $relay27;
}

// สร้าง/อัพเดท commands.json
file_put_contents('commands.json', json_encode($commands));

echo "OK";
data.json และ commands.json (ไฟล์เริ่มต้น – สร้างและอัพโหลดใน /smartapprmuti/)
- data.json
{
  "mq135": 0,
  "mq2": 0
}
commands.json
{
  "relay26": "off",
  "relay27": "off"
}
Frontend: index.html – อัพเดทใหม่ (ปรับ path สำหรับ subdirectory)
อัพโหลดไปยัง /smartapprmuti/ (UI ควรเข้าถึงได้ที่ http://thailink.net/smartapprmuti/)
<!doctype html>
<html lang="th">
<head>
<meta charset="utf-8">
<meta name="viewport" content="width=device-width,initial-scale=1">
<title>Node Station 1 - Smart Farm V2.14</title>
<style>
:root{
--bg:#FAFAFA; --ink:#435058; --muted:#6C7A89; --card:#FFFFFF;
--accent:#A5D8FF; --accent-2:#FFD6A5; --accent-3:#BDE0FE; --accent-4:#CDEAC0; --accent-5:#FFADAD;
--shadow:0 10px 28px rgba(67,80,88,.12); --rad:16px; --gap:14px;
--btn-on:#CDEAC0; --btn-off:#E7F0F9; --btn-text:#2F3A40;
--bar:#EAEFF4; --bar-fill1:#A5D8FF; --bar-fill2:#FFADAD;
--logo-w:160px;
}
*{box-sizing:border-box}
html,body{margin:0;padding:0;font-family:ui-sans-serif,system-ui,-apple-system,Segoe UI,Roboto,Arial,"Noto Sans Thai","Noto Sans",sans-serif;background:linear-gradient(180deg,#FDFCFB 0%,var(--bg) 100%);color:var(--ink)}
.wrap{max-width:1040px;margin:22px auto;padding:0 16px;text-align:left}
.brand{display:flex;justify-content:center;align-items:center;margin:8px 0 12px}
.brand img{width:var(--logo-w);max-width:40vw;height:auto;display:block;filter:drop-shadow(0 2px 6px rgba(0,0,0,.08))}
h1{font-size:1.7rem;margin:8px 0 8px;text-align:center}
p.desc{margin:0 0 16px;color:var(--muted);text-align:center}
.grid{display:grid;grid-template-columns:repeat(12,1fr);gap:var(--gap)}
.card{grid-column:span 12;background:var(--card);border-radius:var(--rad);box-shadow:var(--shadow);padding:16px;border:1px solid rgba(67,80,88,.06)}
@media(min-width:720px){.half{grid-column:span 6}}
.sensor{display:flex;align-items:center;gap:12px;padding:10px 0;border-bottom:1px dashed rgba(67,80,88,.15)}
.sensor:last-child{border-bottom:0}
.sensor .name{min-width:110px}
.value{font-weight:700;letter-spacing:.2px}
.bar{height:12px;background:var(--bar);border-radius:999px;overflow:hidden;flex:1;position:relative}
.bar>i{display:block;height:100%;width:0%;transition:width .25s ease;border-radius:999px}
.row{display:flex;flex-wrap:wrap;gap:10px}
.btn{cursor:pointer;appearance:none;border:0;border-radius:14px;padding:14px 18px;font-weight:700;color:var(--btn-text);background:var(--btn-off);box-shadow:var(--shadow);transition:transform .05s ease,filter .15s ease}
.btn:hover{filter:brightness(1.04)}
.btn:active{transform:translateY(1px)}
.btn.active{background:var(--btn-on)}
h2{font-size:1.1rem;margin:0 0 10px;padding-bottom:6px;border-bottom:2px solid rgba(67,80,88,.08)}
.sensors{border-top:5px solid var(--accent-3)}
.controls{border-top:5px solid var(--accent-2)}
.label{color:var(--muted);font-size:.95rem;margin-top:10px}
</style>
</head>
<body>
<div class="wrap">
<div class="brand">
<img src="https://upload.wikimedia.org/wikipedia/commons/thumb/c/c6/Logo_rmuti.png/600px-Logo_rmuti.png"
alt="RMUTI Logo" loading="lazy">
</div>
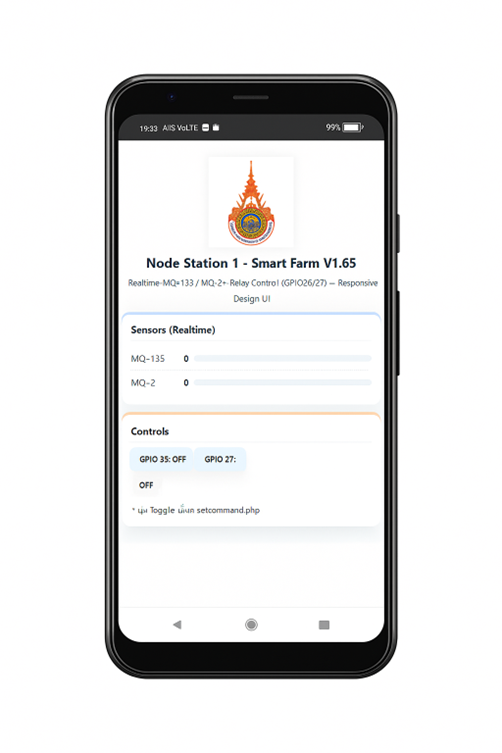
<h1>Node Station 1 - Smart Farm V1.65</h1>
<p class="desc">Realtime MQ-135 / MQ-2 + Relay Control (GPIO26/27) — Responsive Design UI</p>
<section class="grid">
<div class="card sensors half">
<h2>Sensors (Realtime)</h2>
<div class="sensor">
<span class="name">MQ-135</span>
<span class="value" id="v135">—</span>
<div class="bar"><i id="b135" style="background:var(--bar-fill1)"></i></div>
</div>
<div class="sensor">
<span class="name">MQ-2</span>
<span class="value" id="v2">—</span>
<div class="bar"><i id="b2" style="background:var(--bar-fill2)"></i></div>
</div>
</div>
<div class="card controls half">
<h2>Controls</h2>
<div class="row" style="margin-bottom:12px;">
<button id="btn-26" class="btn">GPIO 26: OFF</button>
<button id="btn-27" class="btn">GPIO 27: OFF</button>
</div>
<div class="label">* ปุ่ม Toggle: เรียก setcommand.php</div>
</div>
</section>
</div>
<script>
let st26 = false, st27 = false;
const $ = (id)=>document.getElementById(id);
const pct = (x)=>Math.max(0, Math.min(100, Math.round((x/4095)*100)));
const setBtn = (el, on, label)=>{ el.classList.toggle('active', on); el.textContent = label + (on? 'ON':'OFF'); };
const pullSensors = async ()=>{
try{
const r = await fetch('/smartapprmuti/getdata.php'); // ชี้ path เต็มสำหรับ subdirectory
const data = await r.json();
const v135 = parseInt(data.mq135, 10);
const v2 = parseInt(data.mq2, 10);
$('v135').textContent = isNaN(v135)? '\u2014' : v135;
$('v2').textContent = isNaN(v2)? '\u2014' : v2;
if(!isNaN(v135)) $('b135').style.width = pct(v135)+'%';
if(!isNaN(v2)) $('b2').style.width = pct(v2)+'%';
}catch(e){ console.error(e); }
};
setInterval(pullSensors, 500);
pullSensors();
document.getElementById('btn-26').addEventListener('click', async ()=>{
st26 = !st26;
await fetch(`/smartapprmuti/setcommand.php?relay26=${st26 ? 'on' : 'off'}`);
setBtn(document.getElementById('btn-26'), st26, 'GPIO 26: ');
});
document.getElementById('btn-27').addEventListener('click', async ()=>{
st27 = !st27;
await fetch(`/smartapprmuti/setcommand.php?relay27=${st27 ? 'on' : 'off'}`);
setBtn(document.getElementById('btn-27'), st27, 'GPIO 27: ');
});
</script>
</body>
</html>ทดสอบ PHP ใน subdirectory
- สร้าง test.php ใน /smartapprmuti/ ด้วย
<?php
echo "PHP OK in /smartapprmuti/! Time: " . date('Y-m-d H:i:s');
?>
เข้า http://thailink.net/smartapprmuti/test.php (หรือ HTTPS) ถ้าแสดง "PHP OK" + เวลา = PHP ทำงาน ถ้าแสดงโค้ดดิบ = ไม่รองรับ (ติดต่อ hosting)5. Step การทำงานของระบบ
ขั้นตอนการทำงานของระบบมีดังนี้:
- ตั้งค่าและเชื่อมต่อ: ESP32 เชื่อมต่อ WiFi และตั้งค่า pins สำหรับเซ็นเซอร์/รีเลย์ (ใน setup())
- อ่านข้อมูลเซ็นเซอร์: ESP32 อ่านค่า MQ-135 (GPIO34) และ MQ-2 (GPIO35) ด้วย analogRead แล้วเฉลี่ยค่าเพื่อลด noise
- ส่งข้อมูลไป server: ESP32 ส่ง POST ไป https://thailink.net/smartapprmuti/update.php ด้วย HTTPClient (ส่ง mq135 & mq2)
- อัพเดท JSON บน server: update.php รับข้อมูลแล้วเขียนลง data.json
- แสดงผลบน UI: index.html fetch จาก getdata.php (ซึ่งอ่าน data.json) แล้วอัพเดทค่าเซ็นเซอร์และ bar graph ทุก 500ms
- ควบคุม relay จาก UI: ผู้ใช้กดปุ่มใน index.html ส่ง GET ไป setcommand.php (เช่น ?relay26=on) เพื่ออัพเดท commands.json
- poll คำสั่งจาก server: ESP32 GET จาก command.php (ซึ่งอ่าน commands.json) แล้วตรวจสอบ string response เพื่อเปลี่ยนสถานะ relay (HIGH/LOW บน GPIO26/27)
- วนซ้ำ: ระบบ loop ต่อเนื่องเพื่ออัพเดทเรียลไทม์ (delay 1 วินาทีใน ESP32)
6. ทฤษฎีที่ต้องรู้เกี่ยวกับโครงงาน
โครงงานนี้เกี่ยวข้องกับทฤษฎีพื้นฐานด้าน IoT, Network และ Web Development ดังนี้:
- HTTP/HTTPS Protocol: HTTP (Hypertext Transfer Protocol) คือโปรโตคอลสำหรับสื่อสารข้อมูลระหว่าง client (ESP32) และ server (thailink.net) ใช้ method เช่น POST (ส่งข้อมูลเซ็นเซอร์) และ GET (รับคำสั่ง) HTTPS หรือ(encrypt ด้วย SSL) เพื่อป้องกันการดักข้อมูล ในโครงงานนี้ ESP32 ใช้ HTTPClient เพื่อ POST/GET โดยไม่มี push notification (ใช้ polling แทนเพื่อความเรียบง่าย)
- JSON (JavaScript Object Notation): รูปแบบข้อมูลแบบ lightweight สำหรับแลกเปลี่ยนข้อมูล (เช่น {“key”:”value”}) ในโครงงานใช้ JSON สำหรับเก็บข้อมูลชั่วคราวใน data.json และ commands.json เพราะง่ายต่อการ parse ใน PHP/JS/ESP32 (ใช้ json_encode/decode ใน PHP)
- Web Server และ Client-Server Model: Web server (thailink.net) รับ request จาก client (ESP32 หรือ browser) แล้วตอบ response ในโครงงาน ESP32 เป็น client (ส่งข้อมูล) และ thailink.net เป็น server (PHP ประมวลผล) โดยไม่ใช้ฐานข้อมูล (file-based storage)
- ADC (Analog-to-Digital Converter) ใน ESP32: ESP32 มี ADC 12-bit (0-4095) สำหรับอ่านค่า analog จากเซ็นเซอร์ MQ-* (แรงดัน 0-3.3V) เราทำ average เพื่อลด noise
- Relay และ Digital Control: รีเลย์คือสวิตช์ไฟฟ้าที่ควบคุมด้วยสัญญาณ digital (HIGH/LOW) จาก GPIO เพื่อเปิด/ปิดอุปกรณ์ 220V โดยปลอดภัย (optically isolated)
- Polling vs Push: ระบบใช้ polling (ESP32 ถาม server ทุกวินาที) เพราะ ESP32 ไม่สามารถรับ push ได้ง่ายๆ (เว้นใช้ WebSocket หรือ MQTT ซึ่งซับซ้อนกว่า)
- อื่นๆ: WiFi STA mode สำหรับเชื่อมต่ออินเทอร์เน็ต, Responsive Design ใน HTML/CSS สำหรับ UI บนมือถือ/PC
(ทฤษฎีเหล่านี้พื้นฐานจากมาตรฐาน IoT สามารถศึกษาจากเอกสาร Arduino/ESP32 official docs)
7. อธิบาย code
อธิบายโค้ดหลักๆ แยกตามส่วน (จากเวอร์ชันล่าสุดที่รันได้)
- ESP32 Code (SmartFarmClient.ino):
- #include <WiFi.h> <HTTPClient.h> <WiFiClientSecure.h>: นำเข้าไลบรารีสำหรับ WiFi, HTTP, และ HTTPS
- setup(): ตั้งค่า Serial, pins รีเลย์, เชื่อม WiFi, และ setInsecure() สำหรับ HTTPS (ข้าม cert check)
- loop():
- อ่านเซ็นเซอร์ด้วย readADCavg() (average 8 ครั้งเพื่อลด noise)
- ส่ง POST ไป /update.php ด้วย http.POST(postData) (postData = “mq135=…&mq2=…”)
- GET จาก /command.php แล้ว parse response (เช่น “relay26=on&relay27=off”) เพื่อควบคุม digitalWrite บน GPIO
- delay(1000) เพื่อ loop ทุกวินาที
- Debug: Serial.printf สำหรับ log code/response
- PHP Files:
- update.php: รับ $_POST[‘mq135’], $_POST[‘mq2’], สร้าง array แล้ว file_put_contents ลง data.json, ส่ง “OK”
- command.php: อ่าน file_get_contents(‘commands.json’), json_decode แล้ว echo string สำหรับ ESP32 parse
- getdata.php: อ่าน file_get_contents(‘data.json’) แล้ว echo JSON สำหรับ JS ใน UI
- setcommand.php: รับ $_GET[‘relay26’] หรือ $_GET[‘relay27’], อ่าน JSON เก่าเพื่ออัพเดทเฉพาะ field ที่เปลี่ยน แล้ว file_put_contents
- index.html:
- HTML/CSS: สร้าง dashboard ด้วย grid, card, bar graph (ใช้ CSS variable สำหรับสีสัน pastel)
- JS: pullSensors() fetch ‘/smartapprmuti/getdata.php’ แล้วอัพเดท text/bar ทุก 500ms
- Event listener บนปุ่ม: toggle st26/st27 แล้ว fetch ‘/smartapprmuti/setcommand.php?relayXX=on/off’
8. ข้อควรระวังและคำแนะนำ
- ข้อควรระวัง:
- ความปลอดภัย: ระบบไม่มี authentication ดังนั้นใครก็เข้าถึง API ได้ – เพิ่ม API key (เช่น ?key=secret) แล้วตรวจใน PHP/ESP32
- Power Supply: ESP32 และเซ็นเซอร์ sensitive กับไฟตก ใช้ UPS หรือ battery ในฟาร์ม
- Network Stability: WiFi อาจหลุด – เพิ่ม reconnect code ใน loop() ถ้า WL_CONNECTED == false
- JSON File: ถ้า write บ่อยอาจ corrupt – ใช้ lock file ใน PHP ถ้ามีหลาย client
- HTTPS: ถ้า cert ไม่ match ใช้ setInsecure() ชั่วคราว แต่เปิดใช้งานจริงเพื่อ encrypt
- Voltage: เซ็นเซอร์ MQ-* ต้องแบ่งแรงดันไม่เกิน 3.3V สำหรับ ADC ESP32
- คำแนะนำ:
- ทดสอบใน lab ก่อนนำไปฟาร์มจริง
- เพิ่ม logging ใน PHP (เช่น error_log) เพื่อ debug server side
- ขยายระบบ: เพิ่มเซ็นเซอร์อื่น (เช่น DHT22 สำหรับความชื้น) หรือใช้ MQTT สำหรับ realtime ดีกว่า polling
- Optimize: ลด delay เป็น 500ms ถ้าเน็ตเสถียร, หรือใช้ WebSocket ถ้า hosting รองรับ
- Backup: สำรองไฟล์บน thailink.net สม่ำเสมอ
Download Application For Android