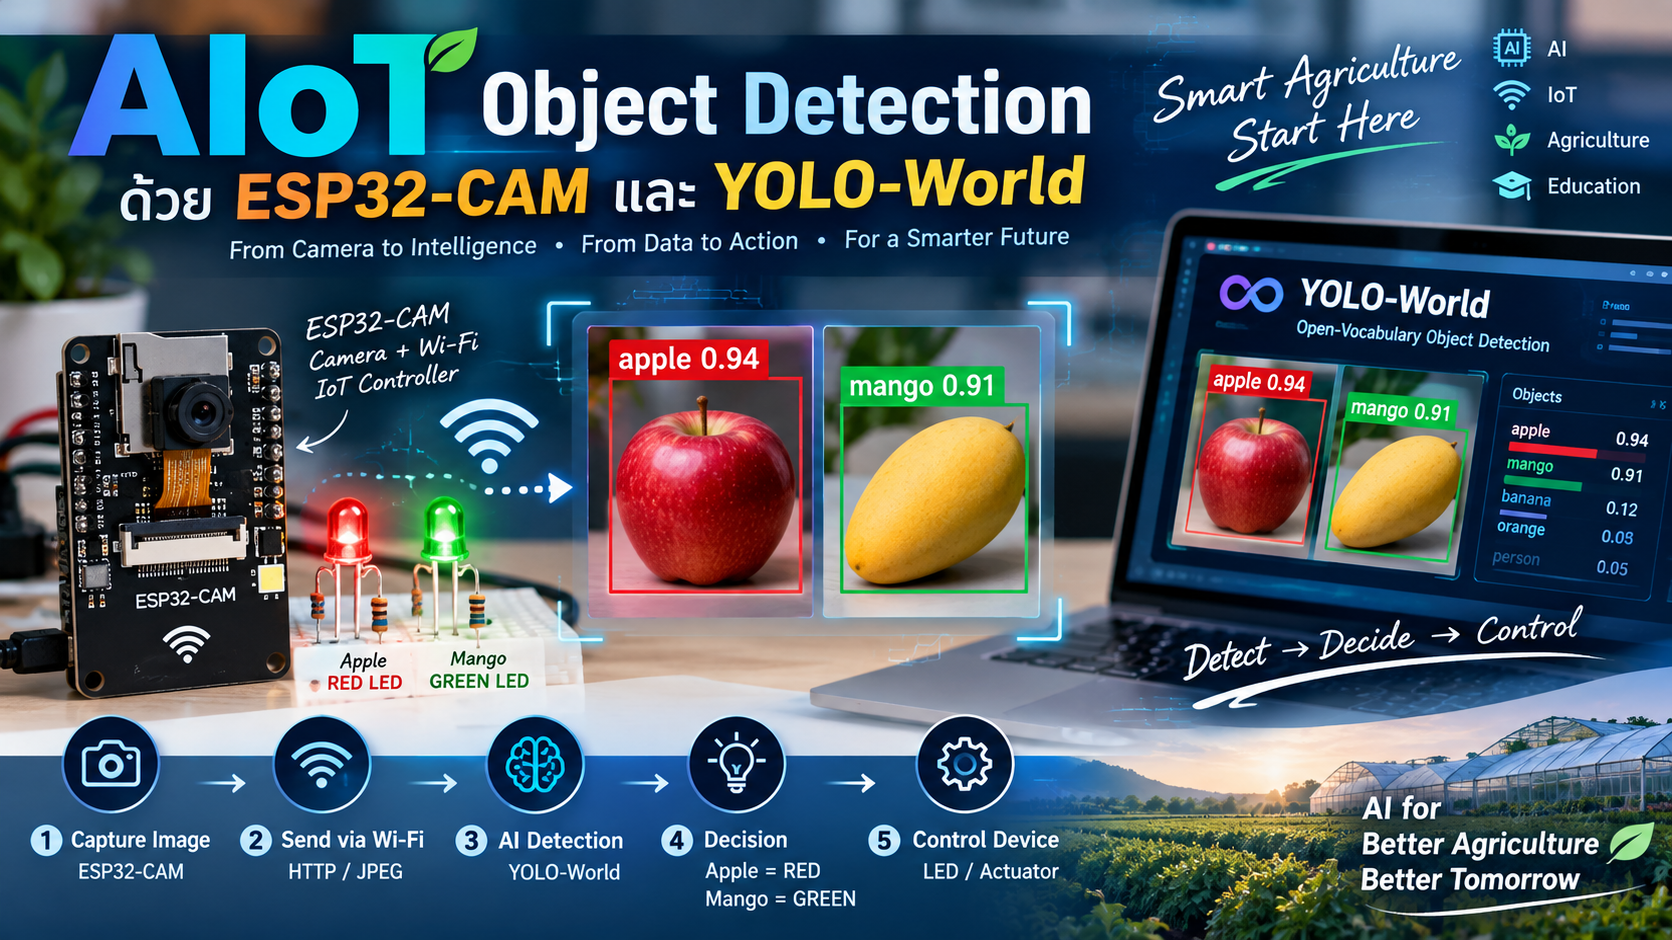
เอกสารประกอบการสอน
LAB: AIoT Object Detection ด้วย ESP32-CAM และ YOLO-World
การตรวจจับ Apple และ Mango เพื่อควบคุม LED แบบอัจฉริยะ
รายวิชา: การประยุกต์ใช้ปัญญาประดิษฐ์ในวิศวกรรมเครื่องจักกลเกษตร
ผู้สอน: ผศ.ดร.เฉลิมชัย หล่อวงศ์ตระกูล
หัวข้อ: Computer Vision, Object Detection และ AIoT
ระดับ: นักศึกษามหาวิทยาลัย
ระยะเวลาแนะนำ: 3–4 ชั่วโมง
1. ที่มาและความสำคัญ
ปัจจุบันเทคโนโลยีปัญญาประดิษฐ์ (Artificial Intelligence: AI) โดยเฉพาะ Computer Vision สามารถทำให้คอมพิวเตอร์หรืออุปกรณ์อิเล็กทรอนิกส์เข้าใจข้อมูลจากภาพได้ เช่น การตรวจจับวัตถุ การจำแนกประเภทของผลผลิตทางการเกษตร การตรวจสอบคุณภาพผลไม้ และการตรวจจับโรคหรือศัตรูพืช
ในงานด้านการเกษตร เทคโนโลยีดังกล่าวสามารถนำมาประยุกต์ใช้กับระบบ Smart Farm เพื่อช่วยลดการพึ่งพาการตรวจสอบด้วยมนุษย์ และทำให้ระบบสามารถตอบสนองต่อสิ่งที่ตรวจพบได้โดยอัตโนมัติ
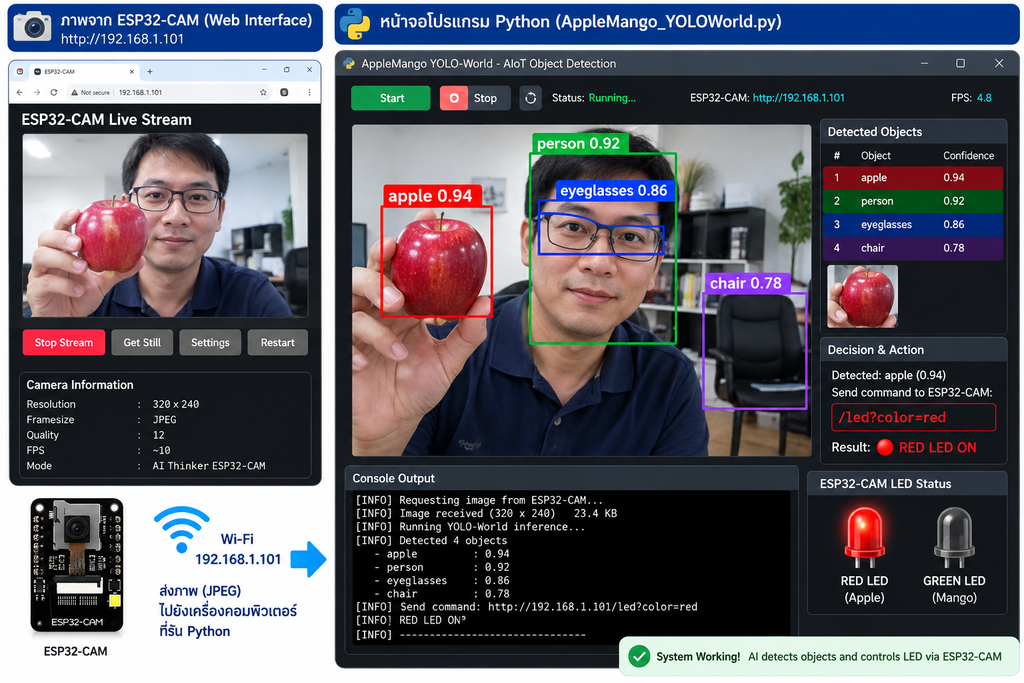
การทดลองนี้จึงนำ ESP32-CAM ซึ่งเป็นไมโครคอนโทรลเลอร์ที่มีกล้องในตัว มาใช้เป็นอุปกรณ์สำหรับรับภาพ และใช้คอมพิวเตอร์เป็นหน่วยประมวลผล AI โดยใช้ YOLO-World สำหรับตรวจจับวัตถุจากภาพ
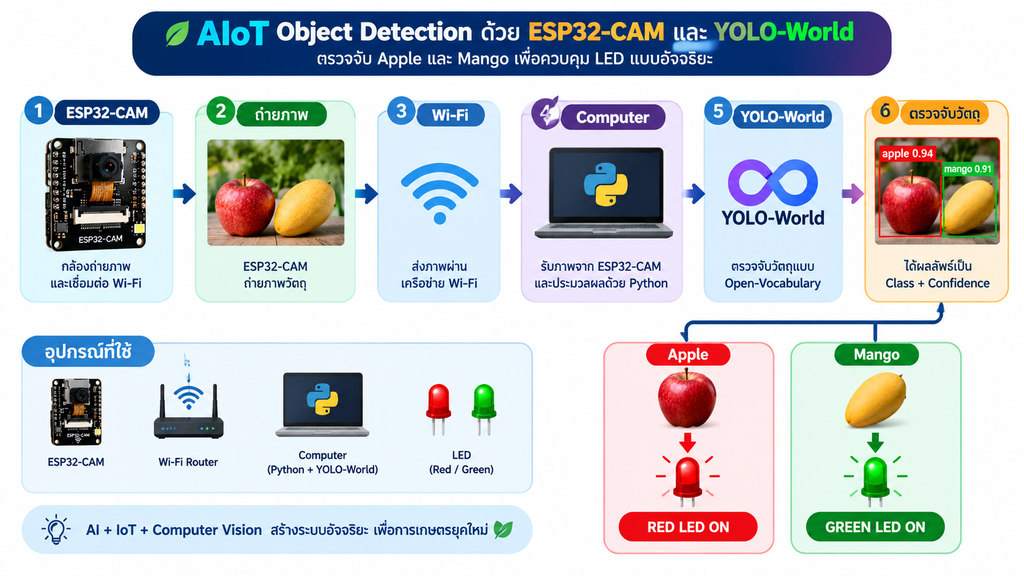
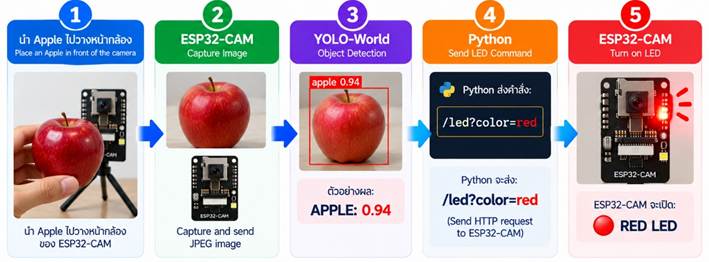
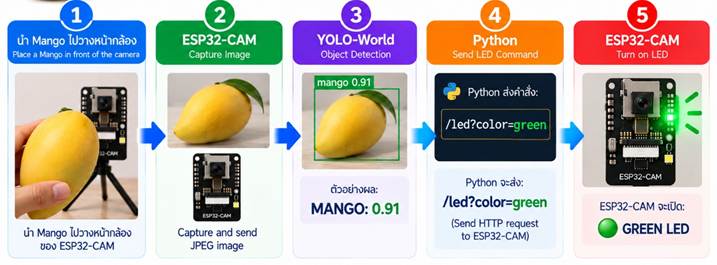
หาก AI ตรวจพบ Apple ระบบจะสั่งให้ LED สีแดงติด และหากตรวจพบ Mango ระบบจะสั่งให้ LED สีเขียวติด
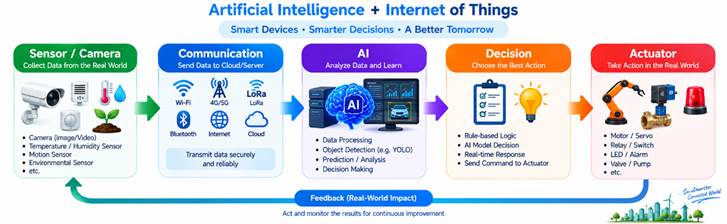
การทดลองนี้ช่วยให้นักศึกษาเข้าใจแนวคิดสำคัญของระบบ AIoT (Artificial Intelligence of Things) ซึ่งเป็นการนำ AI มาทำงานร่วมกับอุปกรณ์ IoT เพื่อให้ระบบสามารถ รับข้อมูล → วิเคราะห์ → ตัดสินใจ → สั่งงานอุปกรณ์ ได้อย่างอัตโนมัติ
2. วัตถุประสงค์
เมื่อจบการทดลอง นักศึกษาสามารถ:
- อธิบายหลักการทำงานของ Computer Vision และ Object Detection ได้
- อธิบายหลักการทำงานของ YOLO-World ในการตรวจจับวัตถุได้
- เชื่อมต่อ ESP32-CAM เข้ากับเครือข่าย Wi-Fi ได้
- ใช้ ESP32-CAM ถ่ายภาพและส่งภาพผ่าน HTTP ได้
- ใช้ Python และ YOLO-World วิเคราะห์ภาพจาก ESP32-CAM ได้
- เชื่อมโยงผลการตรวจจับ AI กับการควบคุมอุปกรณ์ IoT
- เขียนโปรแกรมควบคุม LED ตามผลการตรวจจับวัตถุได้
- อธิบายสถาปัตยกรรมของระบบ AIoT ได้
3. อุปกรณ์ที่ต้องเตรียม
3.1 Hardware
| ลำดับ | อุปกรณ์ | จำนวน | หน้าที่ |
| 1 | ESP32-CAM AI-Thinker | 1 | กล้องและ IoT Controller |
| 2 | USB-to-TTL Programmer | 1 | Upload โปรแกรม |
| 3 | LED สีแดง | 1 | แสดงผล Apple |
| 4 | LED สีเขียว | 1 | แสดงผล Mango |
| 5 | Resistor 220Ω | 2 | จำกัดกระแส LED |
| 6 | Breadboard | 1 | ต่อวงจรทดลอง |
| 7 | Jumper Wire | หลายเส้น | เชื่อมต่อวงจร |
| 8 | Computer/Laptop | 1 | รัน YOLO-World |
| 9 | Wi-Fi Router/Hotspot | 1 | เชื่อม ESP32-CAM กับ Computer |
หมายเหตุ: การทดลองนี้ไม่ใช้ MicroSD เพราะ GPIO12 และ GPIO13 ถูกนำมาใช้ควบคุม LED
4. Software ที่ต้องเตรียม
ฝั่ง ESP32-CAM
- Arduino IDE
- ESP32 Board Package
ฝั่ง Computer
- Python 3.x
- Ultralytics
- OpenCV
- Requests
- NumPy
ติดตั้งด้วยคำสั่ง:
pip install ultralytics opencv-python requests numpy
5. โครงสร้างระบบ
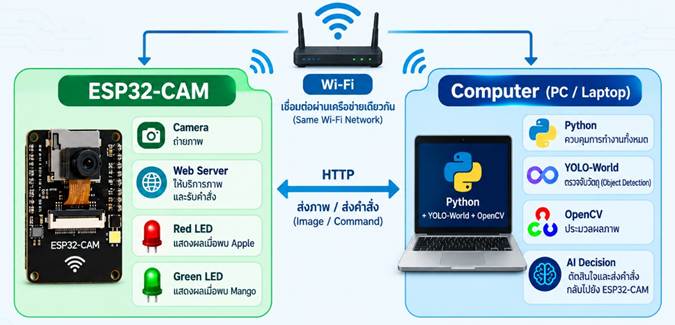
ระบบแบ่งออกเป็น 2 ฝั่ง
ฝั่งที่ 1: ESP32-CAM
ทำหน้าที่
- ถ่ายภาพ
- เชื่อม Wi-Fi
- เปิด HTTP Server
- ส่งภาพให้ Computer
- รับคำสั่งควบคุม LED
ฝั่งที่ 2: Computer
ทำหน้าที่
- Request ภาพจาก ESP32-CAM
- ใช้ YOLO-World วิเคราะห์ภาพ
- ตรวจว่าเป็น Apple หรือ Mango
- ตรวจ Confidence
- ส่งคำสั่งกลับไปยัง ESP32-CAM
6. การกำหนด IP Address
ตัวอย่างเครือข่าย:
Router
192.168.1.1
กำหนด:
Computer
192.168.1.100
ESP32-CAM
192.168.1.101
ดังนั้นใน Python:
ESP32_CAM_IP = “192.168.1.101”
ข้อควรจำ: IP 192.168.1.100 เป็น IP ของ Computer ไม่ใช่ IP ของ ESP32-CAM
ทั้ง Computer และ ESP32-CAM ต้องเชื่อมต่อ Wi-Fi Network เดียวกัน
7. การต่อวงจร GPIO
สำหรับ ESP32-CAM AI-Thinker กำหนดดังนี้
| อุปกรณ์ | ESP32-CAM GPIO |
| 🔴 Red LED | GPIO13 |
| 🟢 Green LED | GPIO12 |
| LED GND | GND |
| LED แต่ละดวง | ผ่าน Resistor 220Ω |
วงจร
ESP32-CAM
GPIO13 ─── 220Ω ───► 🔴 RED LED ───► GND
GPIO12 ─── 220Ω ───► 🟢 GREEN LED ─► GND
เมื่อ:
digitalWrite(13, HIGH);
→ LED แดงติด
และ
digitalWrite(12, HIGH);
→ LED เขียวติด
8. ข้อควรระวังเกี่ยวกับ GPIO12 และ GPIO13
ESP32-CAM AI-Thinker มี GPIO หลายขาที่ถูกใช้งานร่วมกับกล้องและ MicroSD
ใน Lab นี้
GPIO12 → Green LED
GPIO13 → Red LED
ดังนั้น
ไม่ใช้ MicroSD Card
เพื่อหลีกเลี่ยงปัญหา GPIO ทำงานซ้ำซ้อนกัน
9. ทฤษฎีที่เกี่ยวข้อง
9.1 Artificial Intelligence

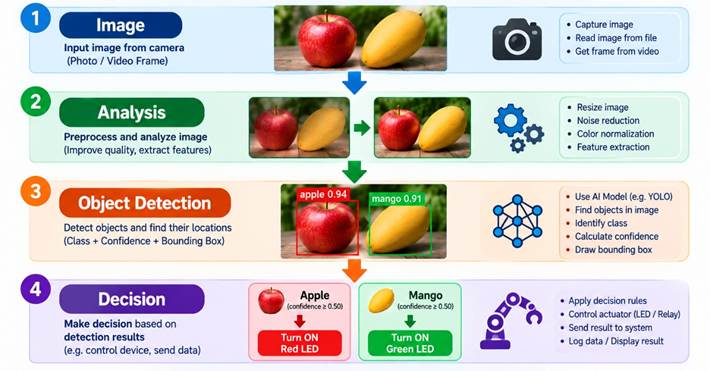
ในการทดลองนี้ AI ทำหน้าที่:
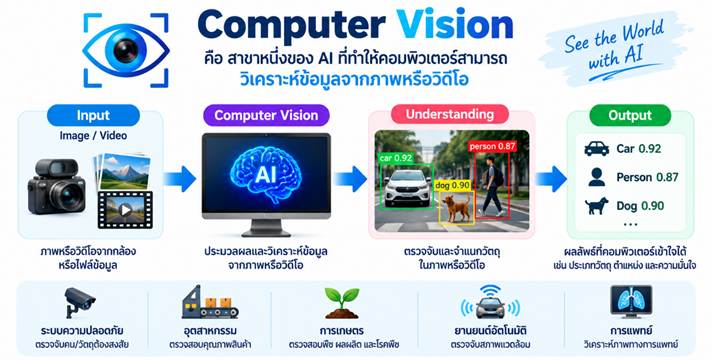
9.2 Computer Vision
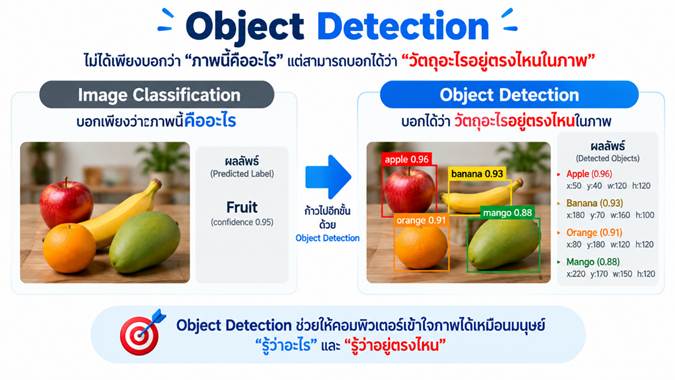
9.3 Object Detection
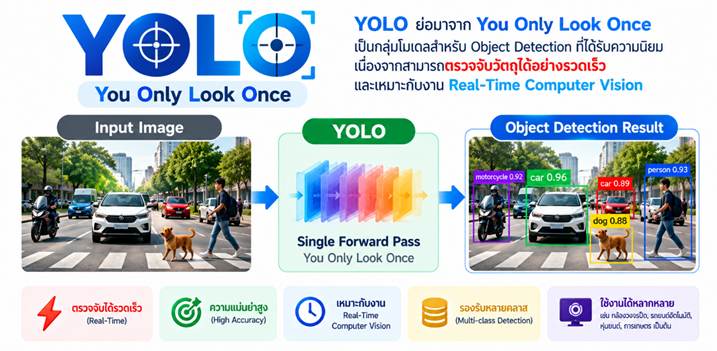
9.4 YOLO
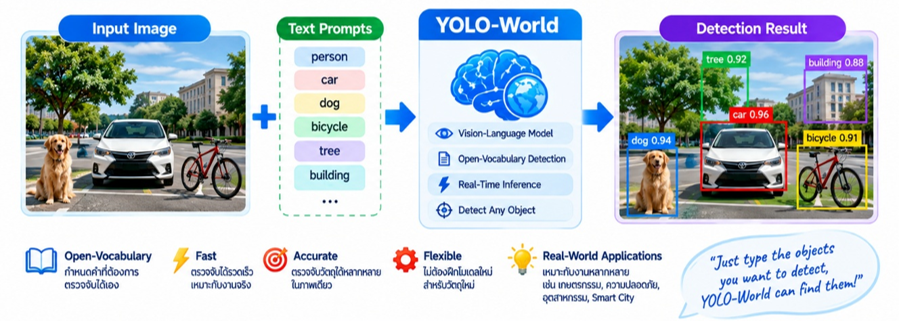
9.5 YOLO-World
YOLO-World เป็นแนวทางของ YOLO ที่รองรับ Open-Vocabulary Object Detection
จุดเด่นสำหรับการเรียนการสอนคือ สามารถกำหนดคำที่ต้องการตรวจจับ เช่น
CLASSES = [“apple”, “mango”]
ทำให้เราสามารถทดลอง Object Detection กับวัตถุที่สนใจได้อย่างรวดเร็ว โดยไม่จำเป็นต้องเริ่มต้นจากการสร้าง Dataset และ Train โมเดลใหม่ทุกครั้ง
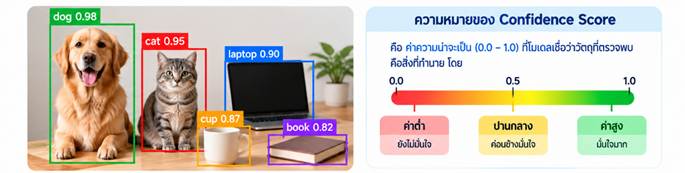
9.6 Confidence Score
9.7 AIoT
10. ขั้นตอนการทำ LAB
ขั้นที่ 1: เตรียม ESP32-CAM
ติดตั้ง Arduino IDE และ ESP32 Board Package
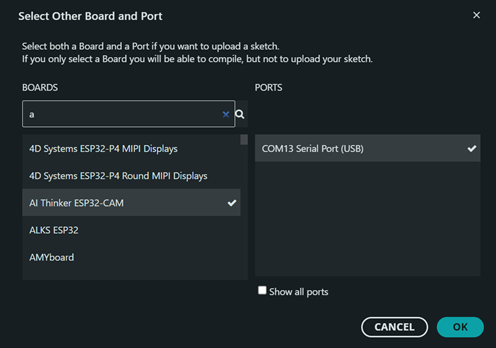
เลือก Board ให้ตรงกับบอร์ดที่ใช้
สำหรับ ESP32-CAM AI-Thinker ให้เลือก:
AI Thinker ESP32-CAM
ขั้นที่ 2: ต่อ LED
GPIO13 → 220Ω → Red LED → GND
GPIO12 → 220Ω → Green LED → GND
ตรวจสอบขั้ว LED ให้ถูกต้อง
ขั้นที่ 3: แก้ Wi-Fi ใน ESP32-CAM
เปิด:
AppleMango_ESP32CAM.ino
แก้:
const char* WIFI_SSID = “YOUR_WIFI_NAME”;
const char* WIFI_PASSWORD = “YOUR_WIFI_PASSWORD”;
เป็น Wi-Fi จริง เช่น:
const char* WIFI_SSID = “SmartFarm”;
const char* WIFI_PASSWORD = “12345678”;
ขั้นที่ 4: Upload โปรแกรม
เชื่อม USB-to-TTL กับ ESP32-CAM
จากนั้น Upload:
AppleMango_ESP32CAM.ino
เปิด Serial Monitor:
115200 baud
หากสำเร็จจะเห็น:
[WiFi] Connected!
[WiFi] IP Address: 192.168.1.101
[CAMERA] Camera initialized.
[HTTP] Server started.
SYSTEM READY
ขั้นที่ 5: ทดสอบ ESP32-CAM
เปิด Browser บน Computer
ใส่:
http://192.168.1.101/
ควรพบหน้า:
ESP32-CAM Apple & Mango
RED ON
GREEN ON
LED OFF
Test Camera Capture
ขั้นที่ 6: ทดสอบ LED
กด:
RED ON
ต้องได้:
🔴 RED LED ON
กด:
GREEN ON
ต้องได้:
🟢 GREEN LED ON
ถ้าทำงานได้ แสดงว่า ESP32-CAM + GPIO + LED + Wi-Fi ทำงานถูกต้อง
ขั้นที่ 7: ทดสอบ Camera
เปิด:
http://192.168.1.101/capture
ถ้าถูกต้อง Browser จะแสดงภาพจากกล้อง
ขั้นที่ 8: เตรียม Computer
ติดตั้ง Library:
pip install ultralytics opencv-python requests numpy
เตรียมไฟล์:
AppleMango_YOLOWorld.py
และไฟล์โมเดล:
yolov8s-worldv2.pt
ขั้นที่ 9: กำหนด IP ของ ESP32-CAM
ใน Python:
ESP32_CAM_IP = “192.168.1.101”
ต้องเป็น IP ของ ESP32-CAM
ขั้นที่ 10: กำหนด Object ที่ต้องการตรวจจับ
ใน Python:
CLASSES = [“apple”, “mango”]
หมายความว่าเราสนใจเพียง 2 Class:
0 = apple
1 = mango
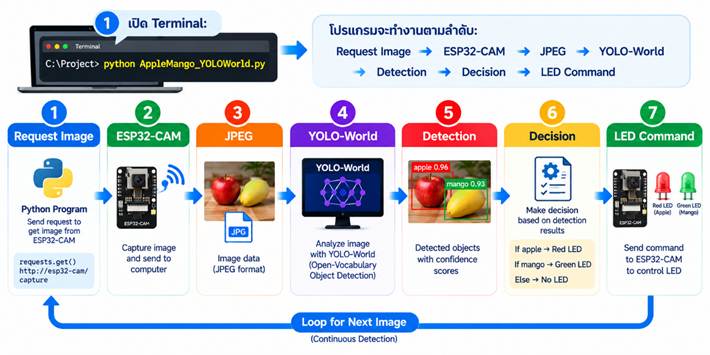
ขั้นที่ 11: Run YOLO-World
เปิด Terminal
พิมพ์ : python AppleMango_YOLOWorld.py
ขั้นที่ 12: ทดลองด้วย Apple
ขั้นที่ 13: ทดลองด้วยมะม่วง
11. โค้ดระบบฝั่งที่ 1: ESP32-CAM
ไฟล์:
AppleMango_ESP32CAM.ino
#include "esp_camera.h"
#include <WiFi.h>
#include <WebServer.h>

const char* WIFI_SSID = "YOUR_WIFI_NAME";
const char* WIFI_PASSWORD = "YOUR_WIFI_PASSWORD";

#define RED_LED_PIN 13
#define GREEN_LED_PIN 12

#define PWDN_GPIO_NUM     32
#define RESET_GPIO_NUM    -1
#define XCLK_GPIO_NUM      0
#define SIOD_GPIO_NUM     26
#define SIOC_GPIO_NUM     27

#define Y9_GPIO_NUM       35
#define Y8_GPIO_NUM       34
#define Y7_GPIO_NUM       39
#define Y6_GPIO_NUM       36
#define Y5_GPIO_NUM       21
#define Y4_GPIO_NUM       19
#define Y3_GPIO_NUM       18
#define Y2_GPIO_NUM        5
#define VSYNC_GPIO_NUM    25
#define HREF_GPIO_NUM     23
#define PCLK_GPIO_NUM     22

WebServer server(80);

void ledOff() {
  digitalWrite(RED_LED_PIN, LOW);
  digitalWrite(GREEN_LED_PIN, LOW);
}

void ledRed() {
  digitalWrite(RED_LED_PIN, HIGH);
  digitalWrite(GREEN_LED_PIN, LOW);
}

void ledGreen() {
  digitalWrite(RED_LED_PIN, LOW);
  digitalWrite(GREEN_LED_PIN, HIGH);
}

void handleCapture() {
  camera_fb_t* fb = esp_camera_fb_get();

  if (!fb) {
    server.send(500, "text/plain", "Camera capture failed");
    return;
  }

  server.send_P(
    200,
    "image/jpeg",
    (const char*)fb->buf,
    fb->len
  );

  esp_camera_fb_return(fb);
}

void handleLED() {

  if (!server.hasArg("color")) {
    server.send(400, "text/plain", "Missing color");
    return;
  }

  String color = server.arg("color");
  color.toLowerCase();

  if (color == "red") {
    ledRed();
    server.send(200, "text/plain", "RED LED ON");
  } else if (color == "green") {
    ledGreen();
    server.send(200, "text/plain", "GREEN LED ON");
  } else if (color == "off") {
    ledOff();
    server.send(200, "text/plain", "ALL LED OFF");
  } else {
    server.send(400, "text/plain", "Unknown color");
  }
}

bool initCamera() {

  camera_config_t config;

  config.ledc_channel = LEDC_CHANNEL_0;
  config.ledc_timer = LEDC_TIMER_0;

  config.pin_d0 = Y2_GPIO_NUM;
  config.pin_d1 = Y3_GPIO_NUM;
  config.pin_d2 = Y4_GPIO_NUM;
  config.pin_d3 = Y5_GPIO_NUM;
  config.pin_d4 = Y6_GPIO_NUM;
  config.pin_d5 = Y7_GPIO_NUM;
  config.pin_d6 = Y8_GPIO_NUM;
  config.pin_d7 = Y9_GPIO_NUM;

  config.pin_xclk = XCLK_GPIO_NUM;
  config.pin_pclk = PCLK_GPIO_NUM;
  config.pin_vsync = VSYNC_GPIO_NUM;
  config.pin_href = HREF_GPIO_NUM;

  config.pin_sccb_sda = SIOD_GPIO_NUM;
  config.pin_sccb_scl = SIOC_GPIO_NUM;

  config.pin_pwdn = PWDN_GPIO_NUM;
  config.pin_reset = RESET_GPIO_NUM;

  config.xclk_freq_hz = 20000000;
  config.pixel_format = PIXFORMAT_JPEG;

  if (psramFound()) {
    config.frame_size = FRAMESIZE_VGA;
    config.jpeg_quality = 10;
    config.fb_count = 2;
  } else {
    config.frame_size = FRAMESIZE_QVGA;
    config.jpeg_quality = 12;
    config.fb_count = 1;
  }

  return esp_camera_init(&config) == ESP_OK;
}

void setup() {

  Serial.begin(115200);

  pinMode(RED_LED_PIN, OUTPUT);
  pinMode(GREEN_LED_PIN, OUTPUT);

  ledOff();

  if (!initCamera()) {
    Serial.println("Camera initialization failed.");
    while (true) {
      delay(1000);
    }
  }

  WiFi.begin(WIFI_SSID, WIFI_PASSWORD);

  Serial.print("Connecting WiFi");

  while (WiFi.status() != WL_CONNECTED) {
    delay(500);
    Serial.print(".");
  }

  Serial.println();
  Serial.println("WiFi Connected");
  Serial.print("IP Address: ");
  Serial.println(WiFi.localIP());

  server.on("/capture", HTTP_GET, handleCapture);
  server.on("/led", HTTP_GET, handleLED);

  server.begin();

  Serial.println("HTTP Server Started");
}

void loop() {
  server.handleClient();
}
โค้ดเต็มที่จัดเตรียมไว้ก่อนหน้านี้อยู่ในไฟล์ AppleMango_ESP32CAM.ino และมีหน้า Web สำหรับทดสอบ LED ด้วย
12. โค้ดระบบฝั่งที่ 2: Computer + YOLO-World
ไฟล์:
AppleMango_YOLOWorld.py
"""
AppleMango_YOLOWorld.py
ESP32-CAM + YOLO-World + Red/Green LED

Install:
    pip install ultralytics opencv-python requests

Run:
    python AppleMango_YOLOWorld.py

Change ESP32_CAM_IP to the IP address of your ESP32-CAM.

Expected ESP32-CAM HTTP endpoints:
    GET /capture
    GET /led?color=red
    GET /led?color=green
    GET /led?color=off
"""

import time
import cv2
import requests
import numpy as np
from ultralytics import YOLO

# ============================================================
# SETTINGS
# ============================================================

ESP32_CAM_IP = "192.168.1.100"       # <-- CHANGE THIS
CAPTURE_URL = f"http://{ESP32_CAM_IP}/capture"
LED_URL = f"http://{ESP32_CAM_IP}/led"

MODEL_FILE = "yolov8s-worldv2.pt"

# YOLO-World vocabulary
CLASSES = ["apple", "mango"]

CONFIDENCE_THRESHOLD = 0.50
HTTP_TIMEOUT = 5
LOOP_DELAY = 0.05

# If both Apple and Mango are detected:
# BOTH_OFF, APPLE_PRIORITY, or MANGO_PRIORITY
BOTH_POLICY = "BOTH_OFF"

SAVE_RESULT_IMAGE = True
RESULT_IMAGE_FILE = "AppleMango_result.jpg"

# ============================================================
# ESP32-CAM
# ============================================================

def capture_from_esp32():
    try:
        response = requests.get(CAPTURE_URL, timeout=HTTP_TIMEOUT)

        if response.status_code != 200:
            print(f"[ESP32] Capture error: HTTP {response.status_code}")
            return None

        image_array = np.frombuffer(response.content, dtype=np.uint8)
        frame = cv2.imdecode(image_array, cv2.IMREAD_COLOR)

        if frame is None:
            print("[ESP32] Invalid JPEG received.")
            return None

        return frame

    except requests.RequestException as e:
        print(f"[ESP32] Connection error: {e}")
        return None


def set_led(color):
    try:
        response = requests.get(
            LED_URL,
            params={"color": color},
            timeout=HTTP_TIMEOUT
        )

        if response.status_code == 200:
            print(f"[LED] {color.upper()}")
        else:
            print(f"[LED] Error: HTTP {response.status_code}")

    except requests.RequestException as e:
        print(f"[LED] Connection error: {e}")

# ============================================================
# YOLO-WORLD
# ============================================================

print("=" * 60)
print(" Apple + Mango Object Detection")
print(" ESP32-CAM + YOLO-World")
print("=" * 60)
print(f"[INFO] ESP32-CAM : {ESP32_CAM_IP}")
print(f"[INFO] Model     : {MODEL_FILE}")
print(f"[INFO] Classes   : {CLASSES}")
print(f"[INFO] Threshold : {CONFIDENCE_THRESHOLD}")
print()

print("[AI] Loading YOLO-World model...")
model = YOLO(MODEL_FILE)
model.set_classes(CLASSES)
print("[AI] Model loaded.")
print("[INFO] Press Q to quit.")
print()

# ============================================================
# MAIN LOOP
# ============================================================

last_led = "off"

while True:
    frame = capture_from_esp32()

    if frame is None:
        if last_led != "off":
            set_led("off")
            last_led = "off"
        time.sleep(1)
        continue

    # YOLO-World inference
    results = model.predict(
        source=frame,
        conf=CONFIDENCE_THRESHOLD,
        verbose=False
    )

    result = results[0]

    apple_found = False
    mango_found = False
    best_apple_conf = 0.0
    best_mango_conf = 0.0

    # Process detections
    if result.boxes is not None:
        for box in result.boxes:
            cls_id = int(box.cls[0])
            confidence = float(box.conf[0])

            x1, y1, x2, y2 = map(
                int,
                box.xyxy[0].tolist()
            )

            if 0 <= cls_id < len(CLASSES):
                class_name = CLASSES[cls_id]
            else:
                continue

            if class_name == "apple":
                apple_found = True
                best_apple_conf = max(best_apple_conf, confidence)
            elif class_name == "mango":
                mango_found = True
                best_mango_conf = max(best_mango_conf, confidence)

            # Bounding box
            cv2.rectangle(
                frame,
                (x1, y1),
                (x2, y2),
                (255, 255, 255),
                2
            )

            label = f"{class_name}: {confidence:.2f}"

            cv2.putText(
                frame,
                label,
                (x1, max(y1 - 10, 20)),
                cv2.FONT_HERSHEY_SIMPLEX,
                0.7,
                (255, 255, 255),
                2
            )

    # ========================================================
    # DECISION
    # ========================================================

    if apple_found and mango_found:
        print(
            f"[AI] Apple={best_apple_conf:.2f}, "
            f"Mango={best_mango_conf:.2f}"
        )

        if BOTH_POLICY == "APPLE_PRIORITY":
            decision = "apple"
        elif BOTH_POLICY == "MANGO_PRIORITY":
            decision = "mango"
        else:
            decision = "off"

    elif apple_found:
        decision = "apple"
        print(f"[AI] APPLE detected: {best_apple_conf:.2f}")

    elif mango_found:
        decision = "mango"
        print(f"[AI] MANGO detected: {best_mango_conf:.2f}")

    else:
        decision = "off"
        print("[AI] No Apple/Mango detected.")

    # ========================================================
    # LED CONTROL
    # ========================================================

    if decision == "apple":
        if last_led != "red":
            set_led("red")
            last_led = "red"

    elif decision == "mango":
        if last_led != "green":
            set_led("green")
            last_led = "green"

    else:
        if last_led != "off":
            set_led("off")
            last_led = "off"

    # ========================================================
    # DISPLAY
    # ========================================================

    if decision == "apple":
        decision_text = "APPLE -> RED LED"
    elif decision == "mango":
        decision_text = "MANGO -> GREEN LED"
    else:
        decision_text = "NO TARGET -> LED OFF"

    cv2.putText(
        frame,
        decision_text,
        (20, 40),
        cv2.FONT_HERSHEY_SIMPLEX,
        0.9,
        (255, 255, 255),
        2
    )

    if SAVE_RESULT_IMAGE:
        cv2.imwrite(RESULT_IMAGE_FILE, frame)

    cv2.imshow(
        "ESP32-CAM + YOLO-World | Apple & Mango",
        frame
    )

    key = cv2.waitKey(1) & 0xFF
    if key == ord("q") or key == ord("Q"):
        break

    time.sleep(LOOP_DELAY)

# ============================================================
# EXIT
# ============================================================

print("[INFO] Turning LEDs OFF...")
set_led("off")
cv2.destroyAllWindows()
print("[INFO] Program stopped.")
CLASSES = [
    "apple",
    "mango",
    "glass",
    "chair",
    "person",
    "eyeglasses"
]
เราสามารถทำให้ LED แสดงผลตาม Object ได้ เช่น
if apple_found:
    set_led("red")
elif mango_found:
    set_led("green")
elif chair_found:
    set_led("blue")
elif person_found:
    set_led("yellow")
else:
    set_led("off")