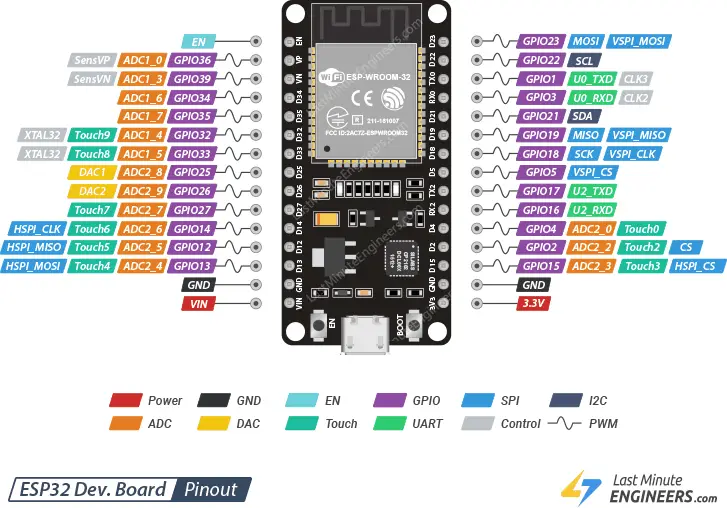
ภาพ esp32 pinout
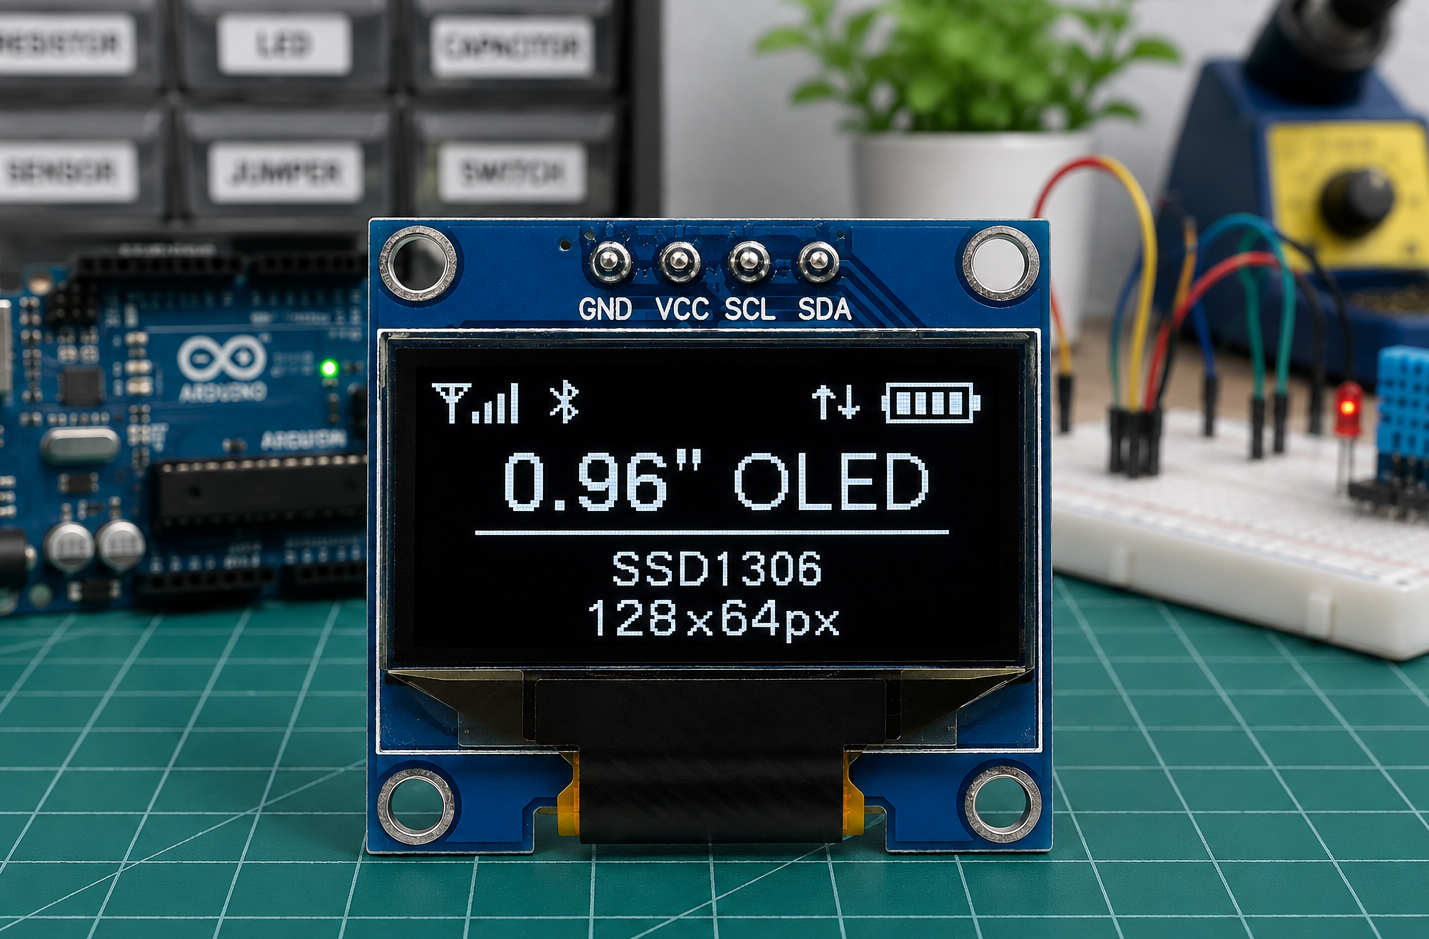
SSD1306Pinout
Library Installation
The SSD1306 controller used in OLED displays is very flexible, but it can also be quite complicated to work with directly. To use it properly, you would normally need a good understanding of how memory addressing works, which can be tricky—especially for beginners.
Luckily, we don’t have to worry about all that. The Adafruit SSD1306 library was created to make things much easier. This library takes care of all the complex stuff behind the scenes, so you can control your OLED display using simple and easy-to-understand commands.
To install the library,
- First open your Arduino IDE program. Then click on the Library Manager icon on the left sidebar.
- Type “adafruit ssd1306” in the search box to filter your results.
- Look for the Adafruit SSD1306 Library by Adafruit.
- Click the Install button to add it to your Arduino IDE.

Since the Adafruit SSD1306 Library relies on other libraries to function, you will be prompted to install its dependencies, which include the Adafruit Bus IO Library and the Adafruit GFX Library.
When this message appears, simply click INSTALL ALL to ensure everything is set up correctly.

Arduino Example 1 – Displaying Text
Now comes the fun part—let’s start displaying some cool stuff on the OLED screen!
The sketch below shows you how to:
- Display simple text
- Display inverted text
- Display numbers
- Display numbers with base (Hex, Dec)
- Display ASCII symbols
- Scroll text horizontally and vertically
- Scroll part of the display
Once you understand this example, you’ll be well on your way to building more creative and advanced projects with your OLED display.
#include <SPI.h>
#include <Wire.h>
#include <Adafruit_GFX.h>
#include <Adafruit_SSD1306.h>

#define SCREEN_WIDTH 128  // OLED display width, in pixels
#define SCREEN_HEIGHT 64  // OLED display height, in pixels

// Declaration for SSD1306 display connected using I2C
#define OLED_RESET -1  // Reset pin # (or -1 if sharing Arduino reset pin)
#define SCREEN_ADDRESS 0x3C
Adafruit_SSD1306 display(SCREEN_WIDTH, SCREEN_HEIGHT, &Wire, OLED_RESET);

// Declaration for SSD1306 display connected using software SPI:
//#define OLED_MOSI   9
//#define OLED_CLK   10
//#define OLED_DC    11
//#define OLED_CS    12
//#define OLED_RESET 13
//Adafruit_SSD1306 display(SCREEN_WIDTH, SCREEN_HEIGHT, OLED_MOSI, OLED_CLK, OLED_DC, OLED_RESET, OLED_CS);

void setup() {
  Serial.begin(9600);

  // initialize the OLED object
  if (!display.begin(SSD1306_SWITCHCAPVCC, SCREEN_ADDRESS)) {
    Serial.println(F("SSD1306 allocation failed"));
    for (;;)
      ;  // Don't proceed, loop forever
  }

  // Uncomment this if you are using SPI
  //if(!display.begin(SSD1306_SWITCHCAPVCC)) {
  //  Serial.println(F("SSD1306 allocation failed"));
  //  for(;;); // Don't proceed, loop forever
  //}

  // Clear the buffer.
  display.clearDisplay();

  // Display Text
  display.setTextSize(1);
  display.setTextColor(WHITE);
  display.setCursor(0, 28);
  display.println("Hello world!");
  display.display();
  delay(2000);
  display.clearDisplay();

  // Display Inverted Text
  display.setTextColor(BLACK, WHITE);  // 'inverted' text
  display.setCursor(0, 28);
  display.println("Hello world!");
  display.display();
  delay(2000);
  display.clearDisplay();

  // Changing Font Size
  display.setTextColor(WHITE);
  display.setCursor(0, 24);
  display.setTextSize(2);
  display.println("Hello!");
  display.display();
  delay(2000);
  display.clearDisplay();

  // Display Numbers
  display.setTextSize(1);
  display.setCursor(0, 28);
  display.println(123456789);
  display.display();
  delay(2000);
  display.clearDisplay();

  // Specifying Base For Numbers
  display.setCursor(0, 28);
  display.print("0x");
  display.print(0xFF, HEX);
  display.print("(HEX) = ");
  display.print(0xFF, DEC);
  display.println("(DEC)");
  display.display();
  delay(2000);
  display.clearDisplay();

  // Display ASCII Characters
  display.setCursor(0, 24);
  display.setTextSize(2);
  display.write(3);
  display.display();
  delay(2000);
  display.clearDisplay();

  // Scroll full screen
  display.setCursor(0, 0);
  display.setTextSize(1);
  display.println("Full");
  display.println("screen");
  display.println("scrolling!");
  display.display();
  display.startscrollright(0x00, 0x07);
  delay(2000);
  display.stopscroll();
  delay(1000);
  display.startscrollleft(0x00, 0x07);
  delay(2000);
  display.stopscroll();
  delay(1000);
  display.startscrolldiagright(0x00, 0x07);
  delay(2000);
  display.startscrolldiagleft(0x00, 0x07);
  delay(2000);
  display.stopscroll();
  display.clearDisplay();

  // Scroll part of the screen
  display.setCursor(0, 0);
  display.setTextSize(1);
  display.println("Scroll");
  display.println("some part");
  display.println("of the screen.");
  display.display();
  display.startscrollright(0x00, 0x00);
}

void loop() {
}
This is what the output looks like.

Code Explanation:
At the beginning, we include four libraries: SPI.h, Wire.h, Adafruit_GFX.h, and Adafruit_SSD1306.h. These libraries help the Arduino talk to the OLED display. Even though we’re using I2C (which doesn’t require the SPI library), we still include SPI to make sure the code compiles properly.
#include <SPI.h>
#include <Wire.h>
#include <Adafruit_GFX.h>
#include <Adafruit_SSD1306.h>
Next, we define the width and height of the screen in pixels. Most common OLED displays are 128 pixels wide and 64 pixels tall, so we set SCREEN_WIDTH to 128 and SCREEN_HEIGHT to 64.
Then, we create a display object using the Adafruit_SSD1306 library. We tell it the size of our screen—128 pixels wide and 64 pixels tall—and we let it know we’re using I2C. Since our OLED module doesn’t have a reset pin, we pass -1 to show that we’re not using one.
#define SCREEN_WIDTH 128 // OLED display width, in pixels
#define SCREEN_HEIGHT 64 // OLED display height, in pixels

// Declaration for SSD1306 display connected using I2C
#define OLED_RESET     -1 // Reset pin # (or -1 if sharing Arduino reset pin)
#define SCREEN_ADDRESS 0x3C
Adafruit_SSD1306 display(SCREEN_WIDTH, SCREEN_HEIGHT, &Wire, OLED_RESET);
This sketch uses the I2C protocol to communicate with the display. However, if you want to use SPI instead, it’s easy to switch. Just uncomment the following lines of code, and the sketch will work with the SPI protocol.
// Declaration for SSD1306 display connected using software SPI:
//#define OLED_MOSI   9
//#define OLED_CLK   10
//#define OLED_DC    11
//#define OLED_CS    12
//#define OLED_RESET 13
//Adafruit_SSD1306 display(SCREEN_WIDTH, SCREEN_HEIGHT, OLED_MOSI, OLED_CLK, OLED_DC, OLED_RESET, OLED_CS);
Inside the setup() function, we first begin serial communication to print messages to the Serial Monitor for debugging.
Then we call display.begin() to start communication with the OLED display. The first argument turns on the internal charge pump circuitry, which helps power the screen, and the second argument sets the I2C address (the I2C address of the screen is usually 0x3C, but some displays use 0x3D, so you’d change it if needed). If the display doesn’t start correctly, we show an error message and stop the program.
Serial.begin(9600);

// initialize the OLED object
if(!display.begin(SSD1306_SWITCHCAPVCC, SCREEN_ADDRESS)) {
  Serial.println(F("SSD1306 allocation failed"));
  for(;;); // Don't proceed, loop forever
}

// Uncomment this if you are using SPI
//if(!display.begin(SSD1306_SWITCHCAPVCC)) {
//  Serial.println(F("SSD1306 allocation failed"));
//  for(;;); // Don't proceed, loop forever
//}
Once the display is ready, we clear the screen using display.clearDisplay(). This makes sure we’re working with a blank screen.
// Clear the buffer.
display.clearDisplay();
Displaying simple Text (Hello World)

// Display Text
display.setTextSize(1);
display.setTextColor(WHITE);
display.setCursor(0,28);
display.println("Hello world!");
display.display();
delay(2000);
To show text on the OLED screen, we first set the size of the text using the setTextSize() function. This function takes a number where 1 is the smallest size, and higher numbers make the text bigger.
Next, we choose the color of the text using setTextColor(). Since our OLED screen has a dark background, we usually use WHITE so the text stands out clearly.
Before printing anything, we tell the display where to start writing by setting the cursor position using setCursor(x, y). The x value controls how far from the left the text starts, and y controls how far from the top. The top-left corner is position (0, 0).
To actually show the message, we use println("Hello world!"). This works just like printing to the Serial Monitor and moves the cursor to the next line after printing.
Finally, we use display() to update the screen and show everything we’ve prepared in the code. The screen doesn’t update until you call this function.
Displaying Inverted Text

// Display Inverted Text
display.clearDisplay();
display.setTextColor(BLACK, WHITE); // 'inverted' text
display.setCursor(0,28);
display.println("Hello world!");
display.display();
delay(2000);
If you want to show text with the colors flipped (black text on a white background), you can do that by using the setTextColor() function again, but this time with two values. When we use setTextColor(BLACK, WHITE), we’re telling the display to draw black letters on a white rectangle. The reason we can pass two values now is because of something called “function overloading“—it just means the same function can behave differently depending on how many values we give it.
Scaling Font Size

// Changing Font Size
display.clearDisplay();
display.setTextColor(WHITE);
display.setCursor(0,24);
display.setTextSize(2);
display.println("Hello!");
display.display();
delay(2000);
Earlier in the sketch, we used the setTextSize() function and passed the number 1 to set the default font size. But you’re not limited to just that—you can make the text bigger by passing a larger number instead.
For example, calling setTextSize(2) will make the text twice as big as size 1. You can use any whole number (like 2, 3, 4…) depending on how big you want the text to appear.
Note that each character on the OLED screen is drawn in a rectangular box with a width-to-height ratio of 7:10. So:
- Font size 1 draws each character at 7×10 pixels
- Font size 2 draws each character at 14×20 pixels
- Font size 3 would be 21×30 pixels, and so on
Displaying Numbers

// Display Numbers
display.clearDisplay();
display.setTextSize(1);
display.setCursor(0,28);
display.println(123456789);
display.display();
delay(2000);
Just like with text, you can use print() or println() to show numbers on the screen. These functions accept 32-bit unsigned integer values, meaning you can display numbers ranging from 0 to 4,294,967,295.
Specifying Base For Numbers

// Specifying Base For Numbers
display.clearDisplay();
display.setCursor(0,28);
display.print("0x"); display.print(0xFF, HEX);
display.print("(HEX) = ");
display.print(0xFF, DEC);
display.println("(DEC)");
display.display();
delay(2000);
Sometimes, you might want to show a number in a different format, like binary (base 2), octal (base 8), decimal (base 10), or hexadecimal (base 16). The print() and println() functions let you do this by adding a second parameter that tells it which format to use. For example, print(78, BIN) shows 1001110, while print(78, HEX) shows 4E.
This second parameter can also be used for decimal numbers to control how many digits appear after the decimal. For instance, print(1.23456, 2) will show 1.23, and print(1.23456, 4) will show 1.2346.
Displaying ASCII Symbols

// Display ASCII Characters
display.clearDisplay();
display.setCursor(0,24);
display.setTextSize(2);
display.write(3);
display.display();
delay(2000);
You can also show special symbols using the write() function. This works a bit differently than print()—instead of regular text, it sends a number that represents an ASCII symbol directly to the screen. For example, write(3) will display a heart symbol. It’s a fun way to add icons to your display!
Full Screen Scrolling

// Scroll full screen
display.clearDisplay();
display.setCursor(0,0);
display.setTextSize(1);
display.println("Full");
display.println("screen");
display.println("scrolling!");
display.display();
display.startscrollright(0x00, 0x07);
delay(2000);
display.stopscroll();
delay(1000);
display.startscrollleft(0x00, 0x07);
delay(2000);
display.stopscroll();
delay(1000);
display.startscrolldiagright(0x00, 0x07);
delay(2000);
display.startscrolldiagleft(0x00, 0x07);
delay(2000);
display.stopscroll();
If you want your message to move across the screen, you can make it scroll. First, you display the message normally using the steps we’ve learned. Then, you use startscrollright() or startscrollleft() to make the text move in that direction. You can also use startscrolldiagright() or startscrolldiagleft() to scroll diagonally.
Each of these functions requires two parameters: the start page and the stop page. For more information on the pages, refer to the OLED Memory Map section. Since the display has eight pages, numbered from 0 to 7, you can scroll the entire screen by scrolling through all the pages. To do this, simply pass the parameters 0x00 (for the start page) and 0x07 (for the stop page).
When you want the scrolling to stop, just use stopscroll().
Scrolling Specific Part

// Scroll part of the screen
display.setCursor(0,0);
display.setTextSize(1);
display.println("Scroll");
display.println("some part");
display.println("of the screen.");
display.display();
display.startscrollright(0x00, 0x00);
Sometimes, you might not want to scroll the entire screen, but just a part of it. You can do this by providing the correct start and stop page values to the scrolling functions. For example, if you pass 0x00 for both the start and stop page, it will only scroll the first page of the display.
Arduino Example 2 – Basic Drawings
This example sketch shows how you can draw simple shapes like rectangles, circles, and triangles on the OLED display.
Go ahead and upload the sketch to your Arduino to see how it works before we explain it in detail.
#include <SPI.h>
#include <Wire.h>
#include <Adafruit_GFX.h>
#include <Adafruit_SSD1306.h>

#define SCREEN_WIDTH 128  // OLED display width, in pixels
#define SCREEN_HEIGHT 64  // OLED display height, in pixels

// Declaration for SSD1306 display connected using I2C
#define OLED_RESET -1  // Reset pin # (or -1 if sharing Arduino reset pin)
#define SCREEN_ADDRESS 0x3C
Adafruit_SSD1306 display(SCREEN_WIDTH, SCREEN_HEIGHT, &Wire, OLED_RESET);

// Declaration for SSD1306 display connected using software SPI:
//#define OLED_MOSI   9
//#define OLED_CLK   10
//#define OLED_DC    11
//#define OLED_CS    12
//#define OLED_RESET 13
//Adafruit_SSD1306 display(SCREEN_WIDTH, SCREEN_HEIGHT, OLED_MOSI, OLED_CLK, OLED_DC, OLED_RESET, OLED_CS);

void setup() {
  Serial.begin(9600);

  // initialize the OLED object
  if (!display.begin(SSD1306_SWITCHCAPVCC, SCREEN_ADDRESS)) {
    Serial.println(F("SSD1306 allocation failed"));
    for (;;)
      ;  // Don't proceed, loop forever
  }

  // Uncomment this if you are using SPI
  //if(!display.begin(SSD1306_SWITCHCAPVCC)) {
  //  Serial.println(F("SSD1306 allocation failed"));
  //  for(;;); // Don't proceed, loop forever
  //}

  // Clear the buffer.
  display.clearDisplay();

  // Draw Rectangle
  display.setTextSize(1);
  display.setTextColor(WHITE);
  display.setCursor(0, 0);
  display.println("Rectangle");
  display.drawRect(0, 15, 60, 40, WHITE);
  display.display();
  delay(2000);
  display.clearDisplay();

  // Draw Filled Rectangle
  display.setTextSize(1);
  display.setTextColor(WHITE);
  display.setCursor(0, 0);
  display.println("Filled Rectangle");
  display.fillRect(0, 15, 60, 40, WHITE);
  display.display();
  delay(2000);
  display.clearDisplay();

  // Draw Round Rectangle
  display.setTextSize(1);
  display.setTextColor(WHITE);
  display.setCursor(0, 0);
  display.println("Round Rectangle");
  display.drawRoundRect(0, 15, 60, 40, 8, WHITE);
  display.display();
  delay(2000);
  display.clearDisplay();

  // Draw Filled Round Rectangle
  display.setTextSize(1);
  display.setTextColor(WHITE);
  display.setCursor(0, 0);
  display.println("Filled Round Rectangl");
  display.fillRoundRect(0, 15, 60, 40, 8, WHITE);
  display.display();
  delay(2000);
  display.clearDisplay();

  // Draw Circle
  display.setTextSize(1);
  display.setTextColor(WHITE);
  display.setCursor(0, 0);
  display.println("Circle");
  display.drawCircle(20, 35, 20, WHITE);
  display.display();
  delay(2000);
  display.clearDisplay();

  // Draw Filled Circle
  display.setTextSize(1);
  display.setTextColor(WHITE);
  display.setCursor(0, 0);
  display.println("Filled Circle");
  display.fillCircle(20, 35, 20, WHITE);
  display.display();
  delay(2000);
  display.clearDisplay();

  // Draw Triangle
  display.setTextSize(1);
  display.setTextColor(WHITE);
  display.setCursor(0, 0);
  display.println("Triangle");
  display.drawTriangle(30, 15, 0, 60, 60, 60, WHITE);
  display.display();
  delay(2000);
  display.clearDisplay();

  // Draw Filled Triangle
  display.setTextSize(1);
  display.setTextColor(WHITE);
  display.setCursor(0, 0);
  display.println("Filled Triangle");
  display.fillTriangle(30, 15, 0, 60, 60, 60, WHITE);
  display.display();
  delay(2000);
  display.clearDisplay();
}

void loop() {
}
This is what the output looks like.

You’ll notice that the code for setting up the display is exactly the same as in the previous example. The difference here is that we’re using new functions that let us draw shapes instead of just showing text.
Drawing Rectangle


display.clearDisplay();
display.setTextSize(1);
display.setTextColor(WHITE);
display.setCursor(0,0);
display.println("Rectangle");
display.drawRect(0, 15, 60, 40, WHITE);
display.display();
delay(2000);

display.clearDisplay();
display.setTextSize(1);
display.setTextColor(WHITE);
display.setCursor(0,0);
display.println("Filled Rectangle");
display.fillRect(0, 15, 60, 40, WHITE);
display.display();
delay(2000);
To draw a rectangle, we use the drawRect() function. This function needs five values: where to start drawing on the screen (the X and Y coordinates), how wide and tall the rectangle should be, and what color to draw it in. This function draws only the outline of the rectangle with a 1-pixel thick border.
If you want the rectangle to be filled in completely, you can use fillRect() instead.
Drawing Round Rectangle


display.clearDisplay();
display.setTextSize(1);
display.setTextColor(WHITE);
display.setCursor(0,0);
display.println("Round Rectangle");
display.drawRoundRect(0, 15, 60, 40, 8, WHITE);
display.display();
delay(2000);

display.clearDisplay();
display.setTextSize(1);
display.setTextColor(WHITE);
display.setCursor(0,0);
display.println("Filled Round Rectangl");
display.fillRoundRect(0, 15, 60, 40, 8, WHITE);
display.display();
delay(2000);
For a rectangle with curved corners, you use drawRoundRect(). Just like drawRect(), you give it the X and Y coordinates, the width and height, and the color. But this one also needs an extra number that tells the display how round the corners (the corner radius) should be.
Again, if you want the rounded rectangle to be filled in, you can use fillRoundRect().
Drawing Circle


display.clearDisplay();
display.setTextSize(1);
display.setTextColor(WHITE);
display.setCursor(0,0);
display.println("Circle");
display.drawCircle(20, 35, 20, WHITE);
display.display();
delay(2000);

display.clearDisplay();
display.setTextSize(1);
display.setTextColor(WHITE);
display.setCursor(0,0);
display.println("Filled Circle");
display.fillCircle(20, 35, 20, WHITE);
display.display();
delay(2000);
To draw a circle, you use the drawCircle() function. Here, instead of giving the top-left corner like we did with rectangles, we give the X and Y position of the center of the circle, along with the radius, and the color. This draws just the outline of the circle.
If you want to draw a solid circle, use fillCircle() with the same values.
Drawing Triangle


display.clearDisplay();
display.setTextSize(1);
display.setTextColor(WHITE);
display.setCursor(0,0);
display.println("Triangle");
display.drawTriangle(30, 15, 0, 60, 60, 60, WHITE);
display.display();
delay(2000);

display.clearDisplay();
display.setTextSize(1);
display.setTextColor(WHITE);
display.setCursor(0,0);
display.println("Filled Triangle");
display.fillTriangle(30, 15, 0, 60, 60, 60, WHITE);
display.display();
delay(2000);
To draw a triangle, we use the drawTriangle() function. This one is a bit different because we need to provide three points—each point is made up of an X and Y coordinate. These three points represent the vertices of the triangle. The first point is the top vertex, and the other two are the left and right vertices, in that order. This function draws the outline of the triangle by connecting the three points with straight lines. You also pass in the color just like before.
If you want a filled triangle, use fillTriangle() and give it the same coordinates and color.
Arduino Example 3 – Displaying an Image
In this final example, we’re going to learn how to show an image on the OLED screen. This can be really useful when you want to display things like logos, icons, game sprites, or even simple infographics.
To display an image on the OLED, you first need to convert the image into something the OLED can understand—a special byte array. This array is made up of numbers that represent each individual pixel in the image.
To make things easier, we’ve developed a simple tool that helps you turn your image into an array that the OLED display can use.
OLED Image Converter
1. Select image
OLED Image Converter
How to Use the Converter?
To get started, upload the image you want to display on your OLED screen.
For this example, we chose a picture of Marilyn Monroe.

Once your image is uploaded, fill in the Identifier field with a name that matches your image. This name will be used as the title of the array in your final Arduino code.
Since our image is of Marilyn Monroe, we entered “MarilynMonroe” as the identifier.
Before you move forward, it’s really important to make sure your image matches the OLED screen’s resolution of 128×64 pixels. If your image is larger than that, it might not display properly on the screen.
You’ll see your image’s current size displayed under the “Image size” section in the Image Settings. To resize it, enter 128 for the width and 64 for the height. Then, choose the proper scaling option to fit your image. You can also choose to center the image vertically or horizontally, and even flip it if you want. All of your changes will appear instantly in the Preview section.
In our case, the original Marilyn Monroe image was 400×300 pixels. So, we entered 128 for the width and 64 for the height, selected “scale to fit,” and centered the image horizontally to make sure it was positioned nicely.

One of the most important settings here is the brightness threshold. This setting decides which pixels become black or white. Any pixel brighter than the threshold will appear white, and anything darker will turn black. There’s also a setting that lets you invert the image colors, which can be useful depending on how you want it to look on your display.
For our image, we set the brightness threshold to 171 to capture more detail and make the image clearer.
As you adjust these settings, keep an eye on the Preview section—it updates in real time so you can see exactly how the image will appear on the OLED.

Once you’re happy with the way everything looks, just click the Generate code button.
And that’s it! Your image will be converted into a ready-to-use array that you can copy and paste into your Arduino sketch.

Arduino Code
To display your image on the OLED screen, insert the generated byte array into the Arduino sketch below.
#include <SPI.h>
#include <Wire.h>
#include <Adafruit_GFX.h>
#include <Adafruit_SSD1306.h>

#define SCREEN_WIDTH 128  // OLED display width, in pixels
#define SCREEN_HEIGHT 64  // OLED display height, in pixels

// Declaration for SSD1306 display connected using I2C
#define OLED_RESET -1  // Reset pin # (or -1 if sharing Arduino reset pin)
#define SCREEN_ADDRESS 0x3C
Adafruit_SSD1306 display(SCREEN_WIDTH, SCREEN_HEIGHT, &Wire, OLED_RESET);

// Declaration for SSD1306 display connected using software SPI:
//#define OLED_MOSI   9
//#define OLED_CLK   10
//#define OLED_DC    11
//#define OLED_CS    12
//#define OLED_RESET 13
//Adafruit_SSD1306 display(SCREEN_WIDTH, SCREEN_HEIGHT, OLED_MOSI, OLED_CLK, OLED_DC, OLED_RESET, OLED_CS);

// Bitmap of MarilynMonroe Image
const unsigned char MarilynMonroe[] PROGMEM = {
  0xff, 0xff, 0xff, 0xff, 0xff, 0xf8, 0x1f, 0xff, 0xff, 0xff, 0xff, 0xff, 0xff, 0xff, 0xff, 0xff,
  0xff, 0xff, 0xff, 0xff, 0xff, 0xc0, 0x1f, 0xff, 0xff, 0xf0, 0x41, 0xff, 0xff, 0xff, 0xff, 0xff,
  0xff, 0xff, 0xff, 0xff, 0xff, 0x80, 0x7f, 0xff, 0xff, 0xf8, 0x03, 0xff, 0xff, 0xff, 0xff, 0xff,
  0xff, 0xff, 0xff, 0xff, 0xff, 0xf9, 0xff, 0xff, 0xff, 0xe0, 0x07, 0xff, 0xff, 0xff, 0xff, 0xff,
  0xff, 0xff, 0xff, 0xff, 0xff, 0x87, 0xff, 0xff, 0xff, 0xf8, 0x03, 0xff, 0xff, 0xff, 0xff, 0xff,
  0xff, 0xff, 0xff, 0xff, 0xff, 0x07, 0xff, 0xff, 0xff, 0xf8, 0x01, 0xf1, 0xff, 0xff, 0xff, 0xff,
  0xff, 0xff, 0xff, 0xff, 0xff, 0x9f, 0xff, 0xff, 0xff, 0xf8, 0x00, 0xf8, 0xff, 0xff, 0xff, 0xff,
  0xff, 0xff, 0xff, 0xff, 0xff, 0xbf, 0xff, 0xff, 0xff, 0xfc, 0x02, 0x78, 0x7f, 0xff, 0xff, 0xff,
  0xff, 0xff, 0xff, 0xff, 0xff, 0xfc, 0x3f, 0xff, 0xff, 0xfe, 0x03, 0x7c, 0x1f, 0xff, 0xff, 0xff,
  0xff, 0xff, 0xff, 0xff, 0xff, 0xf0, 0x07, 0xff, 0xff, 0xfe, 0x01, 0xfe, 0x1f, 0xff, 0xff, 0xff,
  0xff, 0xff, 0xff, 0xff, 0xfd, 0xe0, 0x03, 0xff, 0xff, 0xfc, 0x00, 0xfe, 0x0f, 0xff, 0xff, 0xff,
  0xff, 0xff, 0xff, 0xff, 0xfe, 0x87, 0xe0, 0xff, 0xff, 0xfc, 0x00, 0x06, 0x07, 0xff, 0xff, 0xff,
  0xff, 0xff, 0xff, 0xff, 0xfc, 0x1f, 0xf9, 0xff, 0xff, 0xfc, 0x00, 0x02, 0x07, 0xff, 0xff, 0xff,
  0xff, 0xff, 0xff, 0xff, 0xf8, 0x1f, 0xff, 0xff, 0xff, 0xfc, 0x00, 0xc3, 0xc3, 0xff, 0xff, 0xff,
  0xff, 0xff, 0xff, 0xff, 0xf0, 0x3f, 0xff, 0xff, 0xe0, 0x0c, 0x00, 0xe7, 0x81, 0xff, 0xff, 0xff,
  0xff, 0xff, 0xff, 0xff, 0xf0, 0x0f, 0xff, 0xff, 0xe0, 0x02, 0x00, 0x02, 0x00, 0xff, 0xff, 0xff,
  0xff, 0xff, 0xff, 0xff, 0xf0, 0x0f, 0xff, 0xff, 0xe0, 0x01, 0x00, 0x00, 0x00, 0x3f, 0xff, 0xff,
  0xff, 0xff, 0xff, 0xff, 0x80, 0x00, 0x3f, 0xff, 0xff, 0xe0, 0x00, 0x00, 0x1e, 0x3f, 0xff, 0xff,
  0xff, 0xff, 0xff, 0xfc, 0x00, 0x00, 0x0f, 0xff, 0x3f, 0xf8, 0x00, 0x18, 0x7f, 0x1f, 0xff, 0xff,
  0xff, 0xff, 0xff, 0xf8, 0x01, 0x80, 0x03, 0xfc, 0x3f, 0xfc, 0x00, 0x70, 0xfe, 0x1f, 0xff, 0xff,
  0xff, 0xff, 0xff, 0xf0, 0x43, 0xff, 0xff, 0xf8, 0x7f, 0xf8, 0x00, 0x00, 0x7e, 0x1f, 0xff, 0xff,
  0xff, 0xff, 0xff, 0xe0, 0x07, 0xff, 0xff, 0xf0, 0xff, 0xfc, 0x00, 0x00, 0x7c, 0x3f, 0xff, 0xff,
  0xff, 0xff, 0xff, 0xe0, 0x0f, 0xff, 0xff, 0xf1, 0xef, 0xf8, 0x00, 0x01, 0xfc, 0x3f, 0xff, 0xff,
  0xff, 0xff, 0xff, 0xe4, 0xff, 0xff, 0xff, 0xf3, 0x80, 0xa0, 0x00, 0x07, 0xfc, 0xaf, 0xff, 0xff,
  0xff, 0xff, 0xff, 0xec, 0x5f, 0xff, 0xff, 0xe7, 0xf0, 0x00, 0x00, 0x03, 0xfe, 0xdf, 0xff, 0xff,
  0xff, 0xff, 0xff, 0xee, 0x7f, 0xff, 0xff, 0xc7, 0xf8, 0x00, 0x00, 0x03, 0xff, 0xdf, 0xff, 0xff,
  0xff, 0xff, 0xff, 0xfe, 0x7f, 0xff, 0xf7, 0xc7, 0xff, 0x06, 0x00, 0x03, 0xff, 0xbf, 0xff, 0xff,
  0xff, 0xff, 0xff, 0xfe, 0x5f, 0xff, 0xc7, 0x07, 0xff, 0x80, 0x00, 0x07, 0xdb, 0xbf, 0xff, 0xff,
  0xff, 0xff, 0xff, 0xee, 0xff, 0xff, 0x80, 0x03, 0xff, 0xc0, 0x00, 0x03, 0xc3, 0x0f, 0xff, 0xff,
  0xff, 0xff, 0xff, 0xfe, 0xff, 0xff, 0x98, 0x03, 0xff, 0xf8, 0x00, 0x07, 0xe0, 0x0f, 0xff, 0xff,
  0xff, 0xff, 0xff, 0xef, 0xff, 0xff, 0xf8, 0x01, 0xff, 0xfc, 0x01, 0x07, 0xfc, 0x1f, 0xff, 0xff,
  0xff, 0xff, 0xff, 0xcf, 0xef, 0xff, 0xff, 0xe1, 0xff, 0xfc, 0x01, 0x07, 0xf8, 0x1f, 0xff, 0xff,
  0xff, 0xff, 0xff, 0x9f, 0xff, 0xff, 0x7f, 0xf1, 0xff, 0xf8, 0x02, 0x07, 0x88, 0x3f, 0xff, 0xff,
  0xff, 0xff, 0xff, 0xcf, 0xef, 0xf8, 0x0f, 0xff, 0xff, 0xe0, 0x00, 0x07, 0x84, 0x3f, 0xff, 0xff,
  0xff, 0xff, 0xff, 0xe7, 0xef, 0xf0, 0x04, 0x7f, 0xff, 0xc0, 0x00, 0x07, 0x84, 0x7f, 0xff, 0xff,
  0xff, 0xff, 0xff, 0x3f, 0xff, 0xe0, 0x00, 0x1f, 0xff, 0x80, 0x00, 0x06, 0x04, 0xff, 0xff, 0xff,
  0xff, 0xff, 0xff, 0x3f, 0x7f, 0xe1, 0xf0, 0x07, 0xff, 0x80, 0x00, 0x07, 0x06, 0xff, 0xff, 0xff,
  0xff, 0xff, 0xff, 0xff, 0xff, 0xc3, 0xfe, 0x03, 0xff, 0x00, 0x00, 0x03, 0x80, 0xff, 0xff, 0xff,
  0xff, 0xff, 0xff, 0xf2, 0x3f, 0xc6, 0x7f, 0x81, 0xce, 0x00, 0x00, 0x01, 0xc1, 0xff, 0xff, 0xff,
  0xff, 0xff, 0xff, 0xe0, 0x3f, 0xc0, 0x07, 0xc1, 0xfe, 0x00, 0x00, 0x0d, 0xc0, 0x7f, 0xff, 0xff,
  0xff, 0xff, 0xff, 0xe0, 0x3f, 0xc0, 0x01, 0xe0, 0xfc, 0x00, 0x00, 0x0f, 0xc0, 0x7f, 0xff, 0xff,
  0xff, 0xff, 0xff, 0xc0, 0x3f, 0xc0, 0x00, 0x50, 0xfc, 0x00, 0x00, 0x0e, 0xc0, 0xff, 0xff, 0xff,
  0xff, 0xff, 0xff, 0xc0, 0x3f, 0xc0, 0x00, 0x18, 0xf8, 0x00, 0x00, 0x0e, 0xc1, 0xff, 0xff, 0xff,
  0xff, 0xff, 0xff, 0xc0, 0x3f, 0xc0, 0x00, 0x00, 0xf8, 0x00, 0x00, 0x66, 0x81, 0xff, 0xff, 0xff,
  0xff, 0xff, 0xff, 0xc0, 0x1f, 0xc7, 0x80, 0x00, 0xf8, 0x00, 0x01, 0xe0, 0x00, 0xff, 0xff, 0xff,
  0xff, 0xff, 0xff, 0xc0, 0x1f, 0xc1, 0xe0, 0x01, 0xf8, 0x00, 0x03, 0xf0, 0x01, 0xff, 0xff, 0xff,
  0xff, 0xff, 0xff, 0x80, 0x1f, 0xc0, 0x3e, 0x03, 0xf0, 0x00, 0x00, 0xe0, 0x03, 0xff, 0xff, 0xff,
  0xff, 0xff, 0xff, 0x00, 0x1f, 0xe0, 0xe0, 0x03, 0xf2, 0x00, 0x00, 0xc0, 0x03, 0xff, 0xff, 0xff,
  0xff, 0xff, 0xff, 0x80, 0x1f, 0xf0, 0x00, 0x07, 0xe6, 0x00, 0x00, 0xc0, 0x03, 0xff, 0xff, 0xff,
  0xff, 0xff, 0xff, 0x80, 0x1f, 0xff, 0x00, 0x1f, 0xee, 0x00, 0x00, 0x80, 0x07, 0xff, 0xff, 0xff,
  0xff, 0xff, 0xff, 0xb8, 0x0f, 0xff, 0xf0, 0x3f, 0xdc, 0x00, 0x00, 0x00, 0x0f, 0xff, 0xff, 0xff,
  0xff, 0xff, 0xff, 0xbc, 0x0f, 0xff, 0xff, 0xff, 0xdc, 0x00, 0x00, 0x00, 0x0f, 0xff, 0xff, 0xff,
  0xff, 0xff, 0xff, 0x9e, 0x0f, 0xff, 0xff, 0xff, 0xf8, 0x00, 0x00, 0x00, 0x1f, 0xff, 0xff, 0xff,
  0xff, 0xff, 0xff, 0x08, 0x0f, 0xff, 0xff, 0xff, 0x70, 0x00, 0x00, 0x00, 0x1f, 0xff, 0xff, 0xff,
  0xff, 0xff, 0xff, 0x00, 0x0b, 0xff, 0xff, 0xfe, 0xe0, 0x00, 0x00, 0x00, 0x1f, 0xff, 0xff, 0xff,
  0xff, 0xff, 0xff, 0x00, 0x0b, 0xff, 0xff, 0xf9, 0xc0, 0x00, 0x00, 0x00, 0x3f, 0xff, 0xff, 0xff,
  0xff, 0xff, 0xff, 0x3c, 0x09, 0xff, 0xff, 0xf1, 0x80, 0x00, 0x00, 0x00, 0x7f, 0xff, 0xff, 0xff,
  0xff, 0xff, 0xff, 0x1e, 0x08, 0x3f, 0xff, 0xc0, 0x00, 0x00, 0x00, 0x00, 0x7f, 0xff, 0xff, 0xff,
  0xff, 0xff, 0xff, 0x1f, 0x08, 0x03, 0xff, 0x00, 0x00, 0x00, 0x00, 0x00, 0x7f, 0xff, 0xff, 0xff,
  0xff, 0xff, 0xff, 0x00, 0x08, 0x00, 0x00, 0x00, 0x00, 0x00, 0x00, 0x00, 0x1f, 0xff, 0xff, 0xff,
  0xff, 0xff, 0xff, 0x80, 0x1c, 0x00, 0x00, 0x00, 0x00, 0x00, 0x00, 0x00, 0x1f, 0xff, 0xff, 0xff,
  0xff, 0xff, 0xff, 0xce, 0x1c, 0x00, 0x00, 0x00, 0x00, 0x00, 0x00, 0x00, 0x1f, 0xff, 0xff, 0xff,
  0xff, 0xff, 0xff, 0xfe, 0x1c, 0x00, 0x00, 0x00, 0x00, 0x00, 0x00, 0x00, 0x3f, 0xff, 0xff, 0xff,
  0xff, 0xff, 0xff, 0xff, 0x7e, 0x00, 0x00, 0x00, 0x00, 0x00, 0x00, 0x00, 0x7f, 0xff, 0xff, 0xff
};

void setup() {
  Serial.begin(9600);

  // initialize the OLED object
  if (!display.begin(SSD1306_SWITCHCAPVCC, SCREEN_ADDRESS)) {
    Serial.println(F("SSD1306 allocation failed"));
    for (;;)
      ;  // Don't proceed, loop forever
  }

  // Uncomment this if you are using SPI
  //if(!display.begin(SSD1306_SWITCHCAPVCC)) {
  //  Serial.println(F("SSD1306 allocation failed"));
  //  for(;;); // Don't proceed, loop forever
  //}

  // Clear the buffer.
  display.clearDisplay();

  // Display bitmap
  display.drawBitmap(0, 0, MarilynMonroe, 128, 64, WHITE);
  display.display();
}

void loop() {
}
Once you upload this sketch to your Arduino, your image will appear on the OLED screen just like in the Preview from the converter tool.

Give it a try, and have fun experimenting with your own favorite images!
Code Explanation
This sketch begins just like the previous examples, where we first set up the OLED display. We include the required libraries and initialize the display using the begin() function. Once that setup is done, we are now adding a custom image to the screen.
To do this, we first place the image data—a byte array—in the global section of the code, above the setup() function. This array is generated using our image converter tool, which turns a picture into a format the OLED screen can understand. In our example, the array is named MarilynMonroe.
Inside the setup() function, after clearing the display, we use a new function called drawBitmap() to draw the image onto the screen. This function is the key to displaying images and it requires six inputs.
The first two values are the X and Y coordinates, which decide where on the screen the image will begin. In our case, we set both to 0, which means the image starts from the top-left corner of the display. The third value is the name of the image array we want to draw, which in our example is MarilynMonroe. The next two values are the width and height of the image—in pixels. Our OLED screen is 128 pixels wide and 64 pixels tall, and our image is exactly that size, so we pass 128 and 64. The last parameter is the color. Since we’re working with a monochrome screen, we use WHITE to display the image in white pixels against the dark background.
So the complete line looks like this:
// Display bitmap
display.drawBitmap(0, 0,  MarilynMonroe, 128, 64, WHITE);
However, even though this function prepares the image to be shown, it won’t actually appear on the screen until we call display.display();. This line sends everything we’ve prepared in memory to the actual OLED screen, so it can be seen.
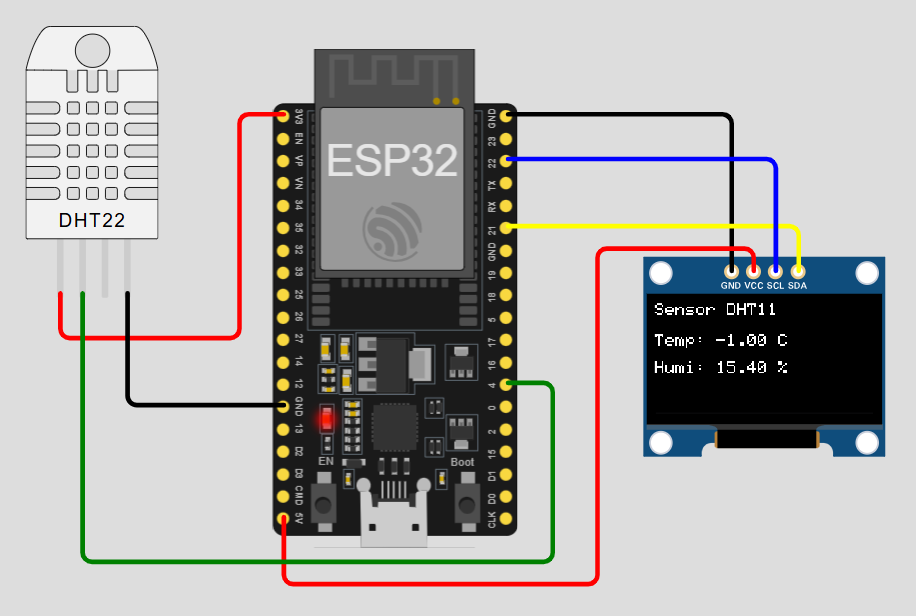
#include <Wire.h>
#include <Adafruit_GFX.h>
#include <Adafruit_SSD1306.h>

#define SCREEN_WIDTH 128
#define SCREEN_HEIGHT 64
#define OLED_RESET -1

Adafruit_SSD1306 display(SCREEN_WIDTH, SCREEN_HEIGHT, &Wire, OLED_RESET);

void setup() {
  Wire.begin(21, 22); // SDA, SCL

  if (!display.begin(SSD1306_SWITCHCAPVCC, 0x3C)) {
    Serial.println("OLED not found");
    while (true);
  }

  display.clearDisplay();
  display.setTextSize(2);
  display.setTextColor(SSD1306_WHITE);
  display.setCursor(0, 0);
  display.println("Hello");
  display.setTextSize(1);
  display.println("ESP32 + OLED");
  display.display();
}

void loop() {
}
#include <Wire.h>
#include <Adafruit_GFX.h>
#include <Adafruit_SSD1306.h>
#include "DHT.h"
#define SCREEN_WIDTH 128
#define SCREEN_HEIGHT 64
#define OLED_RESET -1
#define DHTPIN 4
#define DHTTYPE DHT11
Adafruit_SSD1306 display(SCREEN_WIDTH, SCREEN_HEIGHT, &Wire, OLED_RESET);
DHT dht(DHTPIN, DHTTYPE);
void setup() {
Serial.begin(115200);
Wire.begin(21, 22); // SDA, SCL
dht.begin();
if (!display.begin(SSD1306_SWITCHCAPVCC, 0x3C)) {
Serial.println("OLED not found");
while (true);
}
display.clearDisplay();
display.setTextColor(SSD1306_WHITE);
display.setTextSize(1);
display.setCursor(0, 0);
display.println("ESP32 + OLED + DHT11");
display.display();
delay(2000);
}
void loop() {
float humidity = dht.readHumidity();
float temperature = dht.readTemperature();
display.clearDisplay();
display.setTextColor(SSD1306_WHITE);
display.setTextSize(1);
display.setCursor(0, 0);
display.println("Sensor DHT11");
if (isnan(humidity) || isnan(temperature)) {
display.setCursor(0, 20);
display.println("Read failed!");
display.println("Check wiring");
Serial.println("Failed to read from DHT sensor!");
} else {
display.setCursor(0, 18);
display.print("Temp: ");
display.print(temperature);
display.println(" C");
display.setCursor(0, 34);
display.print("Humi: ");
display.print(humidity);
display.println(" %");
Serial.print("Temperature: ");
Serial.print(temperature);
Serial.println(" C");
Serial.print("Humidity: ");
Serial.print(humidity);
Serial.println(" %");
}
display.display();
delay(2000);
}Link:https://lastminuteengineers.com/oled-display-arduino-tutorial/